Stronger AHSS Knowledge Required for Metal Stampers

Stronger AHSS Knowledge Required for Metal Stampers

This month’s blog was contributed by Peter Ulintz, Precision Metalforming Association. This content originally appeared in the September 2023 issue of MetalForming Magazine under the title Stronger AHSS Knowledge Required for Metal Stampers” and has been reproduced with the permission of MetalForming Magazine.

Metal stampers and die shops experienced with mild and HSLA steels often have problems making parts from AHSS grades. The higher initial yield strengths and increased work hardening of these steels can require as much as four times the working loads of mild steel. Some AHSS grades also have hardness levels approaching the dies used to form them.

Dies Get Tougher

Metal stampers and die shops experienced with mild and HSLA steels often have problems making parts from AHSS grades. The higher initial yield strengths and increased work hardening of these steels can require as much as four times the working loads of mild steel. Some AHSS grades also have hardness levels approaching the dies used to form them.

The higher stresses required to penetrate higher-strength materials require increased punch-to-die clearances compared to mild steels and HSLA grades. Why? This clearance acts as leverage to bend and break the slug out of the sheet metal. Stronger materials need longer levers to bend the slug. The required clearance is a function of the steel grade and tensile strength, and sheet thickness.

Increasing cutting clearance can result in punch cracking and head breakage due to higher snapthrough loads and reverse-unloading forces within the die. Adding shear angles to the punch face helps reduce punch forces and reverse unloading.

Tight-cutting clearances increase the tendency for die galling and chipping. The severity of galling depends on the surface finish and microstructure of both the tool steel and work material. Chipping can occur when process stresses are high enough to cause low-cycle fatigue of the tooling material, indicating that the material lacks toughness.

Stamping Tool Failure Modes (Citations T-20 and U-7)


Tempering of tools and dies represents a critical heat-treatment step and serves more than one purpose, but of primary concern is the need to relieve residual stresses and impart toughness. Dies placed in service without proper tempering likely will experience early failure.

Dies made from the higher-alloy tool-steel grades (D, M or T grades) require more than one tempering step. These grades contain large amounts of retained austenite and untempered martensite after the first tempering step and require at least one more temper to relieve internal stresses, and sometimes a third temper for even greater toughness.

Unfortunately, heat treatment remains a “black-box” process for most die shops and manufacturing companies, which send soft die details to the local heat treat facility, with hardened details returned. A cursory Rockwell hardness test may be conducted at the die shop when the parts return. If they meet hardness requirements, the parts usually are accepted, regardless of how they may have been processed—a problem, as hardness alone does not adequately measure impact toughness.

Machines Get Stronger

The increased forces needed to form, cut and trim higher-strength steels create significant challenges for pressroom equipment and tooling. These include excessive tooling deflections, damaging tipping-moments, and amplified vibrations and snapthrough forces that can shock and break dies—and sometimes presses. Stamping AHSS materials can affect the size, strength, power and overall configuration of every major piece of the press line, including material-handling equipment, coil straighteners, feed systems and presses. 

Here is what every stamper should know about higher-strength materials:

  • Because higher-strength steels require more stress to deform, additional servo motor power and torque capability may be needed to pull the coil material through the straightener. Additional back tension between the coil feed and straightening equipment also may be required due to the higher yield strength of the material in the loop as the material tries to push back against the straightener and feed system. 
  • Higher-strength materials, due to their greater yield strengths, have a greater tendency to retain coil set. This requires greater horsepower to straighten the material to an acceptable level of flatness. Straightening higher-strength coils requires larger-diameter rolls and wider roll spacing in order to work the stronger material more effectively. But increasing roll diameter and center distances on straighteners to accommodate higher-strength steels limits the range of materials that can effectively be straightened. A straightener capable of processing 600-mm-wide coils to 10 mm thick in mild steel may still straighten 1.5-mm-thick material successfully. But a straightener sized to run the same width and thickness of DP steel might only be capable of straightening 2.5 mm or 3.0-mm thick mild steel. This limitation is primarily due to the larger rolls and broadly spaced centers necessary to run AHSS materials. The larger rolls, journals and broader center distances safeguard the straightener from potential damage caused by the higher stresses. 
  • Because higher-strength materials require greater stress to blank and punch as compared to HSLA or mild steel, they generate proportionally increased snapthrough and reverse-unloading forces. High-tensile snapthrough forces introduce large downward accelerations to the upper die half. These forces work to separate the upper die from the bottom of the ram on every stroke. Insufficient die-clamping force could cause the upper-die half to separate from the bottom of the ram on each stroke, causing fatigue to the upper-die mounting fasteners. 
  • Because energy is expended with each stroke of the press—and this energy must be replaced—critical attention must focus on the size (horsepower) of the main drive motor and the rotational speed of the flywheel in higher-strength-steel applications. The main motor, with its electrical connection, provides the only source of energy for the press and it must generate sufficient power to meet the demands of the stamping operation. The motor must be properly sized to replace the increased energy expended during each press stroke. For these reasons, some stampers consider the benefits of servo-driven presses for these applications.

As steels becomes stronger, a corresponding increase in process knowledge is required in terms of die design, construction and maintenance, and equipment selection.

You can read more about these topics at these links:

Tooling and Die Wear
Coil Processing Straightening and Leveling
Press Requirements

Peter Ulintz

Thanks go to Peter Ulintz, of the Precision Metalforming Association (PMA) for authoring this article. Ulintz was employed in the metal stamping and tool & die industries for 38 years before joining Precision Metalforming Association (PMA) in 2015. He provides industry-related training and seminars in Stamping Press Operation and Setup; Designing and Building Metal Stamping Dies; Die Maintenance and Troubleshooting; Metal Stamping Design for Manufacturability; Deep Draw Tooling and Process Technology; Stamping Higher Strength Steels; and Problem Solving in the Press Shop. Peter is a contributor to ASM Handbook, Volume 14B, Metalworking: Sheet Forming (2006) and writes the monthly column, Tooling by Design, for PMA’s monthly publication, MetalForming Magazine.

 
Talk Like a Metallurgist

Talk Like a Metallurgist

Every industry has its own jargon. In certain settings, these words might be necessary – you wouldn’t want a cardiologist talking to a gastroenterologist about boo-boos and upset tummies. But when these professionals talk with their patients, it’s sometimes necessary for them to use much simpler words. That is, assuming the goal is to actually communicate the issues and concerns.

The steel industry is no different. We use words that have precise meanings in our daily discussions, and we forget that many people we work with don’t have exposure to the terminology that we are accustomed to using. What follows is a brief tour of the words and phrases you are likely to hear when speaking with your metallurgical representative.

Let’s start with the most common word: steel. Simply, steel is just an alloy of iron with up to about 2% carbon. Of course, other elements are in the composition. These fall into two categories: those intentionally added to improve one or more properties (called alloying elements), and those remaining from the steelmaking process that are too costly to remove relative to the benefit the removal would provide (called residual elements). High residuals are usually bad, typically because they lower ductility. But remember high is a relative term. The value may be higher than the standard to which you ordered (which is a cause for rejection), or just higher than what you’ve received in the past. If they are within the tolerance allowed within the standard, the product should still meet your strength and ductility requirements.

I’ve worked with metal formers who believe “steel is steel” and that all grades should behave the same way. According to the World Steel Association, there are more than 3,500 different grades of steel, each with unique properties and characteristics, 75% of which were developed in the past 20 years. Certainly, not all of these are sheet steels, but even within this category, there are sizable numbers. When it comes to just advanced high-strength sheet steels, more than 60 unique grades are available today.

The most common sheet steel grade is routinely called mild steel. Mild steels are low-carbon steels with no alloying elements added for substantial strengthening, and for that reason, they are characterized by relatively lower yield strength. However, there is no single grade or chemistry that meets this definition. Grade definitions require the steelmaker to meet certain chemistry or property limits. These grades are ordered to a standard usually written by the steel producer, a pertinent industry society (like ASTM, Euronorm, or JFS), or the end-user OEM. What is generally thought of as mild steel has chemistry, strength, and ductility overlapping many defined grades. Steel users should order to standards that define and constrain important properties like strength and ductility.

If you hang out with enough metallurgists, you are bound to hear passionate discussions about the iron-carbon phase diagram. (Why you are hanging around metallurgists is another topic entirely.) Before explaining the purpose of a phase diagram, it’s important to understand that a phase is a region of a material that is physically distinct, chemically uniform, and can be seen as different from the rest of the material. Ice and water are two phases that exist in my beverage. You’ll find a chocolate chip phase in my vanilla ice cream. And you’ll find ferrite in my steel – tasty! The properties of each of these change if you increase temperature (converting H2O from a solid to a liquid and eventually a gas) or if you add more alloying elements (chocolate chips or carbon). If you add a lot of that alloying element, you can get something entirely different like ripple or pearlite.

A phase diagram is a graphical representation of composition on the horizontal axis and temperature on the vertical axis. Two important phase diagrams are shown below. The far-left side of each represents 100% vanilla or 100% iron. Different phases exist as the temperature increases, or as the product is alloyed with increasing amounts of either chocolate or carbon.


Vanilla Chocolate Phase Diagram

Figure 1: Vanilla-Chocolate Phase Diagram A-77


Iron Carbon Phase Diagram

     Figure 2: Iron Carbon Phase DiagramA-78


Atoms arrange themselves in three-dimensional patterns called lattices. Think about billiard balls in multiple layers. The balls can be one layer directly above the prior one, or they can be shifted and rest in the crevice formed by adjacent balls in the layer below. The balls are all the same material, but the gap size changes with different arrangements. This is what happens with steel. At lower temperatures, only up to 0.02% carbon fits in the gap. This orientation is called ferrite. At higher temperatures, a different atomic orientation is stable, which we call austenite. Up to 2% carbon can fit into this arrangement of atoms. For low-carbon steels under normal conditions, austenite cannot exist at room temperature – when the steel is slowly cooled, it changes from austenite to a combination of ferrite and a mixture of phases called pearlite. However, heating a certain chemistry to the austenitic zone followed by rapidly cooling just right bypasses the natural conversion to ferrite and pearlite, and creates a structure that contains austenite at room temperature. This leads to the term retained austenite, which is the phase that gives TRIP and 3rd Generation Steels excellent ductility. More on these later.

100% iron is very soft. As a matter of fact, 100% of any element is very soft. As an example, think about gold. 24-carat gold is pure gold. You might think that a wedding ring, as a symbol of long-lasting love and devotion, should be made from 100% gold. In reality, many gold bands are made from 12-carat gold, which is half gold and half impurities. (Showing your love by giving something 50% impure perhaps is not the best marketing approach.) Adding alloying elements to gold is done to improve certain characteristics, like strength, making the alloy appropriate for the applications it serves.

When we talk about ferrite at room temperature, that’s iron with no more than 80 parts per million carbon. That’s really close to pure iron, so when we hear the term ferrite, we should think of something that is really soft, low-strength, and very ductile.

If additional strength is needed, then more alloying elements must be used in addition to carbon. The next most cost-effective alloying element is manganese which produces higher-strength steels called carbon-manganese steels. These are substitutional solid solutions strengthened, where the atoms of manganese swap into where atoms of iron would otherwise go. These grades have limited ductility, especially at higher carbon and manganese contents, so they are used in structural applications that do not need a lot of formability and are therefore also called structural steels (SS). In the ASTM standard specification covering many sheet steels, ASTM A1008/A1008M, these grades are grouped in the SS category.

Around 1980, steelmakers rolled out a new approach to getting higher strength levels while minimizing the loss of elongation usually seen with higher strengths. They do this by strengthening the ferrite through the addition of very small quantities of titanium, niobium, and vanadium to form carbide and nitride precipitates. These microalloying additions are used in precipitation hardening of the ferrite to create High Strength Low Alloy (HSLA) steels.

Switching gears a bit to discuss something unrelated to sheet steel but a process with which we might be familiar: forged gears. We want forged gears to be hard and high strength. Typical production of gears involves heating up a steel alloy of certain chemistry, followed by rapid cooling (quenching) them faster than a critical cooling rate. The structure that’s produced is called martensite. If the quench rate is only a little too slow, a different phase called bainite can be produced. While martensite is the highest strength phase, it has limited elongation. Bainite is a little lower in strength but has higher elongation and toughness compared with martensite. Bainite shines in applications needing cut-edge ductility during stretch flanging.

Martensite wasn’t commonly found as a microstructural component during most of the history of automotive sheet steels due to the limited number of companies having an annealing line with appropriate quenching capabilities. This started to change around the turn of the millennium when newer annealing lines were installed with the ability to hold at a specific temperature which may be lower than the annealing temperature followed by quenching to another much lower temperature. This led to greater production of the first generation of Advanced High-Strength Steels (AHSS), including grades that have a microstructure of only martensite

Dual Phase steels are the most common AHSS. As you might guess, there are two phases in Dual-Phase steels. Ferrite and martensite are the two phases: ferrite is super-soft and comprises the majority of the microstructure, while martensite is super-hard and takes up 10% (590DP) to 40% (980DP) of the microstructure. The more martensite, the stronger the steel. Elongation is the ductility measured in a tensile test, and since most of the structure is ferrite, these steels have exceptional elongation for the strength level. However, there is a large hardness difference between ferrite and martensite, leading to crack initiation sites and resulting in poor cut-edge ductility during stretch flanging.

[A brief digression on testing. Tensile testing takes a standard sample shape, typically looking like a bone you might give a dog to chew on, and pulls it in tension from the edges. The test results include yield strength, tensile strength, and total elongation, commonly called the YTEs or TYEs based on the initials. More information comes out of the tensile test, covered elsewhere. However, the tensile test is usually not used to measure cut-edge ductility. Cut edge ductility is typically characterized by the hole expansion test, where a punched hole is expanded with a conical punch until a through-thickness crack forms.]

Ferrite-bainite steels have a combination of decent elongation (from the ferrite) and excellent cut-edge ductility (from the bainite). Yes, your assumption is correct that there are only two phases in these steels, with ferrite being about 85% of the microstructure. Due to the way these are produced, ferrite-bainite steels are available as hot-rolled products only. That’s in contrast with Complex Phase (CP) steels, which can be found either at hot-rolled or cold-rolled thicknesses.

Soft ferrite is the primary microstructural component in DP steels and the soon-to-be-discussed TRIP steels, which results in low yield strength and relatively high elongation. On the other hand, the primary microstructural components of complex phase steels are bainite and precipitation-strengthened ferrite, with martensite and retained austenite also present in lower amounts. Lacking soft ferrite, these steels have relatively high yield strength and low elongation as measured in a tensile test, but the bainite leads to exceptional cut-edge ductility as measured in a hole expansion test. Multi-phase steels are a related product. Some OEMs group CP and MP steels in the same category, while others say that CP steels are engineered to favor improved bendability and cut edge extension over tensile elongation at the same tensile strength and that MP steels target balancing the fracture resistance needed for better bendability and hole expansion with the necking resistance found with higher uniform elongation and n-value.

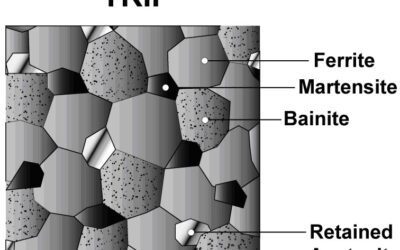
TRIP steels contain mostly ferrite surrounding islands of martensite, as well as some bainite and retained austenite. The amount of bainite is pretty low, so it doesn’t add much to the cut-edge ductility. But the magic is in the retained austenite. Austenite is a very ductile phase. What makes this a special phase is that as austenite-containing steels deform, the atoms rearrange and the austenite transforms into martensite, giving the steel enhanced ductility. (Jargon alert: Another word for ductility used by professionals is plasticity.) A quick review: this enhanced ductility comes from austenite transforming to martensite. In other words, these steels have Transformation Induced Plasticity (TRIP).

Wouldn’t it be great to have an alloy that was just austenite? We’d have a high-strength, high-ductility product. There are two types of steels that are in this category. First are austenitic stainless steels in the 3XX family, like SS304 and SS316. In these alloys, austenite is stable at room temperature, but these require approximately 18% chromium and 8% nickel. Next are TWIP steels. These may look like TRIP steels from how they are written, but these steels get their plasticity differently. TWIP steels deform by a mechanism known as twinning, so they are described as Twinning Induced Plasticity Steels (TWIP). Of course, there are no free lunches. To get fantastic formability properties, a lot of alloying is necessary. This drives up the steelmaking complexity and cost. The alloying elements also make welding much more challenging. TWIP steels are called second-generation advanced high-strength steels.

The 3rd Generation Advanced High-Strength Steels (3rd Gen AHSS or 3rd Gen) are made possible by another advance in annealing technology, allowing steelmakers to produce a refined microstructure. Nearly all 3rd Gen steels have retained austenite in the microstructure and therefore benefit from a high strength, high ductility combination. The latest annealing lines used to make these steels come equipped to not just hold and quench to defined temperatures but have reheating capability followed by another hold and quench to different temperature targets. This allows for the creation of an engineered balance and distribution of ferrite, bainite, martensite, and austenite in the microstructure.

The resultant tensile property ranges from 3rd Gen steels produced at different companies may be similar, but their methods of getting those properties are a function of chemistry and the capabilities and characteristics of the equipment used to produce them. A different chemistry approach may result in different weldability, for example, so users are encouraged to perform thorough due diligence before switching suppliers. The days of steel being simply a commodity are in the past as it relates to these highly engineered higher strength steels.


Final thought 1: What’s an MPa?

This note may have a global readership, but this answer is focused on the countries that haven’t embraced the metric system. Megapascals, abbreviated MPa, is a measure of strength, just like pounds per square inch (psi) or force per area. Like Celsius and Fahrenheit or inches and millimeters, we can convert between them easily enough. There are 1000 psi in a ksi, with k being the abbreviation for kilopounds. And there are 6.895 ksi in an MPa. Make your life easier and focus on a 7:1 difference. 100 ksi is about 700 MPa.


Final thought 2: What about Press Hardening Steels?

Press hardening steel for hot stamping is a separate topic with a lot of nuances. One of the biggest differences is how the properties develop. For cold stamping operations, the stamping company is responsible for creating the formed part from sheet metal supplied to the necessary strength. With press hardening steels, the stamping company creates both the shape and the strength. Different grades come from a combination of different chemistries from the steelmaker and different heating and cooling profiles at the stamping location. The chosen corrosion protection approach impacts the various options. Learn more at the Press Hardening Primer on this site.


Final thought 3: Don’t hesitate to ask questions.

If your metallurgical representative says something that you don’t understand, ask for clarification. Your suppliers want to be your valued partner for more than just a simple transaction. Quite likely, your met rep is passionate about their offerings and would love to talk about them. If you get a deeper understanding of what makes one product different from another, then you’ll be in a better position to weigh the benefits against the inevitable constraints, leading to an optimized material selection. Remember, communication is the key to success for all parties.


Thanks go to author Daniel J. Schaeffler, Ph.D., President, Engineering Quality Solutions, Inc.

Danny Schaeffler is the Metallurgy and Forming Technical Editor of the AHSS Applications Guidelines available from WorldAutoSteel.  He is founder and President of Engineering Quality Solutions (EQS).  Danny writes the monthly “Metal Matters” column for Metalforming Magazine, and provides seminars on sheet metal formability for the Precision Metalforming Association.  He has written for Stamping Journal and The Fabricator, and has lectured at FabTech.  Danny is passionate about training new and experienced employees at manufacturing companies about how sheet metal properties impact their forming success.


Talk Like a Metallurgist

Martensite

Metallurgy of Martensitic Steels

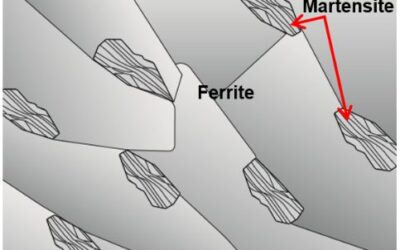
Martensitic steels are characterized by a microstructure that is mostly all martensite, but possibly also containing small amounts of ferrite and/or bainite (Figure 1 and 2). Steels with a fully martensitic microstructure are associated with the highest tensile strength – grades with a tensile strength of 2000 MPa is commercially available, and higher strength levels are under development.

Figure 1: Schematic of a martensitic steel microstructure. Ferrite and bainite may also be found in Small amounts.

Figure 1: Schematic of a martensitic steel microstructure. Ferrite and bainite may also be found in small amounts.

Figure 2: Microstructure of MS 950/1200

Figure 2: Microstructure of MS 950/1200

To create MS steels, the austenite that exists during hot-rolling or annealing is transformed almost entirely to martensite during quenching on the run-out table or in the cooling section of the continuous annealing line. Adding carbon to MS steels increases hardenability and strengthens the martensite. Manganese, silicon, chromium, molybdenum, boron, vanadium, and nickel are also used in various combinations to increase hardenability.

These steels are often subjected to post-quench tempering to improve ductility, so that extremely high strength levels can be achieved along with adequate ductility for certain forming processes like Roll Forming.

Figure 3 shows MS950/1200 compared to HSLA. Engineering and true stress-strain curves for MS steel grades are presented in Figures 4 and 5.

Figure 3: A comparison of stress strain curves for mild steel, HSLA 350/450, and MS 950/1200

Figure 3: A comparison of stress strain curves for mild steel, HSLA 350/450, and MS 950/1200.


Figure 4:  Engineering stress-strain curves for a series of MS steel grades.S-5 Sheet thicknesses: 1.8 mm to 2.0 mm.

Figure 4:  Engineering stress-strain curves for a series of MS steel grades.S-5  Sheet thicknesses: 1.8 mm to 2.0 mm.


Figure 5:  True stress-strain curves for a series of MS steel grades.S-5  Sheet thicknesses: 1.8 mm to 2.0mm.

Figure 5:  True stress-strain curves for a series of MS steel grades.S-5  Sheet thicknesses: 1.8 mm to 2.0mm.


In addition to being produced directly at the steel mill, a martensitic microstructure also can be developed during the hot stamping of press hardening steels.

Examples of current production grades of martensitic steels and typical automotive applications include:

MS 950/1200 Cross-members, side intrusion beams, bumper beams, bumper reinforcements
MS 1150/1400 Rocker outer, side intrusion beams, bumper beams, bumper reinforcements
MS 1250/1500 Side intrusion beams, bumper beams, bumper reinforcements


Some of the specifications describing uncoated cold rolled 1st Generation martensite steel (MS) are included below, with the grades typically listed in order of increasing minimum tensile strength. Different specifications may exist which describe hot or cold rolled, uncoated or coated, or steels of different strengths. Many automakers have proprietary specifications which encompass their requirements.

  • ASTM A980M, with Grades 130 [900], 160 [1100], 190 [1300], and 220 [1500]A-23
  • VDA 239-100, with the terms CR860Y1100T-MS, CR1030Y1300T-MS, CR1220Y1500T-MS, and CR1350Y1700T-MSV-3
  • SAE J2745, with terms Martensite (MS) 900T/700Y, 1100T/860Y, 1300T/1030Y, and 1500T/1200YS-18


Case Study: Using Martensitic Steels

as an Alternative to Press Hardening Steel

– Laboratory Evaluations

Martensitic steel grades provide a cold formed alternative to hot formed press hardening steels. Not all product shapes can be cold formed. For those shapes where forming at ambient temperatures is possible, design and process strategies must address the springback which comes with the high strength levels, as well as eliminate the risk of delayed fracture. The potential benefits associated with cold forming include lower energy costs, reduced carbon footprint, and improved cycle times compared with hot forming processes.

Highlighting product forms achievable in cold stamping, an automotive steel Product Applications Laboratory formed a Roof Center Reinforcement from 1.4 mm CR1200Y1470T-MS using conventional cold stamping rather than roll forming, Figure 6. Using cold stamping allows for the flexibility of considering different strategies when die processing which may result in reduced springback or incorporating part features not achievable with roll forming.

Figure 4: Roof Center Reinforcement cold stamped from CR1200Y1470T-MS martensitic steel.U-1

Figure 6: Roof Center Reinforcement cold stamped from CR1200Y1470T-MS martensitic steel.U-1


Cold stamping of martensitic steels is not limited to simpler shapes with gentle curvature. Shown in Figure 7 is a Center Pillar Outer, cold stamped using a tailor welded blank containing CR1200Y1470T-MS and CR320Y590T-DP as the upper and lower portion steels.U-1

Figure 5: Center Pillar Outer stamped at ambient temperature from a tailor welded blank containing 1470 MPa tensile strength martensitic steel.U-1

Figure 7: Center Pillar Outer stamped at ambient temperature from a tailor welded blank containing 1470 MPa tensile strength martensitic steel.U-1


Another characteristic of martensitic steels is their high yield strength, which is associated with improved crash performance. In a laboratory environment, crash behavior is assessed with 3-point bending moments. A studyS-8 determined there was a correlation between sheet steel yield strength and the 3-point bending deformation of hat shaped parts. Based on a comparison of yield strength, Figure 8 shows that CR1200Y1470T-MS has similar performance to hot stamped PHS-CR1800T-MB and PHS-CR1900T-MB at the same thickness and exceeds the frequently used PHS-CR1500T-MB. For this reason, there may be the potential to reduce costs and even weight with a cold stamping approach, providing appropriate press, process, and die designs are used.

Figure 6: Effect of Yield Strength on Bending Moment. The right image shows the typical yield strength range of CR1030Y1300T-MS and CR1200Y1470T-MS as well as typical yield strength values of several Press Hardened Steels.S-8

Figure 8: Effect of Yield Strength on Bending Moment. The right image shows the typical yield strength range of CR1030Y1300T-MS and CR1200Y1470T-MS as well as typical yield strength values of several Press Hardened Steels.S-8


Case Study: Martensitic Steels as an Alternative to

Press Hardening Steel – Automotive Production Examples

with Springback Mitigation Strategies

Recent years have seen some applications typically associated with press hardening steels transition to a cold stamped martensitic steel, CR1200Y1470T-MS. One such example is found in the third-generation Nissan B-segment hatchback (2020 start of production), which uses 1.2 mm thick CR1200Y1470T-MS as the material for the Second Cross Member Reinforcement.K-45

Using the carbon equivalent formula Ceq=C+Si/30+Mn/20+2P+4S K-45, the newly developed martensitic grade has a carbon equivalent value of 0.28, which is lower than the 0.35 associated with the conventional PHS grade of comparable tensile strength,  22MnB5 (PHS 1500T). The lower carbon equivalent value is expected to translate into easier welding conditions.  Furthermore, conventional mechanical trimming and piercing equipment and techniques work with the cold formable martensitic grade, whereas parts formed from press hardening steels typically require laser trimming or other more costly approaches.  An evaluation of delayed fracture found no evidence of this failure mode.

Figure 9 highlights this reinforcement, with its placement on the cross member and in the vehicle shown in red. The varying elevation of this part, combined with a non-uniform cross section at the outermost edges, help control springback, but makes roll forming significantly more challenging if that were the cold forming approach.

Figure 9: Cold-Stamped Martensitic Steel with 1500 MPa Tensile Strength used in the Nissan B-Segment Hatchback.K-57

Figure 9: Cold-Stamped Martensitic Steel with 1500 MPa Tensile Strength used in the Nissan B-Segment Hatchback.K-57


Unbalanced stresses in stamped parts lead to several types of shape fixability issues collectively called springback. In hat shape wall sections, shape fixing beads sometimes referred to as stake beads (see Post Stretch information at this link) mitigate sidewall curl by imparting a tensile stress state on both the top and bottom sheet surfaces and increasing the rigidity. Springback control to limit flexing down the length of longitudinally curved parts requires a different technique. Here, the root cause is the stress difference between the tensile stress at the punch top and the compressive stress at the flange at bottom dead center of the press stroke. Figure 10 presents schematics of the stress distribution when the punch is located at bottom dead center of the press stroke, and the shape fixability issue after load removal.

Figure 11: Cold-Stamped Martensitic Steel With 1500 MPa Tensile Strength Used in the Lexus NXJ-24

Figure 10: Cold-Stamped Martensitic Steel With 1500 MPa Tensile Strength Used in the Lexus NXJ-24


A patented approach known as Stress Reverse Forming™T-44 improved dimensional accuracy in the second-generation Lexus NX (2021 start of production) center roof reinforcement, cold stamped from martensitic steel, CR1200Y1470T-MS.J-24 Figure 11 shows different views of this part.

Figure 11: Left Image: Springback Differences Exist in Coils at the Low and High End of the Strength Specification; Right Image: Stress Reverse Forming™ Process Reduces Sensitivity to Springback (Images Adapted from Citation T-29)

Figure 11: Left Image: Springback Differences Exist in Coils at the Low and High End of the Strength Specification; Right Image: Stress Reverse Forming™ Process Reduces Sensitivity to Springback (Images Adapted from Citation T-29)


Stress Reverse Forming™T-44 uses the principles of the Bauschinger Effect to reverse the direction of the forming stresses during a restrike forming process to achieve a final part closer to the targeted dimensions.T-29 Parts processed with this two-step approach are first over-formed to a smaller radius of curvature than the final part shape. Removing the part from the tool after this first forming step results in the stress distribution seen in the left image in Figure 10. The unique aspect of this approach comes from the second forming step where the tool shape forces the punch top into slight compression while the lower flange is put into slight tension. The tool shape used in this stage contains a slightly greater radius of curvature than the targeted part shape. As shown in Citation T-29, this process appears to be equally effective at all steel strengths.

Without effective countermeasures, springback increases with part strength. Related to this is the springback difference between coils having strength at the lowest and highest ends of the acceptable property range. This can lead to substantial differences in springback between coils completely within specification. However, after using effective countermeasures such as Stress Reverse Forming™ described in Citation T-29, springback differences between coils are minimized, which leads to increased dimensional accuracy and more consistent stamping performance. This phenomenon is shown schematically in Figure 12. Furthermore, unlike conventional stamping approaches, the amount of springback in parts made with this approach does not increase with steel strength.


Figure 12: Left Image: Springback Differences Exist in Coils at the Low and High End of the Strength Specification; Right Image: Stress Reverse Forming™ Process Reduces Sensitivity to Springback (Images Adapted from Citation T-29)

Figure 12: Left Image: Springback Differences Exist in Coils at the Low and High End of the Strength Specification; Right Image: Stress Reverse Forming™ Process Reduces Sensitivity to Springback (Images Adapted from Citation T-29)

Talk Like a Metallurgist

Press Hardened Steels

Introduction

Press hardening steels are typically carbon-manganese-boron alloyed steels. They are also commonly known as:

  • Press Hardening Steels (PHS)
  • Hot Press Forming Steels (HPF), a term more common in Asia
  • Boron Steel: although the name may also refer to other steels, in automotive industry boron steel is typically used for PHS
  • Hot Formed Steel (HF), a term more common in Europe.

The most common PHS grade is PHS1500. In Europe, this grade is commonly referred to as 22MnB5 or 1.5528. As received, it has ferritic-pearlitic microstructure and a yield strength between 300-600 MPa depending on the cold working. The tensile strength of as received steel can be expected to be between 450 and 750 MPa. Total elongation must be over a minimum of 12% (A80), but depending on coating type and thickness may well exceed 18% (A80), see Figure 1*. Thus, the grade can be cold formed to relatively complex geometries using certain methods and coatings. When hardened, it has a minimum yield strength of 950 MPa and tensile strength typically around 1300-1650 MPa, Figure 1.B-14  Some companies describe them with their yield and tensile strength levels, such as PHS950Y1500T. It is also common in Europe to see this steel as PHS950Y1300T, and thus aiming for a minimum tensile strength of 1300 MPa after quenching.

The PHS1500 name may also be used for the Zn-coated 20MnB8 or air hardenable 22MnSiB9-5 grades. The former is known as “direct forming with pre-cooling steel” and could be abbreviated as CR1500T-PS, PHS1500PS, PHSPS950Y1300T or similar. The latter grade is known as “multi-step hot forming steel” and could be abbreviated as, CR1500T-MS, PHS1500MS, PHSMS950Y1300T or similar.V-9

Figure 1: Stress-Strain Curves of PHS1500 before and after quenching* (re-created after Citations U-9, O-8, B-18).

Figure 1: Stress-Strain Curves of PHS1500 before and after quenching* (re-created after Citations U-9, O-8, B-18).


In the last decade, several steel makers introduced grades with higher carbon levels, leading to a tensile strength between 1800 MPa and 2000 MPa.  Hydrogen induced cracking (HIC) and weldability limit applications of PHS1800, PHS1900 and PHS2000, with studies underway to develop practices which minimize or eliminate these limitations.


Lastly, there are higher energy absorbing, lower strength grades, which have improved ductility and bendability. These fall into two main groups: Press Quenched Steels (PQS) with approximate tensile strength levels of 450 MPa and 550 MPa (noted as PQS450 and PQS550 in Figure 2) and higher ductility PHS grades with approximate tensile strength levels of 1000 and 1200 MPa (shown as PHS1000 and PHS1200 in Figure 2).

Apart from these grades, other grades are suitable for press hardening. Several research groups and steel makers have offered special stainless-steel grades and recently developed Medium-Mn steels for hot stamping purposes. Also, one steel maker in Europe has developed a sandwich material by cladding PHS1500 with thin PQS450 layers on both sides.

Figure 2: Stress-strain curves of several PQS and PHS grades used in automotive industry, after hot stamping for full hardening* (re-created after Citations B-18, L-28, Z-7, Y-12, W-28, F-19, G-30).


PHS Grades with Tensile Strength Approximately 1500 MPa

Hot stamping as we know it today was developed in 1970s in Sweden. The most used steel since then has been 22MnB5 with slight modifications. 22MnB5 means, approximately 0.22 wt-% C, approximately (5/4) = 1.25% wt-% Mn, and B alloying.

The automotive use of this steel started in 1984 with door beams. Until 2001, the automotive use of hot stamped components was limited to door and bumper beams, made from uncoated 22MnB5, in the fully hardened condition. By the end of the 1990s, Type 1 aluminized coating was developed to address scale formation. Since then, 22MnB5 + AlSi coating has been used extensively.B-14

Although some steel makers claim 22MnB5 as a standard material, it is not listed in any international or regional (i.e., European, Asian, or American) standard. Only a similar 20MnB5 is listed in EN 10083-3.T-26, E-3  The acceptable range of chemical composition for 22MnB5 is given in Table 1.S-64, V-9

Table 1: Chemical composition limits for 22MnB5 (listed in wt.%).S-64, V-9

Table 1: Chemical composition limits for 22MnB5 (listed in wt.%).S-64, V-9


VDA239-500, a draft material recommendation from Verband Der Automotbilindustrie E.V. (VDA), is an attempt to further standardize hot stamping materials. The document has not been published as of early 2021. According to this draft standard, 22MnB5 may be delivered coated or uncoated, hot or cold rolled. Depending on these parameters, as-delivered mechanical properties may differ significantly. Steels for the indirect process, for example, has to have a higher elongation to ensure cold formability.V-9 Figure 1 shows generic stress-strain curves, which may vary significantly depending on the coating and selected press hardening process.

For 22MnB5 to reach its high strength after quenching, it must be austenitized first. During heating, ferrite begins to transform to austenite at “lower transformation temperature” known as Ac1. The temperature at which the ferrite-to-austenite transformation is complete is called “upper transformation temperature,” abbreviated as Ac3. Both Ac1 and Ac3 are dependent on the heating rate and the exact chemical composition of the alloy in question. The upper transformation temperature for 22MnB5 is approximately 835-890 °C.D-21, H-30Austenite transforms to other microstructures as the steel is cooled. The microstructures produced from this transformation depends on the cooling rate, as seen in the continuous-cooling-transformation (CCT) curve in Figure 3. Achieving the “fully hardened” condition in PHS grades requires an almost fully martensitic microstructure. Avoiding transformation to other phases requires cooling rates exceeding a minimum threshold, called the “critical cooling rate,” which for 22MnB5 is 27 °C/s. For energy absorbing applications, there are also tailored parts with “soft zones”. In these soft zones, areas of interest will be intentionally made with other microstructures to ensure higher energy absorption.B-14

Figure 3: Continuous Cooling Transformation (CCT) curve for 22MnB5 (Published in Citation B-19, re-created after Citations M-25, V-10).

Figure 3: Continuous Cooling Transformation (CCT) curve for 22MnB5 (Published in Citation B-19, re-created after Citations M-25, V-10).


Once the parts are hot stamped and quenched over the critical cooling rate, they typically have a yield strength of 950-1200 MPa and an ultimate tensile strength between 1300 and 1700 MPa. Their hardness level is typically between 470 and 510 HV, depending on the testing methods.B-14

Once automotive parts are stamped, they are then joined to the car body in body shop. The fully assembled body known as the Body-in-White (BIW) with doors and closures, is then moved to the paint shop. Once the car is coated and painted, the BIW passes through a furnace to cure the paint. The time and temperature for this operation is called the paint bake cycle. Although the temperature and duration may be different from plant to plant, it is typically close to 170 °C for 20 minutes. Most automotive body components made from cold or hot formed steels and some aluminum grades may experience an increase in their yield strength after paint baking.

In Figure 4, press hardened 22MnB5 is shown in the red curve. In this particular example, the proof strength was found to be approximately 1180 MPa. After processing through the standard 170 °C – 20 minutes bake hardening cycle, the proof strength increases to 1280 MPa (shown in the black curve).B-18  Most studies show a bake hardening increase of 100 MPa or more with press hardened 22MnB5 in industrial conditions.B-18, J-17, C-17

Figure 4: Bake hardening effect on press hardened 22MnB5. BH0 is shown since there is no cold deformation pre-strain. (re-created after Citation B-18).

Figure 4: Bake hardening effect on press hardened 22MnB5. BH0 is shown since there is no cold deformation pre-strain. (re-created after Citation B-18).


There are two modified versions of the 22MnB5 recently offered by several steel makers: 20MnB8 and 22MnSiB9-5. Both grades have higher Mn and Si compared to 22MnB5, as shown in Table 2.

Table 2: Chemical compositions of PHS grades with 1500 MPa tensile strength (all listed in wt.%).V-9

Table 2: Chemical compositions of PHS grades with 1500 MPa tensile strength (all listed in wt.%).V-9


Both of these relatively recent grades are designed for Zn-based coatings and are designed for different process routes. For these reasons, many existing hot stamping lines would require some modifications to accommodate these grades.

20MnB8 has been designed for a “direct process with pre-cooling”. The main idea is to solidify the Zn coating before forming, eliminating the possibility that liquid zine fills in the micro-cracks on the formed base metal surface, which in turn eliminates the risk of Liquid Metal Embrittlement (LME). The chemistry is modified such that the phase transformations occur later than 22MnB5. The critical cooling rate of 20MnB8 is approximately 10 °C/s. This allows the part to be transferred from the pre-cooling stage to the forming die. As press hardened, the material has approximately 1000-1050 MPa yield strength and 1500 MPa tensile strength. Once bake hardened (170 °C, 20 minutes), yield strength may exceed 1100 MPa.K-22  This steel may be referred to as PHS950Y1300T-PS (Press Hardening Steel with minimum 950 MPa yield, minimum 1300 MPa tensile strength, for Pre-cooled Stamping).

22MnSiB9-5 has been developed for a transfer press process, named as “multi-step”. As quenched, the material has similar mechanical properties with 22MnB5 (Figure 5). As of 2020, there is at least one automotive part mass produced with this technology and is applied to a compact car in Germany.G-27  Although the critical cooling rate is listed as 5 °C/s, even at a cooling rate of 1 °C/s, hardness over 450HV can be achieved, as shown in Figure 6.H-27  This allows the material to be “air-hardenable” and thus, can handle a transfer press operation (hence the name multi-step) in a servo press. This material is also available with Zn coating.B-15  This steel may be referred to as PHS950Y1300T-MS (Press Hardening Steel with minimum 950 MPa yield, minimum 1300 MPa tensile strength, for Multi-Step process).

Figure 5: Engineering stress-strain curves of 1500 MPa level grades (re-created after Citations B-18, G-29, K-22)

Figure 5: Engineering stress-strain curves of 1500 MPa level grades (re-created after Citations B-18, G-29, K-22)


Figure 6: Critical cooling rates of 1500 MPa level press hardening steels (re-created after Citations K-22, H-31, H-27)

Figure 6: Critical cooling rates of 1500 MPa level press hardening steels (re-created after Citations K-22, H-31, H-27)


Grades with Higher Ductility

Press hardened parts are extremely strong, but cannot absorb much energy. Thus, they are mostly used where intrusion resistance is required. However, newer materials for hot stamping have been developed which have higher elongation (ductility) compared to the most common 22MnB5. These materials can be used in parts where energy absorption is required. These higher energy absorbing, lower strength grades fall into two groups, as shown in Figure 7. Those at the lower strength level are commonly referred to as “Press Quenched Steels” (PQS). The products having higher strength in Figure 7 are press hardening steels since they contain boron and do increase in strength from the quenching operation. The properties listed are after the hot stamping process.

  • 450–600 MPa tensile strength level and >15% total elongation, listed as PQS450 and PQS550.
  • 1000–1300 MPa tensile strength level and >5% total elongation, listed as PHS1000 and PHS1200.
Figure 8: Stress-strain curves of several PQS and PHS grades used in automotive industry, after hot stamping for full hardening* (re-created after Citations B-18, Y-12).

Figure 7: Stress-strain curves of several PQS and PHS grades used in automotive industry, after hot stamping for full hardening* (re-created after Citations B-18, Y-12).


Currently none of these grades are standardized. Most steel producers have their own nomination and standard, as summarized in Table 3. There is a working document by German Association of Automotive Industry (Verband der Automobilindustrie, VDA), which only specifies one of the PQS grades. In the draft standard, VDA239-500, PQS450 is listed as CR500T-LA (Cold Rolled, 500 MPa Tensile strength, Low Alloyed). Similarly, PQS550 is listed as CR600T-LA.V-9  Some OEMs may prefer to name these grades with respect to their yield and tensile strength together, as listed in Table 3.

Table 3: Summary of Higher Ductility grades. The terminology descriptions are not standardized. Higher Ductility grade names are based on their properties and terminology is derived from a possible chemistry or OEM description. The properties listed here encompass those presented in multiple sources and may or may not be associated with any one specific commercial grade.Y-12, T-28, G-32

Table 3: Summary of Higher Ductility grades. The terminology descriptions are not standardized. Higher Ductility grade names are based on their properties and terminology is derived from a possible chemistry or OEM description. The properties listed here encompass those presented in multiple sources and may or may not be associated with any one specific commercial grade.Y-12, T-28, G-32


PQS grades have been under development at least since 2002. In the earliest studies, PQS 1200 was planned.R-11  Between 2007 and 2009, three new cars were introduced in Europe, having improved “energy absorbing” capacity in their hot stamped components. VW Tiguan (2007-2016) and Audi A5 Sportback (2009-2016) had soft zones in their B-pillars (Figure 8B and C). Intentionally reducing the cooling rate in these soft zone areas produces microstructures having higher elongations. In the Audi A4 (2008-2016) a total of three laser welded tailored blanks were hot stamped. The soft areas of the A4 B-pillars were made of HX340LAD+AS (HSLA steel, with AlSi coating, as delivered, min yield strength = 340 MPa, tensile strength = 410-510 MPa) as shown in Figure 8A. After the hot stamping process, HX340LAD likely had a tensile strength between 490 and 560 MPaS-65, H-32, B-20, D-22, putting it in the range of PQS450 (see Table 3). Note that there were not the only cars to have tailored hot stamped components during that time.

Figure 2: Earliest energy absorbing hot stamped B-pillars: (a) Audi A4 (2008-2016) had a tailor-welded blank with HSLA material; (b) VW Tiguan (2007-2015) and (c) Audi A5 Sportback (2009-2016) had soft zones in their B-pillars (re-created after Citations H-32, B-20, D-22).

Figure 8: Earliest energy absorbing hot stamped B-pillars: (A) Audi A4 (2008-2016) had a laser welded tailored blank with HSLA material; (B) VW Tiguan (2007-2015) and (C) Audi A5 Sportback (2009-2016) had soft zones in their B-pillars (re-created after Citations H-32, B-20, D-22).


A 2012 studyK-25 showed that a laser welded tailored B-Pillar with 340 MPa yield strength HSLA and 22MnB5 had the best energy absorbing capacity in drop tower tests, compared to a tailored (part with a ductile soft-zone) or a monolithic part, Figure 9. As HSLA is not designed for hot stamping, most HSLA grades may have very high scatter in the final properties after hot stamping depending on the local cooling rate. Although the overall part may be cooled at an average 40 to 60 °C/s, at local spots the cooling rate may be over 80 °C/s. PQS grades are developed to have stable mechanical properties after a conventional hot stamping process, in which high local cooling rates may be possible.M-26, G-31, T-27 

Figure 9: Energy absorbing capacity of B-pillars increase significantly with soft zones or laser welded tailored blank with ductile material (re-created after Citation K-25).

Figure 9: Energy absorbing capacity of B-pillars increase significantly with soft zones or laser welded tailored blank with ductile material (re-created after Citation K-25).


PQS grades have been in use at latest since 2014. One of the earliest cars to announce using PQS450 was VolvoXC90. There are six components (three right + three left), tailor welded blanks with PQS450, as shown Figure 10.L-29 Since then, many carmakers started to use PQS450 or PQS550 in their car bodies. These include:

  1. Fiat 500X: Patchwork supported, laser welded tailored rear side member with PQS450 in crush zonesD-23,
  2. Fiat Tipo (Hatchback and Station Wagon versions): similar rear side member with PQS450B-14,
  3. Renault Scenic 3: laser welded tailored B-pillar with PQS550 in the lower sectionF-19,
  4. Chrysler Pacifica: five-piece front door ring with PQS550 in the lower section of the B-Pillar areaT-29, and
  5. Chrysler Ram: six-piece front door ring with PQS550 in the lower section of the B-Pillar area.R-3
Figure 4: Use of tailor welded PQS-PHS grades in 2nd generation Volvo XC90 (re-created after Citation L-29).

Figure 10: Use of laser welded tailored PQS-PHS grades in 2nd generation Volvo XC90 (re-created after Citation L-29).


Several car makers use PQS grades to facilitate joining of components. The B-Pillar of the Jaguar I-PACE electric SUV is made of PQS450, with a PHS1500 patch that is spot welded before hot stamping, creating the patchwork blank shown in Figure 11A.B-21  Early PQS applications involved a laser welded tailored blank with PHS 1500. Since 2014, Mercedes hot stamped PQS550 blanks not combined with PHS1500. Figure 11B shows such components on the Mercedes C-Class.K-26

Figure 5: Recent PQS applications: (a) 2018 Jaguar I-PACE uses a patchwork B-pillar with PQS450 master blank and PHS1500 patchB-21, (b) 2014 Mercedes C-Class has a number of PQS550 components that are not tailor welded to PHS1500.K-26

Figure 11: Recent PQS applications: (a) 2018 Jaguar I-PACE uses a patchwork B-pillar with PQS450 master blank and PHS1500 patchB-21, (b) 2014 Mercedes C-Class has a number of PQS550 components that are not laser welded to PHS1500.K-26 


PHS Grades over 1500 MPa

The most commonly used press hardening steels have 1500 MPa tensile strength, but are not the only optionsR-11, with 4 levels between 1700 and 2000 MPa tensile strength available or in development as shown in Figure 12. Hydrogen induced cracking (HIC) and weldability problems limit widespread use in automotive applications, with studies underway to develop practices which minimize or eliminate these limitations.

Figure 1: PHS grades over 1500 MPa tensile strength, compared with the common PHS1500 (re-created after Citations B-18, W-28, Z-7, L-30, L-28, B-14).

Figure 12: PHS grades over 1500 MPa tensile strength, compared with the common PHS1500 (re-created after Citations B-18, W-28, Z-7, L-30, L-28, B-14).


Mazda Motor Corporation was the first vehicle manufacturer to use higher strength boron steels, with the 2011 CX-5 using 1,800MPa tensile strength reinforcements in front and rear bumpers, Figure 13. According to Mazda, the new material saved 4.8 kg per vehicle. The chemistry of the steel is Nb modified 30MnB5.H-33, M-28  Figure 14 shows the comparison of bumper beams with PHS1500 and PHS1800. With the higher strength material, it was possible to save 12.5% weight with equal performance.H-33

Figure 14: Bumper beam reinforcements of Mazda CX-5 (SOP 2011) are the first automotive applications of higher strength boron steels.M-28

Figure 13: Bumper beam reinforcements of Mazda CX-5 (SOP 2011) are the first automotive applications of higher strength boron steels.M-28


Figure 15: Performance comparison of bumper beams with PHS1500 and PHS1800.H-33

Figure 14: Performance comparison of bumper beams with PHS1500 and PHS1800.H-33

PHS 1800 is used in the 2022 Genesis Electrified G80 (G80EV) and the new G90, both from Hyundai Motor. A specialized method lowering the heating furnace temperature by more than 50℃ limits the penetration of hydrogen into the blanks, minimizing the risk of hydrogen embrittlement. L-64.

MBW 1900 is the commercial name for a press hardening steel with 1900 MPa tensile strength. An MBW 1900 B-pillar with correct properties can save 22% weight compared to DP 600 and yet may cost 9% less than the original Dual-Phase design.H-34   Ford had also demonstrated that by using MBW 1900 instead of PHS 1500, a further 15% weight could be saved.L-30  Since 2019, VW’s electric vehicle ID.3 has two seat crossbeams made of MBW 1900 steel, as seen in Figure 15.L-31  The components are part of MEB platform (Modularer E-Antriebs-Baukasten – modular electric-drive toolkit) and may be used in other VW Group EVs.

Figure 4: Underbody of VW ID3 (part of MEB platform).L-31

Figure 15: Underbody of VW ID3 (part of MEB platform).L-31


USIBOR 2000 is the commercial name given to a steel grade similar to 37MnB4 with an AlSi coating. Final properties are expected only after paint baking cycle, and the parts made with this grade may be brittle before paint bake.B-32  In June 2020, Chinese Great Wall Motors started using USIBOR 2000 in the Haval H6 SUV.V-12

HPF 2000, another commercial name, is used in a number of component-based examples, and also in the Renault EOLAB concept car.L-28, R-12  An 1800 MPa grade is under development.P-22  Docol PHS 1800, a commercial grade approximating 30MnB5, has been in production, with Docol PHS 2000 in development.S-66  PHS-Ultraform 2000, a commercial name for a Zn (GI) coated blank, is suited for the indirect process.V-11

General Motors China, together with several still mills across the country, have developed two new PHS grades: PHS 1700 (20MnCr) and PHS2000 (34MnBV). 20MnCr uses Cr alloying to improve hardenability and oxidation resistance. This grade can be hot formed without a coating. The furnace has to be conditioned with N2 gas. The final part has high corrosion resistance, approximately 9% total elongation (see Figure 12) and high bendability (see Table 4). 34MnBV on the other hand, has a thin AlSi coating (20g/m2 on each side). Compared with the typical thickness of AlSi coatings, thinner coatings are preferred for bendability (see Table 5).W-28  More information about these oxidation resistant PHS grades, as well as a 1200 MPa version intended for applications benefiting from enhanced crash energy absorption, can be found in Citation L-60.

Table 4: Chemical compositions of higher strength PHS grades. “0” means it is known that there is no alloying element, while “-” means there is no information. “~” is used for typical values; otherwise, minimum or maximum are given. The terminology descriptions are not standardized. PQS names are based on their properties and grade names are derived from a possible chemistry or OEM description. The properties listed here encompass those presented in multiple sources and may or may not be associated with any one specific commercial grade.W-28, B-32, H-33, G-33, L-28, S-67, S-66, Y-12, B-33

Table 4: Chemical compositions of higher strength PHS grades. “0” means it is known that there is no alloying element, while “-” means there is no information. “~” is used for typical values; otherwise, minimum or maximum are given. The terminology descriptions are not standardized. PQS names are based on their properties and grade names are derived from a possible chemistry or OEM description. The properties listed here encompass those presented in multiple sources and may or may not be associated with any one specific commercial grade.W-28, B-32, H-33, G-33, L-28, S-67, S-66, Y-12, B-33


Table 5: Mechanical properties of higher strength PHS grades. “~” is used for typical values; otherwise, minimum or maximum are given. Superscript PB means after paint bake cycle. The terminology descriptions are not standardized. PQS names are based on their properties and grade names are derived from a possible chemistry or OEM description. The properties listed here encompass those presented in multiple sources and may or may not be associated with any one specific commercial grade.W-28, B-32, H-33, G-33, L-28, S-67, S-66, Y-12

Table 5: Mechanical properties of higher strength PHS grades. “~” is used for typical values; otherwise, minimum or maximum are given. Superscript PB means after paint bake cycle. The terminology descriptions are not standardized. PQS names are based on their properties and grade names are derived from a possible chemistry or OEM description. The properties listed here encompass those presented in multiple sources and may or may not be associated with any one specific commercial grade.W-28, B-32, H-33, G-33, L-28, S-67, S-66, Y-12


Other Steels for Press Hardening Process

In recent years, many new steel grades are under evaluation for use with the press hardening process. Few, if any, have reached mass production, and are instead in the research and development phase. These grades include:

  1. Stainless steels
  2. Medium-Mn steels
  3. Composite steels


Stainless Steels

Studies of press hardening of stainless steels primarily focus on martensitic grades (i.e., AISI SS400 series).M-36, H-42, B-40, M-37, F-30  As seen in Figure 16, martensitic stainless steels may have higher formability at elevated temperatures, compared to PHS1500 (22MnB5). Other advantages of stainless steels are:

  1. better corrosion resistanceM-37,
  2. potentially higher heating rates (i.e., induction heating) F-30,
  3. possibility of air hardening – allowing the multi-step process — as seen in Figure 17a H-42,
  4. high cold formability – allowing indirect process – as seen in Figure 17b.M-37

Disadvantages include (a) higher material cost, and (b) higher furnace temperature (up to around 1050-1150 °C).M-37, F-30  As of 2020, there are two commercially available stainless steel grades specifically developed for press hardening process.

Figure 16: Tensile strength and total elongation variation with temperature of (a) PHS1500 = 22MnB5M-38 and (b) martensitic stainless steel.M-36

Figure 16: Tensile strength and total elongation variation with temperature of (a) PHS1500 = 22MnB5M-38 and (b) martensitic stainless steel.M-36

Figure 17: (a) Critical cooling rate comparison of 22MnB5 and AISI SS410 (re-created after Citation H-42), (b) Room temperature forming limit curve comparison of DP600 and modified AISI SS410 (re-created after Citation M-37).

Figure 17: (a) Critical cooling rate comparison of 22MnB5 and AISI SS410 (re-created after Citation H-42), (b) Room temperature forming limit curve comparison of DP600 and modified AISI SS410 (re-created after Citation M-37).


Final mechanical properties of stainless steels after press hardening process are typically superior to 22MnB5, in terms of elongation and energy absorbing capacity. Figure 18 illustrates engineering stress-strain curves of the commercially available grades (1.6065 and 1.4064), and compares them with the 22MnB5 and a duplex stainless steel (Austenite + Martensite after press hardening). These grades may also have bake hardening effect, abbreviated as BH0, as there will be no cold deformation.B-40, M-37, F-30

Figure 18: Engineering Stress-Strain curves of press hardened stainless steels, compared with 22MnB5 (re-created after Citations B-40, M-37, F-30, B-41).

Figure 18: Engineering Stress-Strain curves of press hardened stainless steels, compared with 22MnB5 (re-created after Citations B-40, M-37, F-30, B-41).


Table 6: Summary of mechanical properties of press hardenable stainless steel grades. Typical values are indicated with “~”. (Table generated from Citations B-40, M-37, F-30.)

Table 6: Summary of mechanical properties of press hardenable stainless steel grades. Typical values are indicated with “~”. (Table generated from Citations B-40, M-37, F-30.)


Medium-Mn Steels

Medium-Mn steels typically contain 3 to 12 weight-% manganese alloying.D-27, H-30, S-80, R-16, K-35  Although these steels were originally designed for cold stamping applications, there are numerous studies related to using them in the press hardening process as well.H-30  Several advantages of medium-Mn steels in press hardening are:

  1. Austenitization temperature may be significantly lower than compared to 22MnB5, as indicated in Figure 19.H-30, S-80  Thus, using medium-Mn steels may save energy in heating process.M-39 Lower heating temperature may also help reducing the liquid-metal embrittlement risk of Zn-coated blanks. It also may reduce oxidation and decarburization of uncoated blanks.S-80
  2. Martensitic transformation can occur at low cooling rates. Simpler dies could be used with less or no cooling channels. In some grades, air hardening may be possible. Thus, multi-step process could be employed.S-80, B-14
  3. Some retained austenite may be present at the final part, which can enhance the elongation, through the TRIP effect. This, in turn, improves toughness significantly.S-80, B-14
Figure 19: Effect of Mn content on equilibrium transformation temperatures (re-created after Citations H-30, B-14)

Figure 19: Effect of Mn content on equilibrium transformation temperatures (re-created after Citations H-30, B-14)


The change in transformation temperatures with Mn-alloying was calculated using ThermoCalc software.H-30  As seen in Figure 19, as Mn alloying is increased, austenitization temperatures are lowered.H-30 For typical 22MnB5 stamping containing 1.1 to 1.5 % Mn, furnace temperature is typically set at 930 °C in mass production. The multi-step material 22MnSiB9-5 has slightly higher Mn levels (2.0 to 2.4 %), so the furnace temperature could be reduced to 890 °C. As also indicated in Table 7, the furnace temperature could be further lowered in hot forming of medium-Mn steels.

A study in the EU showed that if the maximum furnace temperature is 930 °C, which is common for 22MnB5, natural gas consumption will be around 32 m3/hr. In the study, two new medium-Mn steels were developed, one with 3 wt.% Mn and the other with 5 wt% Mn. These grades had lower austenitization temperature, and the maximum furnace set temperature could be reduced to 808 °C and 785 °C, respectively. Experimental data shows that at 808 °C natural gas consumption was reduced to 19 m3/hr, and at 785 °C to 17 m3/hr.M-39  In Figure 20, experimental data is plotted with a curve fit. Based on this model, it was estimated that by using 22MnSiB9-5, furnace gas consumption may be reduced by 15%.

Figure 20: Effect of maximum furnace set temperature (at the highest temperature furnace zone) on natural gas consumption (raw data from Citation M-39)

Figure 20: Effect of maximum furnace set temperature (at the highest temperature furnace zone) on natural gas consumption (raw data from Citation M-39)


Lower heating temperature of medium-Mn steels may also help reducing the liquid-metal embrittlement risk of Zn-coated blanks. It also may reduce oxidation and decarburization of uncoated blanks.S-80

Medium-Mn steels may have high yield-point elongation (YPE), with reports of more than 5% after hot stamping. Mechanical properties may be sensitive to small changes in temperature profile. As seen in Figure 21, all studies with medium-Mn steel have a unique stress-strain curve after press hardening. This can be explained by:

  1. differences in the chemistry,
  2. thermomechanical history of the sheet prior to hot stamping,
  3. heating rate, heating temperature and soaking time, and
  4. cooling rate.S-80
Figure 21: Engineering Stress-Strain curves of several press hardened medium-Mn steels, compared with 22MnB5. See Table 7 for an explanation of each tested material (re-created after Citations S-80, L-37, W-30, L-38).

Figure 21: Engineering Stress-Strain curves of several press hardened medium-Mn steels, compared with 22MnB5. See Table 7 for an explanation of each tested material (re-created after Citations S-80,L-37, W-30, L-38).

Table 7: Summary of mechanical properties of press hardenable Medium-Mn grades shown in Figure 18. Typical values are indicated with “~”. Toughness is calculated as the area under the engineering stress-strain curve. Items 4 and 5 also were annealed at different temperatures and therefore have different thermomechanical history. Note that these grades are not commercially available. Citations: L-38, W-30, L-37, S-80

Table 7: Summary of mechanical properties of press hardenable Medium-Mn grades shown in Figure 18. Typical values are indicated with “~”. Toughness is calculated as the area under the engineering stress-strain curve. Items 4 and 5 also were annealed at different temperatures and therefore have different thermomechanical history. Note that these grades are not commercially available.L-38, W-30, L-37, S-80


Composite Steels

TriBond ® is the name given to a family of steel composites.T-32 Here, three slabs (one core material (60 to 80% of the thickness) and two cladding layers) are surface prepared, stacked on top of each other, and welded around the edges. The stack is hot rolled to thickness. Cold rolling could also be applied. Initially, TriBond ® was designed for wear-resistant cladding and ductile core materials.

The original design was optimized for hot stamping.B-14 The core material, where bending strains are lower than the outer layers, is made from generic 22MnB5 (PHS1500). Outer layers are made with PQS450. The stack is cold rolled, annealed and AlSi coated.Z-9 Two grades are developed, differing by the thickness distribution between the layers, as shown in Figure 22.R-14

Figure 22: Sample microsections of the conventional hot stamping grade PHS1500+AS, the high strength composite Tribond® 1400 and the high energy absorbing composite Tribond® 1200. The Tribond® 1200 microsection is experimental and is taken from Citation R-14. The other two images are renditions created by the author for explanation purposes. (re-created after Citations R-14, R-15)

Figure 22: Sample microsections of the conventional hot stamping grade PHS1500+AS, the high strength composite Tribond® 1400 and the high energy absorbing composite Tribond® 1200. The Tribond® 1200 microsection is experimental and is taken from Citation R-14. The other two images are renditions created by the author for explanation purposes. (re-created after Citations R-14, R-15)


Total elongation of the composite steel is not improved, compared to PHS1500, as shown in Figure 23. The main advantage of the composite steels is their higher bendability, as seen in Table 8. Crashboxes, front and rear rails, seat crossmembers and similar components experience axial crush loading in the event of a crash. In axial crush, Tribond® 1200 saved 15% weight compared to DP780 (CR440Y780T-DP). The bending loading mode effects B-pillars, bumper beams, rocker (sill) reinforcements, side impact door beams, and similar components during a crash. In this bending mode, Tribond® 1400 saved 8 to 10% weight compared to regular PHS1500. Lightweighting cost with Tribond® 1400 was calculated as €1.50/kgsaved.G-37, P-26

Figure 23: Engineering Stress-Strain curves of core layer, outer layer and the composite steel (re-created after Citation P-26).

Figure 23: Engineering Stress-Strain curves of core layer, outer layer and the composite steel (re-created after Citation P-26).


Table 8: Summary of composite steels and comparison with conventional PHS and PQS grades. Typical values are indicated with “~”. (Table re-created after Citation B-14).

Table 8: Summary of composite steels and comparison with conventional PHS and PQS grades. Typical values are indicated with “~”. (Table re-created after Citation B-14).


* Graphs in this article are for information purposes only. Production materials may have different curves. Consult the Certified Mill Test Report and/or characterize your current material with an appropriate test (such as a tensile, bending, hole expansion, or crash test) test to get the material data pertaining to your current stock.

For more information on Press Hardened Steels, see these pages:


eren billur, PhD Thanks are given to Eren Billur, Ph.D., Billur MetalForm, who contributed this article.


Back To Top


Dual Phase

Dual Phase

Dual Phase (DP) steels have a microstructure consisting of a ferritic matrix with martensitic islands as a hard second phase, shown schematically in Figure 1. The soft ferrite phase is generally continuous, giving these steels excellent ductility. When these steels deform, strain is concentrated in the lower-strength ferrite phase surrounding the islands of martensite, creating the unique high initial work-hardening rate (n-value) exhibited by these steels. Figure 2 is a micrograph showing the ferrite and martensite constituents.

Figure 1: Schematic of a dual phase steel microstructure showing islands of martensite in a matrix of ferrite.

Figure 1: Schematic of a Dual Phase steel microstructure showing islands of martensite in a matrix of ferrite.

Figure 2: Micrograph of Dual Phase steel

Figure 2: Micrograph of Dual Phase Steel

Hot rolled DP steels do not have the benefit of an annealing cycle, so the dual phase microstructure must be achieved by controlled cooling from the austenite phase after exiting the hot strip mill finishing stands and before coiling. This typically requires a more highly alloyed chemistry than cold rolled DP steels require. Higher alloying is generally associated with a change in welding practices.

Continuously annealed cold-rolled and hot-dip coated Dual Phase steels are produced by controlled cooling from the two-phase ferrite plus austenite (α + γ) region to transform some austenite to ferrite before a rapid cooling transforms the remaining austenite to martensite. Due to the production process, small amounts of other phases (bainite and retained austenite) may be present.

Higher strength dual phase steels are typically achieved by increasing the martensite volume fraction. Depending on the composition and process route, steels requiring enhanced capability to resist cracking on a stretched edge (as typically measured by hole expansion capacity) can have a microstructure containing significant quantities of bainite.

The work hardening rate plus excellent elongation creates DP steels with much higher ultimate tensile strengths than conventional steels of similar yield strength. Figure 3 compares the engineering stress-strain curve for HSLA steel to a DP steel curve of similar yield strength. The DP steel exhibits higher initial work hardening rate, higher ultimate tensile strength, and lower YS/TS ratio than the HSLA with comparable yield strength. Additional engineering and true stress-strain curves for DP steel grades are presented in Figures 4 and 5.

Figure 3: A comparison of stress strain curves for mild steel, HSLA 350/450, and DP 350/600

Figure 3: A comparison of stress strain curves for mild steel, HSLA 350/450, and DP 350/600K-1


Figure 4:  Engineering stress-strain curves for a series of DP steel grades.S-5, V-1  Sheet thicknesses: DP 250/450 and DP 500/800 = 1.0mm. All other steels were 1.8-2.0mm.

Figure 4:  Engineering stress-strain curves for a series of DP steel grades.S-5, V-1  Sheet thicknesses: DP 250/450 and DP 500/800 = 1.0mm. All other steels were 1.8-2.0mm.


Figure 5:  True stress-strain curves for a series of DP steel grades.S-5, V-1  Sheet thicknesses: DP 250/450 and DP 500/800 = 1.0mm. All other steels were 1.8-2.0mm.

Figure 5:  True stress-strain curves for a series of DP steel grades.S-5, V-1 Sheet thicknesses: DP 250/450 and DP 500/800 = 1.0mm. All other steels were 1.8-2.0mm.


DP and other AHSS also have a bake hardening effect that is an important benefit compared to conventional higher strength steels. The extent of the bake hardening effect in AHSS depends on an adequate amount of forming strain for the specific chemistry and thermal history of the steel.

In DP steels, carbon enables the formation of martensite at practical cooling rates by increasing the hardenability of the steel. Manganese, chromium, molybdenum, vanadium, and nickel, added individually or in combination, also help increase hardenability. Carbon also strengthens the martensite as a ferrite solute strengthener, as do silicon and phosphorus. These additions are carefully balanced, not only to produce unique mechanical properties, but also to maintain the generally good resistance spot welding capability. However, when welding the higher strength grades (DP 700/1000 and above) to themselves, the spot weldability may require adjustments to the welding practice.

Examples of current production grades of DP steels and typical automotive applications include:

DP 300/500 Roof outer, door outer, body side outer, package tray, floor panel
DP 350/600 Floor panel, hood outer, body side outer, cowl, fender, floor reinforcements
DP 500/800 Body side inner, quarter panel inner, rear rails, rear shock reinforcements
DP 600/980 Safety cage components (B-pillar, floor panel tunnel, engine cradle, front sub-frame package tray, shotgun, seat)
DP 700/1000 Roof rails
DP 800/1180 B-Pillar upper


Some of the specifications describing uncoated cold rolled 1st Generation dual phase (DP) steel are included below, with the grades typically listed in order of increasing minimum tensile strength and ductility. Different specifications may exist which describe hot or cold rolled, uncoated or coated, or steels of different strengths. Many automakers have proprietary specifications which encompass their requirements.

  • ASTM A1088, with the terms Dual phase (DP) steel Grades 440T/250Y, 490T/290Y, 590T/340Y, 780T/420Y, and 980T/550YA-22
  • EN 10338, with the terms HCT450X, HCT490X, HCT590X, HCT780X, HCT980X, HCT980XG, and HCT1180XD-6
  • JIS G3135, with the terms SPFC490Y, SPFC540Y, SPFC590Y, SPFC780Y and SPFC980YJ-3
  • JFS A2001, with the terms JSC590Y, JSC780Y, JSC980Y, JSC980YL, JSC980YH, JSC1180Y, JSC1180YL, and JSC1180YHJ-23
  • VDA 239-100, with the terms CR290Y490T-DP, CR330Y590T-DP, CR440Y780T-DP, CR590Y980T-DP, and CR700Y980T-DPV-3
  • SAE J2745, with terms Dual Phase (DP) 440T/250Y, 490T/290Y, 590T/340Y, 6907/550Y, 780T/420Y, and 980T/550YS-18
Transformation Induced Plasticity (TRIP)

Transformation Induced Plasticity (TRIP)

topofpage

Metallurgy

The microstructure of Transformation Induced Plasticity (TRIP) steels contains a matrix of ferrite, with retained austenite, martensite, and bainite present in varying amounts. Production of TRIP steels typically requires the use of an isothermal hold at an intermediate temperature, which produces some bainite. Higher silicon and carbon content of TRIP steels result in significant volume fractions of retained austenite in the final microstructure. Figure 1 shows a schematic of TRIP steel microstructure, with Figure 2 showing a micrograph of an actual sample of TRIP steel. Figure 3 compares the engineering stress-strain curve for HSLA steel to a TRIP steel curve of similar yield strength.


Figure 1: Schematic of a TRIP steel microstructure showing a matrix of ferrite, with martensite, bainite and retained austenite as the additional phases.

Figure 1: Schematic of a TRIP steel microstructure showing a matrix of ferrite, with martensite, bainite and retained austenite as the additional phases.


Figure 2: Micrograph of Transformation Induced Plasticity steel.

Figure 2: Micrograph of Transformation Induced Plasticity steel.


Figure 3: A comparison of stress strain curves for mild steel, HSLA 350/450, and TRIP 350/600.K-1

Figure 3: A comparison of stress strain curves for mild steel, HSLA 350/450, and TRIP 350/600.K-1


During deformation, the dispersion of hard second phases in soft ferrite creates a high work hardening rate, as observed in the DP steels. However, in TRIP steels the retained austenite also progressively transforms to martensite with increasing strain, thereby increasing the work hardening rate at higher strain levels. This is known as the TRIP Effect. This is illustrated in Figure 4, which compares the engineering stress-strain behavior of HSLA, DP and TRIP steels of nominally the same yield strength. The TRIP steel has a lower initial work hardening rate than the DP steel, but the hardening rate persists at higher strains where work hardening of the DP begins to diminish. Additional engineering and true stress-strain curves for TRIP steel grades are shown in Figure 5.


Figure 4: TRIP 350/600 with a greater total elongation than DP 350/600 and HSLA 350/450 Reference K-1

Figure 4: TRIP 350/600 with a greater total elongation than DP 350/600 and HSLA 350/450. K-1


Figure 5: Engineering stress-strain (left graphic) and true stress-strain (right graphic) curves for a series of TRIP steel grades. Sheet thickness: TRIP 350/600 = 1.2mm, TRIP 450/700 = 1.5mm, TRIP 500/750 = 2.0mm, and Mild Steel = approx. 1.9mm. V-1

Figure 5: Engineering stress-strain (left graphic) and true stress-strain (right graphic) curves for a series of TRIP steel grades. Sheet thickness: TRIP 350/600 = 1.2mm, TRIP 450/700 = 1.5mm, TRIP 500/750 = 2.0mm, and Mild Steel = approx. 1.9mm. V-1


The strain hardening response of TRIP steels are substantially higher than for conventional HSS, resulting in significantly improved formability in stretch deformation. This response is indicated by a comparison of the n-value for the grades. The improvement in stretch formability is particularly useful when designers take advantage of the improved strain hardening response to design a part utilizing the as-formed mechanical properties. High n-value persists to higher strains in TRIP steels, providing a slight advantage over DP in the most severe stretch forming applications.

Austenite is a higher temperature phase and is not stable at room temperature under equilibrium conditions. Along with a specific thermal cycle, carbon content greater than that used in DP steels are needed in TRIP steels to promote room-temperature stabilization of austenite. Retained austenite is the term given to the austenitic phase that is stable at room temperature.

Higher contents of silicon and/or aluminum accelerate the ferrite/bainite formation. These elements assist in maintaining the necessary carbon content within the retained austenite. Suppressing the carbide precipitation during bainitic transformation appears to be crucial for TRIP steels. Silicon and aluminum are used to avoid carbide precipitation in the bainite region.

The carbon level of the TRIP alloy alters the strain level at which the TRIP Effect  occurs. The strain level at which retained austenite begins to transform to martensite is controlled by adjusting the carbon content. At lower carbon levels, retained austenite begins to transform almost immediately upon deformation, increasing the work hardening rate and formability during the stamping process. At higher carbon contents, retained austenite is more stable and begins to transform only at strain levels beyond those produced during forming. At these carbon levels, retained austenite transforms to martensite during subsequent deformation, such as a crash event.

TRIP steels therefore can be engineered to provide excellent formability for manufacturing complex AHSS parts or to exhibit high strain hardening during crash deformation resulting in excellent crash energy absorption.

The additional alloying requirements of TRIP steels degrade their resistance spot-welding behavior. This can be addressed through weld cycle modification, such as the use of pulsating welding or dilution welding.  Table 1 provides a list of current production grades of TRIP steels and example automotive applications:

Table 1: Current Production Grades Of TRIP Steels And Example Automotive Applications.

Table 1: Current Production Grades Of TRIP Steels And Example Automotive Applications.


Some of the specifications describing uncoated cold rolled 1st Generation transformation induced plasticity (TRIP) steel are included below, with the grades typically listed in order of increasing minimum tensile strength and ductility. Different specifications may exist which describe hot or cold rolled, uncoated or coated, or steels of different strengths. Many automakers have proprietary specifications which encompass their requirements.
• ASTM A1088, with the terms Transformation induced plasticity (TRIP) steel Grades 690T/410Y and 780T/440YA-22
• JFS A2001, with the terms JSC590T and JSC780TJ-23
• EN 10338, with the terms HCT690T and HCT780TD-18
• VDA 239-100, with the terms CR400Y690T-TR and CR450Y780T-TRV-3
• SAE J2745, with terms Transformation Induced Plasticity (TRIP) 590T/380Y, 690T/400Y, and 780T/420YS-18


Transformation Induced Plasticity Effect

Austenite is not stable at room temperature under equilibrium conditions. An austenitic microstructure is retained at room temperature with the combined use of a specific chemistry and controlled thermal cycle. Deformation from sheet forming provides the necessary energy to allow the crystallographic structure to change from austenite to martensite. There is insufficient time and temperature for substantial diffusion of carbon to occur from carbon-rich austenite, which results in a high-carbon (high strength) martensite after transformation. Transformation to high strength martensite continues as deformation increases, as long as retained austenite is still available to be transformed.

Alloys capable of the TRIP effect are characterized by a high ductility – high strength combination. Such alloys include 1st Gen AHSS TRIP steels, as well as several 3rd Gen AHSS grades like TRIP-Assisted Bainitic Ferrite, Carbide Free Bainite, and Quench & Partition Steels.


Back to the Top