AHSS, Blog, homepage-featured-top, Joining, main-blog, News, Resistance Spot Welding, RSW of Dissimilar Steel, Steel Grades, Tool & Die Professionals
Urbanization and waning interest in vehicle ownership point to new transport opportunities in megacities around the world. Mobility as a Service (MaaS) – characterized by autonomous, ride-sharing-friendly EVs – can be the comfortable, economical, sustainable transport solution of choice thanks to the benefits that today’s steel offers.
The WorldAutoSteel organization is working on the Steel E-Motive program, which delivers autonomous ride-sharing vehicle concepts enabled by Advanced High-Strength Steel (AHSS) products and technologies.
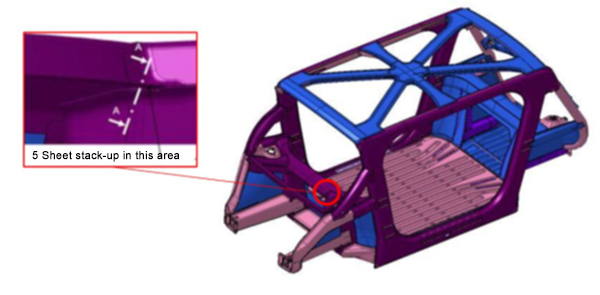
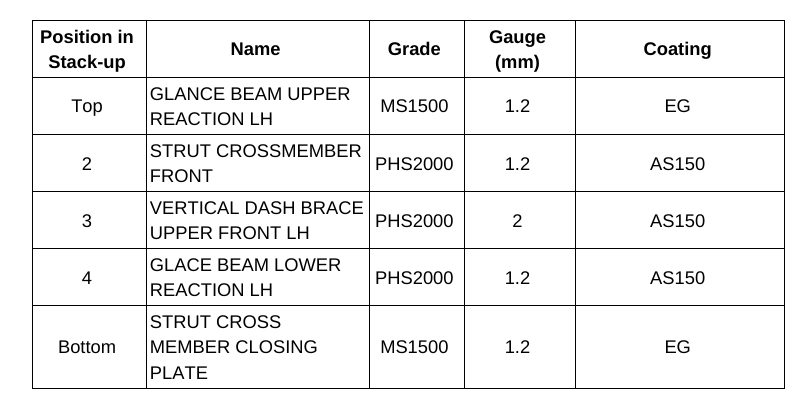
The Body structure design for this vehicle is shown in Figure 1. It also indicates the specific joint configuration of 5 layers AHSS sheet stack-up as shown in Table 1. Resistance spot welding parameters were developed to allow this joint to be made by a single weld. (The previous solution for this welded joint is to create one spot weld with the bottom 3 sheets indicated in the table and a second weld to join the top 2 sheets, combining the two-layer groups to 5T stack-up.)
NOTE: Click this link to read a previous AHSS Insights blog that summarizes development work and recommendations for resistance spot welding 3T and 4T AHSS stack-ups: https://bit.ly/42Alib8


Table 1. Provided materials organized in stack-up formation showing part number, name, grade, gauge in mm, and coating type. Total thickness = 6.8 mm
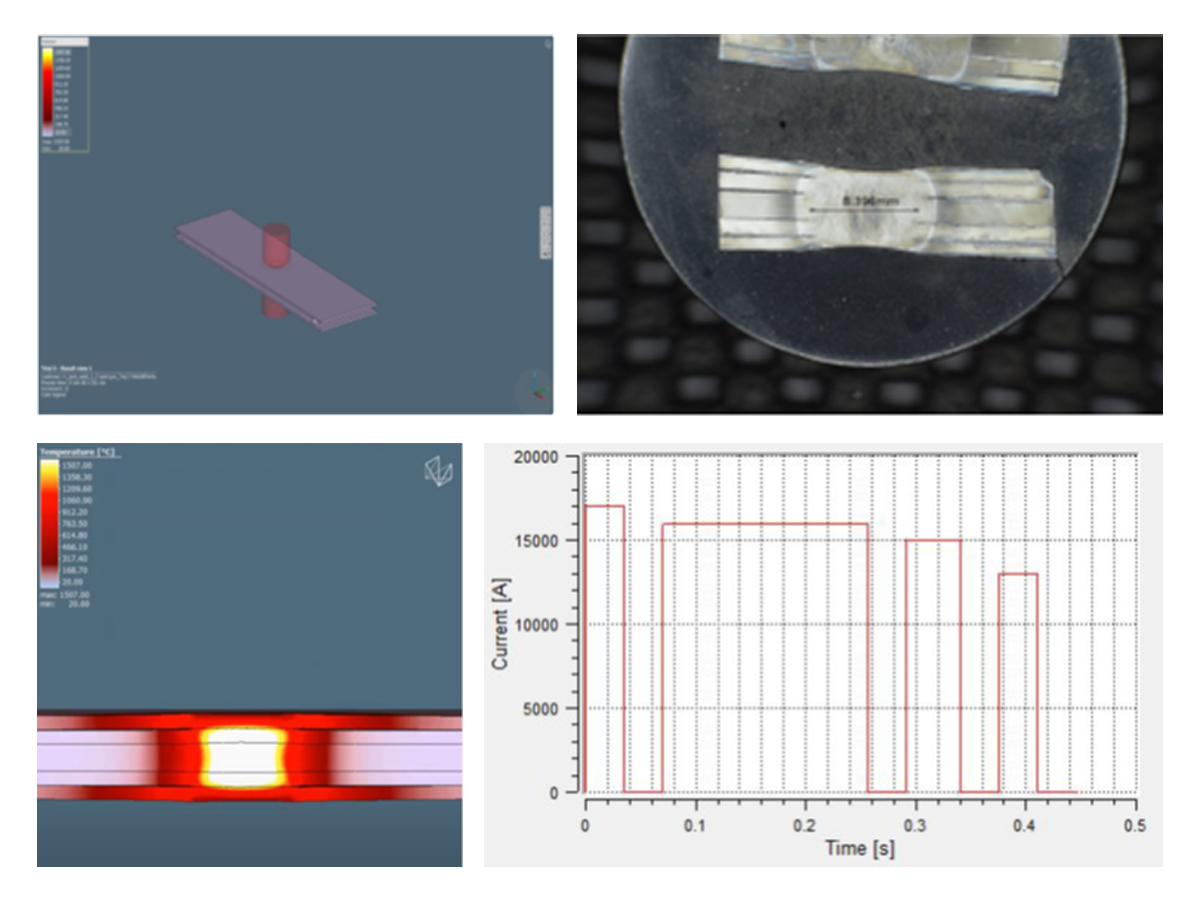
The same approach of utilizing multiple current pulses with short cool time in between the pulses was shown to be most effective in this case of 5T stack-up. It is important to note that in some cases, the application of a secondary force was shown to be beneficial, however, it was not used in this example.
To establish initial welding parameters simulations were conducted using the Simufact software by Hexagon. As shown in Figure 2, the final setup included a set of welding electrodes that clamped the 5-layer AHSS stack-up. Several simulations were created with a designated set of welding parameters of current, time, number of pulses, and electrode force.

Figure 2. Example of simulation and experimental results showing acceptable 5T resistance spot weld (Meets AWS Automotive specifications)

Thanks is given to Menachem Kimchi, Associate Professor-Practice, Dept of Materials Science, Ohio State University and Technical Editor – Joining, AHSS Application Guidelines, for this article.

1stGen AHSS, 2ndGen AHSS, 3rdGen AHSS, AHSS, Blog, homepage-featured-top, main-blog, News, Production Managers, Steel Grades, Tool & Die Professionals
This month’s blog was contributed by Peter Ulintz, Precision Metalforming Association. This content originally appeared in the September 2023 issue of MetalForming Magazine under the title “Stronger AHSS Knowledge Required for Metal Stampers” and has been reproduced with the permission of MetalForming Magazine.
Metal stampers and die shops experienced with mild and HSLA steels often have problems making parts from AHSS grades. The higher initial yield strengths and increased work hardening of these steels can require as much as four times the working loads of mild steel. Some AHSS grades also have hardness levels approaching the dies used to form them.
Dies Get Tougher
Metal stampers and die shops experienced with mild and HSLA steels often have problems making parts from AHSS grades. The higher initial yield strengths and increased work hardening of these steels can require as much as four times the working loads of mild steel. Some AHSS grades also have hardness levels approaching the dies used to form them.
The higher stresses required to penetrate higher-strength materials require increased punch-to-die clearances compared to mild steels and HSLA grades. Why? This clearance acts as leverage to bend and break the slug out of the sheet metal. Stronger materials need longer levers to bend the slug. The required clearance is a function of the steel grade and tensile strength, and sheet thickness.
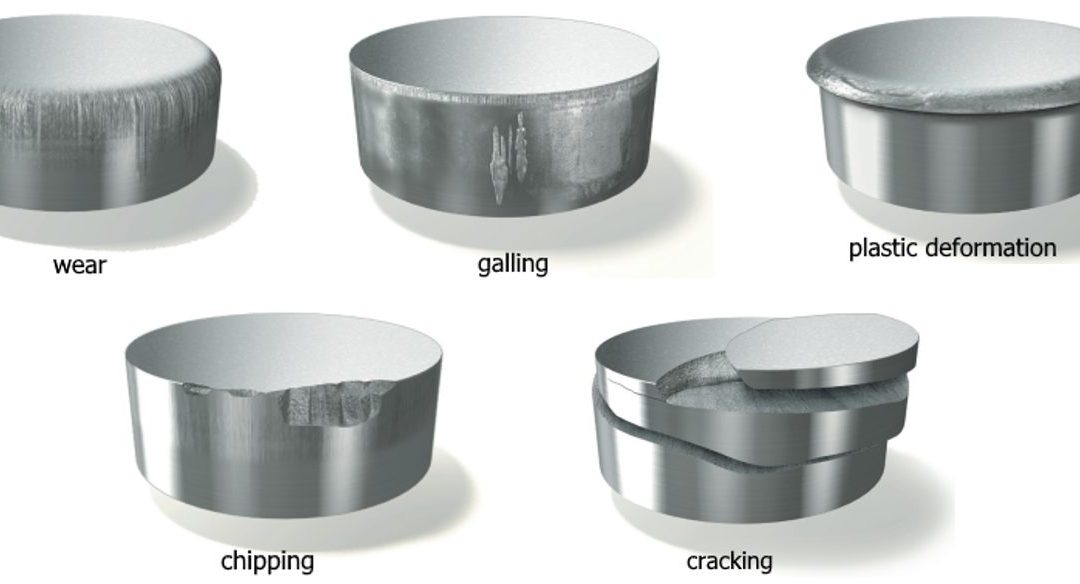
Increasing cutting clearance can result in punch cracking and head breakage due to higher snapthrough loads and reverse-unloading forces within the die. Adding shear angles to the punch face helps reduce punch forces and reverse unloading.
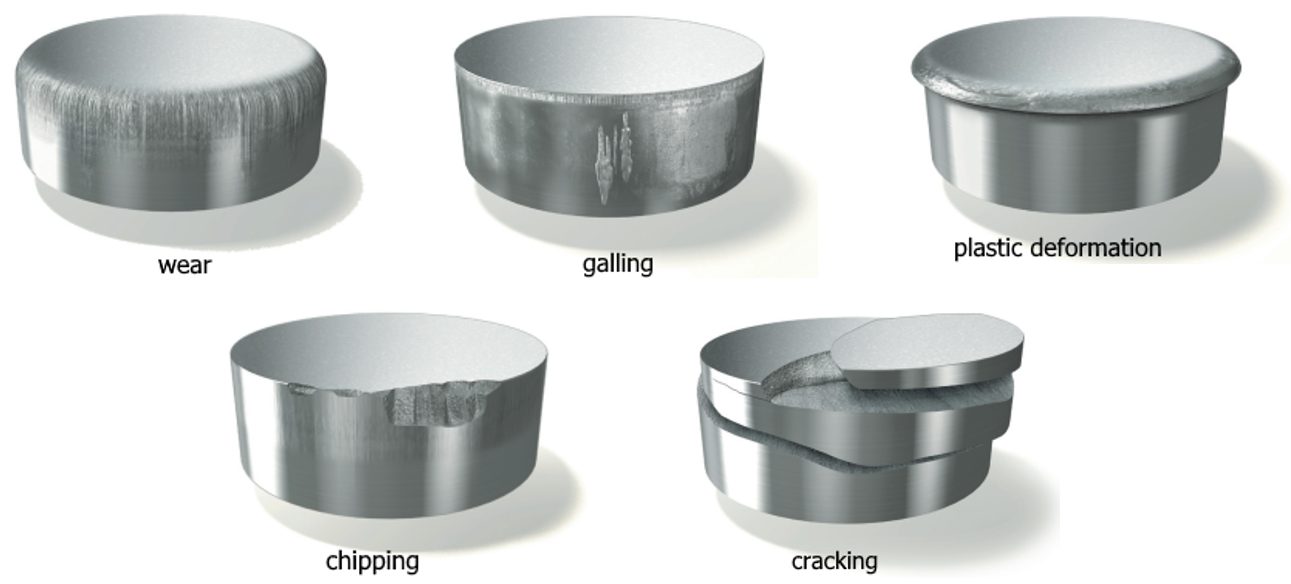
Tight-cutting clearances increase the tendency for die galling and chipping. The severity of galling depends on the surface finish and microstructure of both the tool steel and work material. Chipping can occur when process stresses are high enough to cause low-cycle fatigue of the tooling material, indicating that the material lacks toughness.

Stamping Tool Failure Modes (Citations T-20 and U-7)
Tempering of tools and dies represents a critical heat-treatment step and serves more than one purpose, but of primary concern is the need to relieve residual stresses and impart toughness. Dies placed in service without proper tempering likely will experience early failure.
Dies made from the higher-alloy tool-steel grades (D, M or T grades) require more than one tempering step. These grades contain large amounts of retained austenite and untempered martensite after the first tempering step and require at least one more temper to relieve internal stresses, and sometimes a third temper for even greater toughness.
Unfortunately, heat treatment remains a “black-box” process for most die shops and manufacturing companies, which send soft die details to the local heat treat facility, with hardened details returned. A cursory Rockwell hardness test may be conducted at the die shop when the parts return. If they meet hardness requirements, the parts usually are accepted, regardless of how they may have been processed—a problem, as hardness alone does not adequately measure impact toughness.
Machines Get Stronger
The increased forces needed to form, cut and trim higher-strength steels create significant challenges for pressroom equipment and tooling. These include excessive tooling deflections, damaging tipping-moments, and amplified vibrations and snapthrough forces that can shock and break dies—and sometimes presses. Stamping AHSS materials can affect the size, strength, power and overall configuration of every major piece of the press line, including material-handling equipment, coil straighteners, feed systems and presses.
Here is what every stamper should know about higher-strength materials:
- Because higher-strength steels require more stress to deform, additional servo motor power and torque capability may be needed to pull the coil material through the straightener. Additional back tension between the coil feed and straightening equipment also may be required due to the higher yield strength of the material in the loop as the material tries to push back against the straightener and feed system.
- Higher-strength materials, due to their greater yield strengths, have a greater tendency to retain coil set. This requires greater horsepower to straighten the material to an acceptable level of flatness. Straightening higher-strength coils requires larger-diameter rolls and wider roll spacing in order to work the stronger material more effectively. But increasing roll diameter and center distances on straighteners to accommodate higher-strength steels limits the range of materials that can effectively be straightened. A straightener capable of processing 600-mm-wide coils to 10 mm thick in mild steel may still straighten 1.5-mm-thick material successfully. But a straightener sized to run the same width and thickness of DP steel might only be capable of straightening 2.5 mm or 3.0-mm thick mild steel. This limitation is primarily due to the larger rolls and broadly spaced centers necessary to run AHSS materials. The larger rolls, journals and broader center distances safeguard the straightener from potential damage caused by the higher stresses.
- Because higher-strength materials require greater stress to blank and punch as compared to HSLA or mild steel, they generate proportionally increased snapthrough and reverse-unloading forces. High-tensile snapthrough forces introduce large downward accelerations to the upper die half. These forces work to separate the upper die from the bottom of the ram on every stroke. Insufficient die-clamping force could cause the upper-die half to separate from the bottom of the ram on each stroke, causing fatigue to the upper-die mounting fasteners.
- Because energy is expended with each stroke of the press—and this energy must be replaced—critical attention must focus on the size (horsepower) of the main drive motor and the rotational speed of the flywheel in higher-strength-steel applications. The main motor, with its electrical connection, provides the only source of energy for the press and it must generate sufficient power to meet the demands of the stamping operation. The motor must be properly sized to replace the increased energy expended during each press stroke. For these reasons, some stampers consider the benefits of servo-driven presses for these applications.
As steels becomes stronger, a corresponding increase in process knowledge is required in terms of die design, construction and maintenance, and equipment selection.
You can read more about these topics at these links:
Tooling and Die Wear
Coil Processing Straightening and Leveling
Press Requirements

Thanks go to Peter Ulintz, of the Precision Metalforming Association (PMA) for authoring this article. Ulintz was employed in the metal stamping and tool & die industries for 38 years before joining Precision Metalforming Association (PMA) in 2015. He provides industry-related training and seminars in Stamping Press Operation and Setup; Designing and Building Metal Stamping Dies; Die Maintenance and Troubleshooting; Metal Stamping Design for Manufacturability; Deep Draw Tooling and Process Technology; Stamping Higher Strength Steels; and Problem Solving in the Press Shop. Peter is a contributor to ASM Handbook, Volume 14B, Metalworking: Sheet Forming (2006) and writes the monthly column, Tooling by Design, for PMA’s monthly publication, MetalForming Magazine.

Blanking, Blog, Cutting-Blanking-Shearing-Trimming, homepage-featured-top, main-blog, Tool & Die Professionals
You’ll find this content as part of our page on Laser Blanking, but this month, we want to highlight it in our AHSS Insights blog. We thank Schuler North America for contributing this insightful case study.
Production of Class A quality and structural parts without a blanking die is possible, even for high-volume serial production. Laser blanking enables flexible, cost-effective, and sustainable manufacturing and is capable of reaching 45 parts per minute. DynamicFlow Technology (DFT) from Schuler provides highly productive, die-free blanking with lasers—directly from a continuously running steel coil. DFT combines the advantages of flexible laser cutting with the speed of conventional blanking.

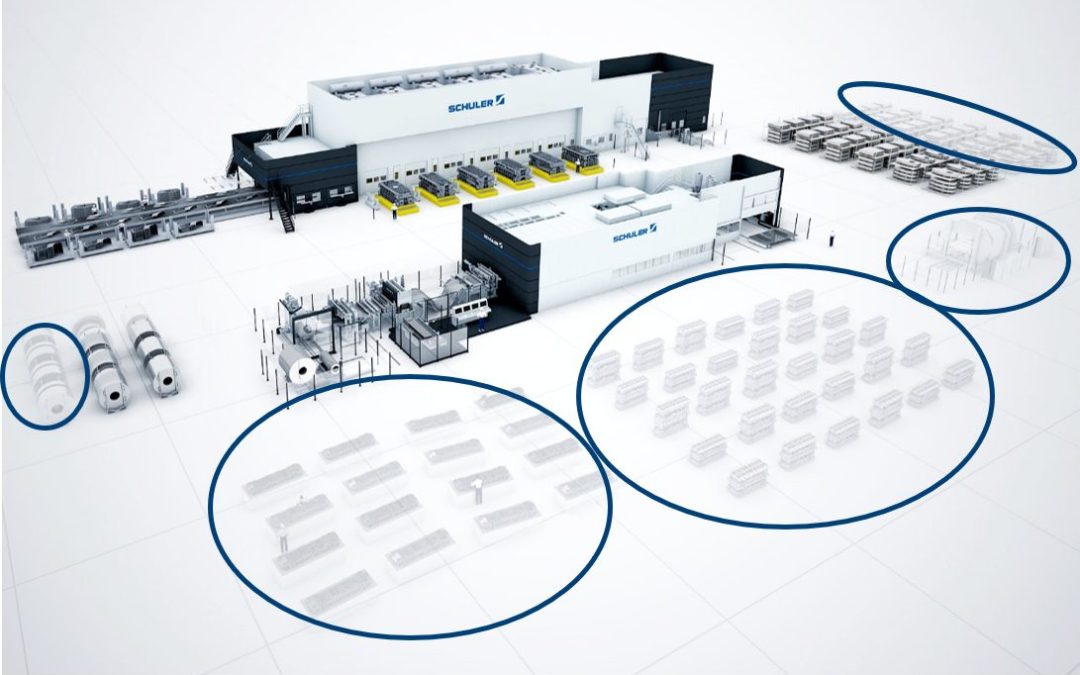
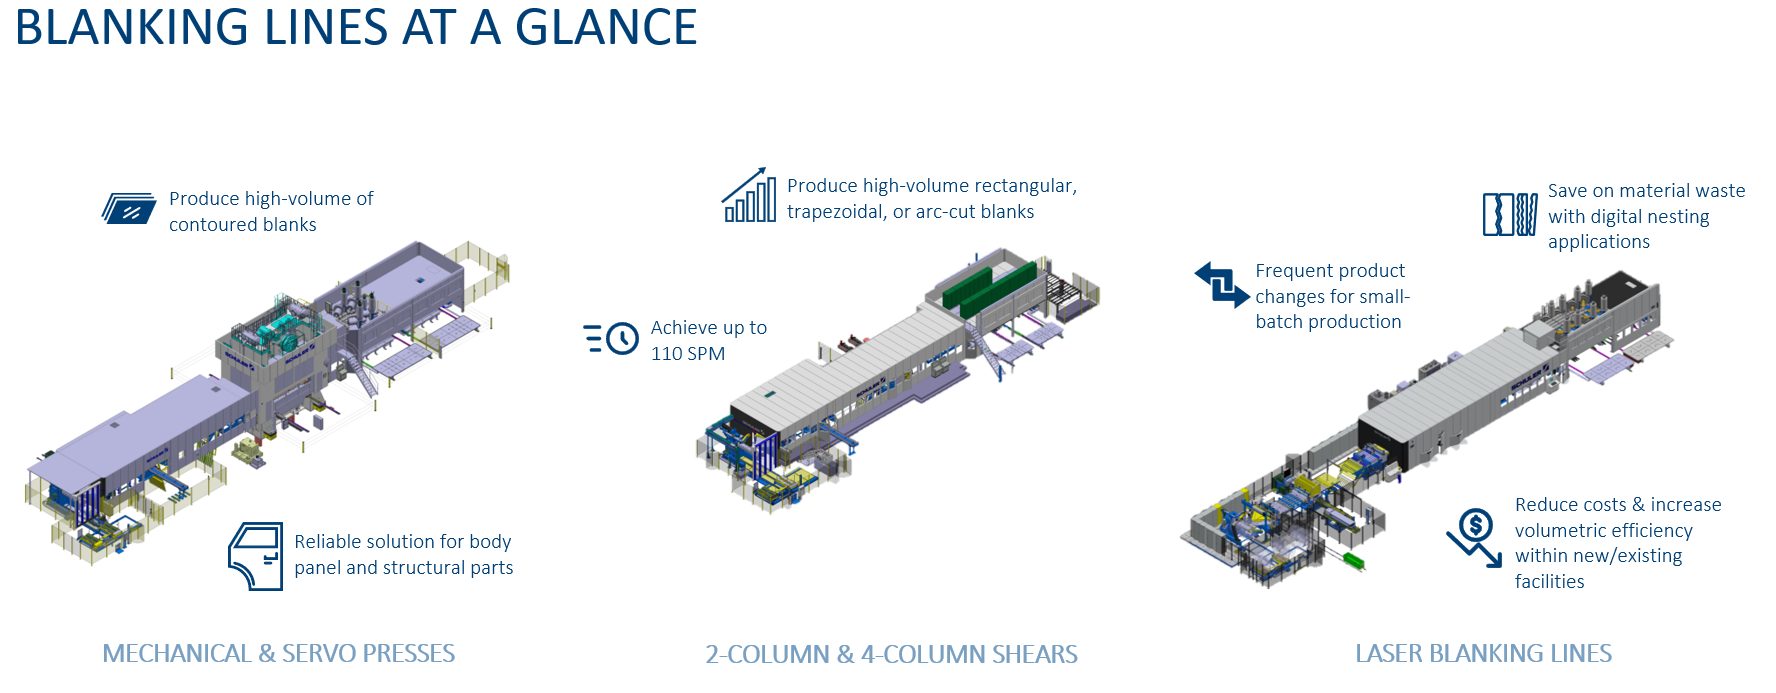
Figure 1 – Laser blanking lines offer additional flexibility over conventional blanking approaches.
Laser blanking technology addresses market challenges such as frequent die changes, the need to increase capacity, and improving plant floor utilization, material utilization, and downstream processes.
LASER BLANKING ELIMINATES FREQUENT DIE CHANGES
It is important to remember that there are no dies with laser blanking technology, and no dies mean no die changes. Overall Equipment Effectiveness (OEE) of up to 80% can be achieved with laser blanking technology. In fact, 4 to 6 million parts per year of various materials are produced with the help of DFT—including mild steel, high-strength steel, and advanced high-strength steel. Even processing press-hardening steels with an aluminum-silicon coating is possible with laser blanking. Surface and cutting quality can be maintained over this spectrum of steel grades. Laser blanking technology can even achieve effective small batch production of Class A outer body panels and structural parts typically up to 3mm thick.
LASER BLANKING INCREASES PLANT OUTPUT
Competitive high-speed and high-output results can be achieved in multiple ways with laser blanking technology. The above-ground coil-fed line, optimized for short setup time, can handle coils with material widths up to 2,150 mm, weighing up to 30 tons. The material transport is smooth and controlled, simplifying setup and leading to uninterrupted processing within the laser cell.
There are three highly dynamic and simultaneously moving laser cutting heads within the laser cell of these lines. These laser cutting heads cut the programmed blank contour from a continuously moving material coil. Cutting speeds can exceed 100 meters per minute. The material is protected against any process contamination throughout the cutting process by custom-designed cutting clearance and material transport.
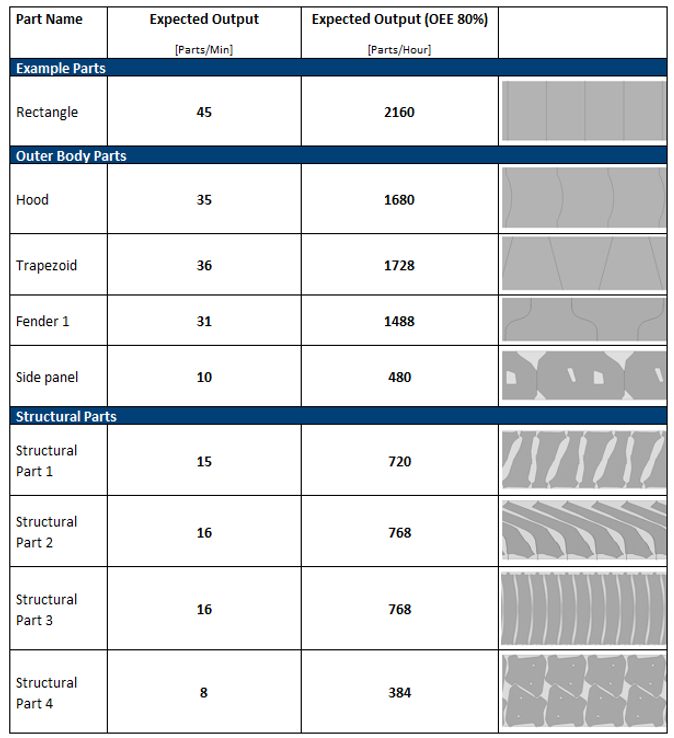
Figure 2 reveals the high-speed and high-output results for outer body parts. Each part is measured by improved output per minute and hour to achieve an OEE of 80%. Laser blanking lines can achieve up to 45 parts per minute and reduce costs per blank.

Figure 2: High productivity achieved with laser blanking
LASER BLANKING IMPROVES MATERIAL UTILIZATION
Up to 90% of blank costs are determined by the material price. The most significant leverage would be to reduce scrap and save on materials. Schuler conducted research based on the production of 300,000 cars per year, at 350 kg per car and $1,000 USD per ton of steel to provide a realistic inside look at how much cost savings can be achieved with laser blanking. The result was $1 Million USD saved with just 1% of material savings. This is extremely significant as material costs keep increasing.
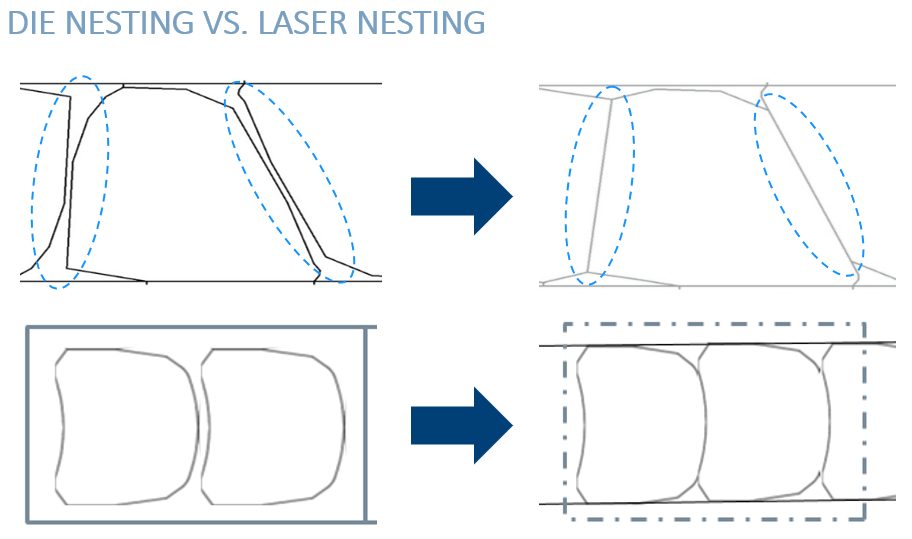
Laser blanking is the digital way to cut blanks. All that’s needed to create a blanking program is a drawing to be loaded and a material to be selected. The part-specific program can be created offline and modified at any time. It is designed to create optimal combinations of material utilization and output—resulting in a high level of flexibility that significantly reduces development time for optimal blanks while also allowing for need-based production. This makes production planning easier, and it also opens the door to continuous contour optimizations for the forming process. Additionally, laser cutting does not require any gaps between individual parts due to smart nesting capabilities that cannot be achieved in comparison to die nesting or flatbed laser nesting. The combined smart, flexible nesting functions unlock new potential for material savings. Manufacturers can optimize individual blanks and eliminate the separating strip or connection bridges. Scrap savings in the forming process can also be achieved as there are no geometric restrictions due to cutting dies, and manufacturers can continuously optimize or adapt parts.
Figure 3 showcases the comparison of die nesting (the two graphics on the left) versus a laser-optimized blank contour and material savings via smart, laser blanking line nesting (the two images on the right).

Figure 3: Die nesting (left) compared with laser-optimized blank contours highlighting potential material savings (right)
Overall, laser blanking lines can have an equivalent throughput to conventional blanking lines, but laser blanking lines can achieve up to 10% greater material utilization.
You can read the full Case Study, including how laser blanking reduces infrastructure costs and improves downstream processes here: Laser Blanking Case Study
Schuler will present laser blanking technology, along with a variety of digital tools that create the “Press Shop of the Future” at FABTECH Chicago 2023 (booth # D41306). Tiago Vasconcellos, Sales Director at Schuler North America, will present “How Smart is Your Press Shop?” during FABTECH’s Educational Conference. The presentation will use The Smart Press Shop, a newly formed joint venture between Porsche and Schuler, as an exemplary case study for smart manufacturing standards. Attendees will discover innovative and practical ways to incorporate digitalization into production and become a state-of-the-art stamping facility directly from Schuler.
Schuler offers customized cutting-edge technology in all areas of forming—from the networked press to press shop planning. In addition to presses, Schuler’s products include automation, dies, process know-how, and service for the entire metalworking industry. Schuler’s Digital Suite brings together solutions for networking forming technology and is continuously being developed to further improve line productivity and availability. Schuler customers include automotive manufacturers and suppliers, as well as companies in the forging, household appliance, and electrical industries. Schuler presses are minting coins for more than 180 countries. Founded in 1839 at the Göppingen, Germany headquarters, Schuler has approximately 5,000 employees at production sites in Europe, China and the Americas, as well as service companies in more than 40 countries. The company is part of the international technology group ANDRITZ.
Schuler’s global portfolio of world-renowned brands include BCN (Bliss Clearing Niagara) Technical Services, Müller Weingarten, Beutler, Umformtechnik Erfurt, SMG Pressen, Hydrap Pressen, Wilkins & Mitchell, Bêché, Spiertz Presses, Farina Presse, Liebergeld, Peltzer & Ehlers, Schleicher, and Sovema Group.
Schuler North America (Schuler), headquartered in Canton, Michigan, is the North American subsidiary of Schuler Group. Schuler provides new equipment, spare parts, and a portfolio of lifecycle services for all press systems—including preventative maintenance, press shop design and optimization, turnkey installations, retrofits for existing systems, and localized production and service. Schuler’s best-in-class position in the metalworking and materials industry serves automotive manufacturers and tier suppliers, as well as home appliance, electronics, forging, and other industries.
