![Uniform Elongation]()
Mechanical Properties
During a tensile test, the elongating sample leads to a reduction in the cross-sectional width and thickness. The shape of the engineering stress-strain curve showing a peak at the load maximum (Figure 1) results from the balance of the work hardening which occurs as metals deform and the reduction in cross-sectional width and thickness which occurs as the sample dogbone is pulled in tension. In the upward sloping region at the beginning of the curve, the effects of work hardening dominate over the cross-sectional reduction. Starting at the load maximum (ultimate tensile strength), the reduction in cross-sectional area of the test sample overpowers the work hardening and the slope of the engineering stress-strain curve decreases. Also beginning at the load maximum, a diffuse neck forms usually in the middle of the sample.

Figure 1: Engineering stress-strain curve from which mechanical properties are derived.
The elongation at which the load maximum occurs is known as Uniform Elongation. In a tensile test, uniform elongation is the percentage the gauge length elongated at peak load relative to the initial gauge length. For example, if the gauge length at peak load measures 61 mm and the initial gauge length was 50mm, uniform elongation is (61-50)/50 = 22%.
Schematics of tensile bar shapes are shown within Figure 1. Note the gauge region highlighted in blue. Up though uniform elongation, the cross-section has a rectangular shape. Necking begins at uniform elongation, and the cross section is no longer rectangular.
Theory and experiments have shown that uniform elongation expressed in true strain units is numerically equivalent to the instantaneous n-value.
Deformation Prior to Uniform Elongation is Not Uniformly Distributed
Conventional wisdom for decades held that there is a uniform distribution of strains within the gauge region of a tensile bar prior to strains reaching uniform elongation. Traditional extensometers calibrated for 50-mm or 80-mm gauge lengths determine elongation from deformation measured relative to this initial length. This approach averages results over these spans.
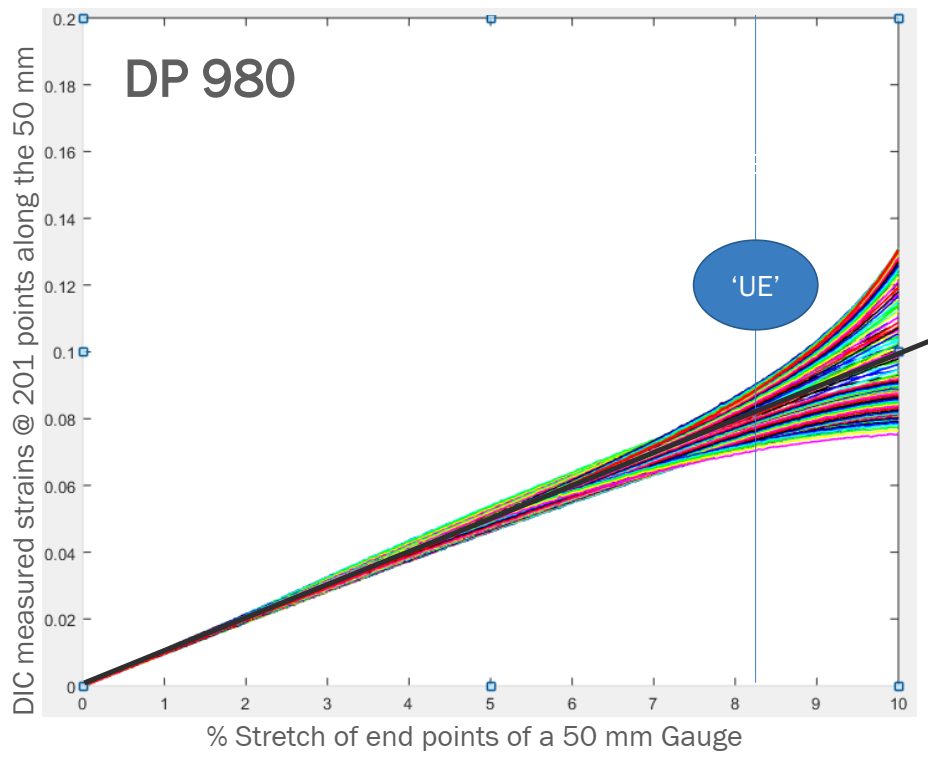
The advent of Digital Image Correlation (DIC) and advanced processing techniques allowed for a closer look. A studyS-113 released in 2021 clearly showed that each of the 201 data points monitored within a 50 mm gauge length (virtual gauge length of 0.5-mm) experiences a unique strain evolution, with differences starting before uniform elongation.

Figure 2: Strain evolution of the 201 points on the DP980 tensile-test specimen exhibits divergence beginning before uniform elongation—counter to conventional thinking.S-113
![Uniform Elongation]()
Mechanical Properties
Elastic Modulus (Young’s Modulus)
When a punch initially contacts a sheet metal blank, the forces produced move the sheet metal atoms away from their neutral state and the blank begins to deform. At the atomic level, these forces are called elastic stresses and the deformation is called elastic strain. Forces within the atomic cell are extremely strong: high values of elastic stress results in only small magnitudes of elastic strain. If the force is removed while causing only elastic strain, atoms return to their original lattice position, with no permanent or plastic deformation. The stresses and strains are now at zero.
A stress-strain curve plots stress on the vertical axis, while strain is shown on the horizontal axis (see Figure 2 in Mechanical Properties). At the beginning of this curve, all metals have a characteristic linear relationship between stress and strain. In this linear region, the slope of elastic stress plotted against elastic strain is called the Elastic Modulus or Young’s Modulus or the Modulus of Elasticity, and is typically abbreviated as E. There is a proportional relationship between stress and strain in this section of the stress-strain curve; the strain becomes non-proportional with the onset of plastic (permanent) deformation (see Figure 1).

Figure 1: The Elastic Modulus is the Slope of the Stress-Strain Curve before plastic deformation begins.
The slope of the modulus line depends on the atomic structure of the metal. Most steels have an atomic unit cell of nine iron atoms – one on each corner of the cube and one in the center of the cube. This is described as a Body Centered Cubic (BCC) structure. The common value for the slope of steel is 210 GPa (30 million psi). In contrast, aluminum and many other non-ferrous metals have 14 atoms as part of the atomic unit cell – one on each corner of the cube and one on each face of the cube. This is referred to as a Face Centered Cubic (FCC) atomic structure. Many aluminum alloys have an elastic modulus of approximately 70 GPa (10 million psi).
Under full press load at bottom dead center, the deformed panel shape is the result of the combination of elastic stress and strain and plastic stress and strain. Removing the forming forces allows the elastic stress and strain to return to zero. The permanent deformation of the sheet metal blank is the formed part coming out of the press, with the release of the elastic stress and strain being the root cause of the detrimental shape phenomenon known as springback. Minimizing or eliminating springback is critical to achieve consistent stamping shape and dimensions.
Depending on panel and process design, some elastic stresses may not be eliminated when the draw panel is removed from the draw press. The elastic stress remaining in the stamping is called residual stress or trapped stress. Any additional change to the stamped panel condition (like trimming, hole punching, bracket welding, reshaping, or other plastic deformation) may change the amount and distribution of residual stresses and therefore potentially change the stamping shape and dimensions.
The amount of springback is inversely proportional to the modulus of elasticity. Therefore, for the same yield stress, steel with three times the modulus of aluminum will have one-third the amount of springback.
Elastic Modulus Variation and Degradation
Analysts often treat the Elastic Modulus as a constant. However, Elastic Modulus varies as a function of orientation relative to the rolling direction (Figure 2). Complicating matters is that this effect changes based on the selected metal grade.

Figure 2: Modulus of Elasticity as a Function of Orientation for Several Grades (Drawing Steel, DP 590, DP 980, DP 1180, and MS 1700) D-11
It is well known that the Bauschinger Effect leads to changes in the Elastic Modulus, and therefore impacts springback. Elastic Modulus determined in the loading portion of the stress-strain curve differs from that determined in the unloading portion. In addition, increasing prestrain lowers the Elastic Modulus, with significant implications for forming and springback simulation accuracy. In DP780, 11% strain resulted in a 28% decrease in the Elastic Modulus, as shown in Figure 3.K-7

Figure 3: Variation of the loading and unloading apparent modulus with strain for DP780K-7
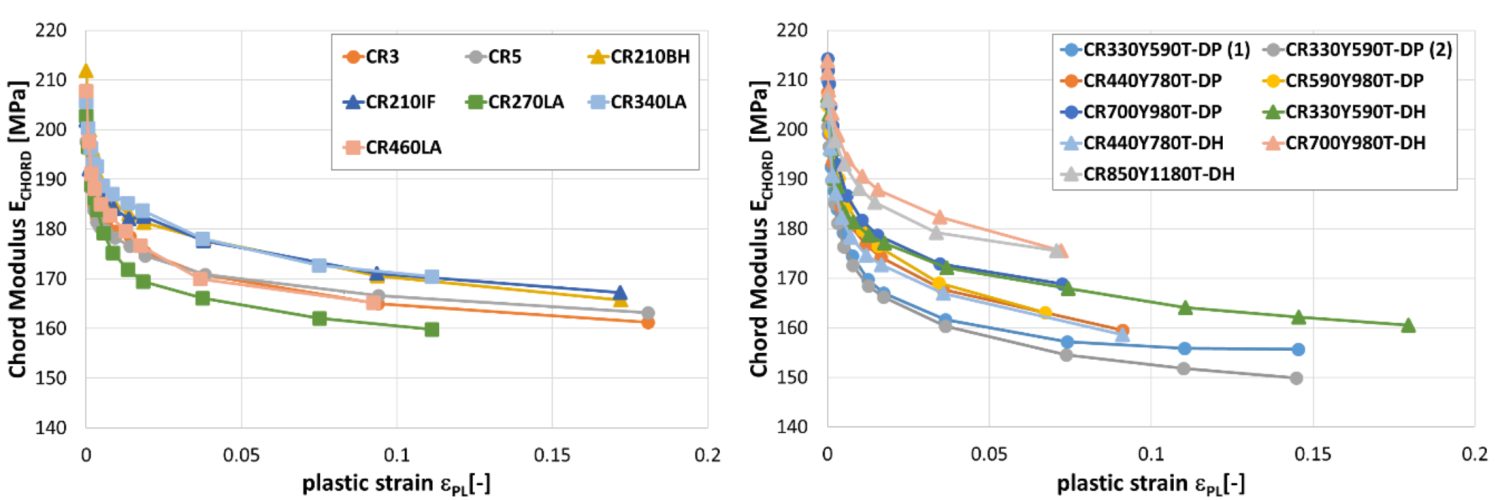
Another study documented the modulus degradation for many steel grades, including mild steel, conventional high strength steels, and several AHSS products.W-10 Data in some of the grades is limited to small plastic strains, since valid data can be obtained from uniaxial tensile testing only through uniform elongation.

Reduction in chord modulus for mild steels and conventional high strength steels (left) and for DP and DH steels (right).W-10

Reduction in chord modulus for CP, CH and MS steels (left) and for a selected of hot rolled steels (right).W-10

Mechanical Properties
M-Value, Strain Rate Sensitivity
All metals strengthen as they are deformed through a process called work hardening. However, the degree of strengthening may change as a function of the speed at which they are tested. In these cases, when local necking starts, the strain rate in the necked area is different in the surrounding non-necking region.
With negative strain-rate sensitivity, as is the case with many aluminium alloys, the necked region is weaker than the surrounding area. Fracture occurs with very little additional strain after necking initiation.
With positive strain-rate sensitivity, the necked region is stronger than the surrounding area. This is the basis for many steel alloys having a total elongation to fracture that is nearly double that of uniform elongation.
This strain-rate sensitivity is described by the exponent, m, in the modified power law equation:
 Equation 1
where έ is the strain rate and m is the strain rate sensitivity.
To characterize the strain rate sensitivity, medium strain rate tests were conducted at strain rates ranging from 10-3/sec (commonly found in tensile tests) to 103/sec. For reference, 101/sec approximates the strain rate observed in a typical stamping. Both yield strength and tensile strength increase with increasing strain rate, as indicated Figures 1 and 2.

Figure 1: Influence of Strain Rate on Yield Strength.Y-1

Figure 2: Influence of Strain Rate on Tensile Strength.Y-1
Up to a strain rate of 101/sec, both the YS and UTS only increased about 16-20 MPa per order of magnitude increase in strain rate. These increases are less than those measured for low strength steels. This means the YS and UTS values active in the sheet metal are somewhat greater than the reported quasi-static values traditionally reported. However, the change in YS and UTS from small changes in press strokes per minute are very small and are less than the changes experienced from one coil to another.
The change in n-value with increase in strain rate is shown in Figure 3. Steels with YS greater than 300 MPa have an almost constant n-value over the full strain rate range, although some variation from one strain rate to another is possible.

Figure 3: Influence of Strain Rate on n-value.Y-1
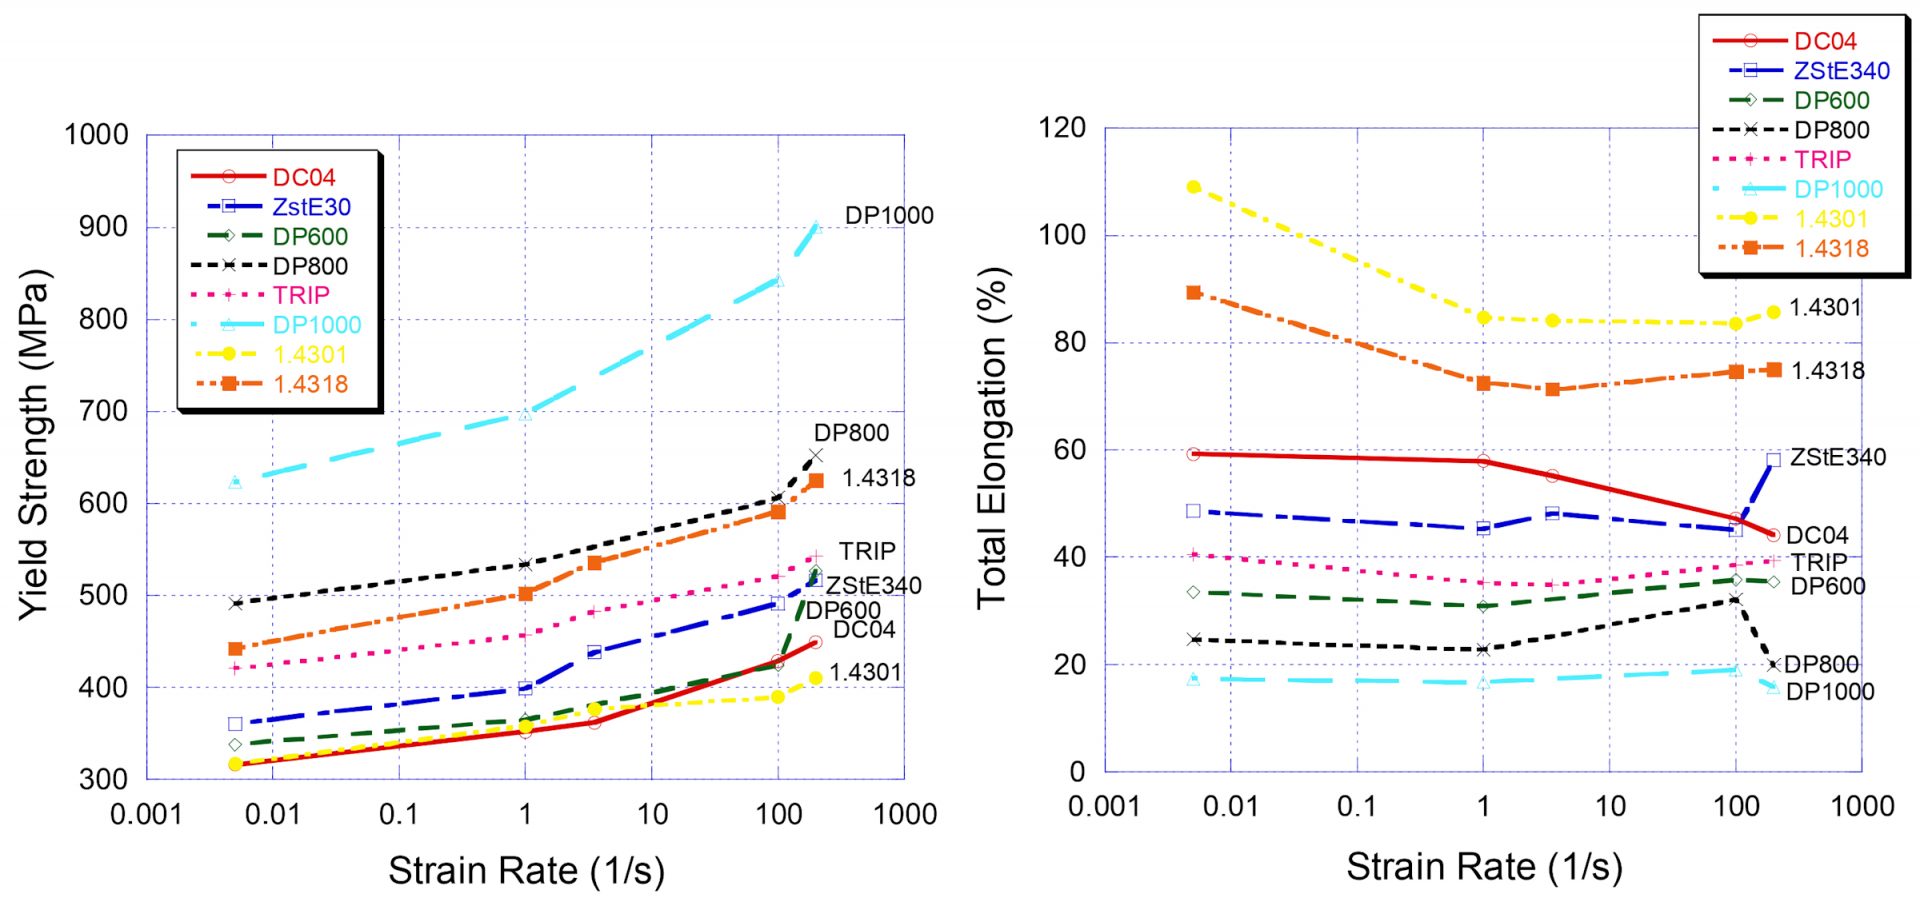
Similar behavior was noted in another studyB-22 that included one TRIP steel and three DP steels. Here, DP1000 showed a 50% increase in yield strength when tested at 200/sec compared with conventional tensile test speeds. Strain rate has little influence on the elongation of AHSS at strain rates under 100/sec.

Figure 4: Relationship between strain rate and yield strength (left) and elongation (right). Citation B-22, as reproduced in Citation D-44
Figure 5 shows the true stress-true strain curves for a processed Press Hardened Steel tested at different strain rates. The yield stress increases approximately five MPa for one order of magnitude increase in strain rate.

Figure 5: True stress-strain curves at different strain rates for 1mm thick Press Hardening Steel (PHS) after heat treatment and quenching.V-1
The tensile and fracture response of different grades is a function of the strain rate and cannot be generalized from conventional tensile tests. This has significant implications when it comes to predicting deformation behavior during the high speeds seen in automotive crash events. See our page on high speed testing for more details.
![Uniform Elongation]()
Mechanical Properties
Introduction to Mechanical Properties
Tensile property characterization of mild and High Strength Low Alloy steel (HSLA) traditionally was tested only in the rolling direction and included only yield strength, tensile strength, and total elongation. Properties vary as a function of orientation relative to the rolling (grain) direction, so testing in the longitudinal (0°), transverse (90°), and diagonal (45°) orientations relative to the rolling direction is done to obtain a better understanding of metal properties (Figure 1).
A more complete perspective of forming characteristics is obtained by also considering work hardening exponents (n-values) and anisotropy ratios (r-values), both of which are important to achieve improved and consistent formability.

Figure 1. Tensile Test Sample Orientation Relative to Rolling Direction
Hardness readings are sometimes included in this characterization, but hardness readings are of little use in assessing formability requirements for sheet steel. Hardness testing is best used to assess the heat treatment quality and durability of the tools used to roll, stamp, and cut sheet metal.
The formability limits of different grades of conventional mild and HSLA steels were learned by correlating press performance with as-received mechanical properties. This information can be fed into computer forming simulation packages to run tryouts and troubleshooting in a virtual environment. Many important parameters can be measured in a tensile test, where the output is a stress-strain curve (Figure 2).

Figure 2: Representative Stress-Strain Curve Showing Some Mechanical Properties
Press shop behavior of Advanced High-Strength Steels is more complex. AHSS properties are modified by changing chemistry, annealing temperature, amount of deformation, time, and even deformation path. With new microstructures, these steels become “Designer Steels” with properties tailored not only for initial forming of the stamping but in-service performance requirements for crash resistance, energy absorption, fatigue life, and other needs. An extended list of properties beyond a conventional tensile test is now needed to evaluate total performance with virtual forming prior to cutting the first die, to ensure ordering and receipt of the correct steel, and to enable successful troubleshooting if problems occur.
With increasing use of advanced steels for value-added applications, combined with the natural flow of more manufacturing occurring down the supply chain, it is critical that all levels of suppliers and users understand both how to measure the parameters and how they affect the forming process.
Highlights
-
- The multiphase microstructure in Advanced High Strength Steels results in properties that change as the steel is deformed. An in-depth understanding of formability properties is necessary for proper application of these steels.
- Tensile test data characterizes the ability of a steel grade to perform with respect to global (tensile and necking) formability. Different tests like hole expansion and bending characterize performance at cut edges or bend radii.
- DP steels have higher n-values in the initial stages of deformation compared to conventional HSLA grades. These higher n-values help distribute deformation more uniformly in the presence of a stress gradient and thereby help minimize strain localization that would otherwise reduce the local thickness of the formed part.
- The n-value of certain AHSS grades, including dual phase steels, is not constant: there is a higher n-value at lower strains followed by a drop as strain increases.
- TRIP steels have a smaller initial increase in n-value than DP steels during forming but sustain the increase throughout the entire deformation process. Part designers can use these steels to achieve more complex geometries or further reduce part thickness for weight savings.
- TRIP steels have retained austenite after forming that transforms into martensite during a crash event, enabling improved crash performance.
- Normal anisotropy values (rm) approximately equal to 1 are a characteristic of all hot-rolled steels and most cold-rolled and coated AHSS and conventional HSLA steels.
- AHSS work hardens with increasing strain rate, but the effect is less than observed with mild steel. The n-value changes very little over a 105 (100,000x) increase in strain rate.
- As-received AHSS does not age-harden in storage.
- DP and TRIP steels have substantial increase in YS due to a bake hardening effect, while conventional HSLA steels have almost none.
![Uniform Elongation]()
Mechanical Properties
N-Value, The Strain Hardening Exponent
Metals get stronger with deformation through a process known as strain hardening or work hardening, resulting in the characteristic parabolic shape of a stress-strain curve between the yield strength at the start of plastic deformation and the tensile strength.
Work hardening has both advantages and disadvantages. The additional work hardening in areas of greater deformation reduces the formation of localized strain gradients, shown in Figure 1.

Figure 1: Higher n-value reduces strain gradients, allowing for more complex stampings. Lower n-value concentrates strains, leading to early failure.
Consider a die design where deformation increased in one zone relative to the remainder of the stamping. Without work hardening, this deformation zone would become thinner as the metal stretches to create more surface area. This thinning increases the local surface stress to cause more thinning until the metal reaches its forming limit. With work hardening the reverse occurs. The metal becomes stronger in the higher deformation zone and reduces the tendency for localized thinning. The surface deformation becomes more uniformly distributed.
Although the yield strength, tensile strength, yield/tensile ratio and percent elongation are helpful when assessing sheet metal formability, for most steels it is the n-value along with steel thickness that determines the position of the forming limit curve (FLC) on the forming limit diagram (FLD). The n-value, therefore, is the mechanical property that one should always analyze when global formability concerns exist. That is also why the n-value is one of the key material related inputs used in virtual forming simulations.
Work hardening of sheet steels is commonly determined through the Holloman power law equation:
 Equation 1
where
σ is the true flow stress (the strength at the current level of strain),
K is a constant known as the Strength Coefficient, defined as the true strength at a true strain of 1,
ε is the applied strain in true strain units, and
n is the work hardening exponent
Rearranging this equation with some knowledge of advanced algebra shows that n-value is mathematically defined as the slope of the logarithmic true stress – true strain curve. This calculated slope – and therefore the n-value – is affected by the strain range over which it is calculated. Typically, the selected range starts at 10% elongation at the lower end to the lesser of uniform elongation or 20% elongation as the upper end. This approach works well when n-value does not change with deformation, which is the case with mild steels and conventional high strength steels.
Conversely, many Advanced High-Strength Steel (AHSS) grades have n-values that change as a function of applied strain. For example, Figure 2 compares the instantaneous n-value of DP 350/600 and TRIP 350/600 against a conventional HSLA350/450 grade. The DP steel has a higher n-value at lower strain levels, then drops to a range similar to the conventional HSLA grade after about 7% to 8% strain. The actual strain gradient on parts produced from these two steels will be different due to this initial higher work hardening rate of the dual phase steel: higher n-value minimizes strain localization.

Figure 2: Instantaneous n-values versus strain for DP 350/600, TRIP 350/600 and HSLA 350/450 steels.K-1
As a result of this unique characteristic of certain AHSS grades with respect to n-value, many steel specifications for these grades have two n-value requirements: the conventional minimum n-value determined from 10% strain to the end of uniform elongation, and a second requirement of greater n-value determined using a 4% to 6% strain range.
Plots of n-value against strain define instantaneous n-values, and are helpful in characterizing the stretchability of these newer steels. Work hardening also plays an important role in determining the amount of total stretchability as measured by various deformation limits like Forming Limit Curves.
Higher n-value at lower strains is a characteristic of Dual Phase (DP) steels and TRIP steels. DP steels exhibit the greatest initial work hardening rate at strains below 8%. Whereas DP steels perform well under global formability conditions, TRIP steels offer additional advantages derived from a unique, multiphase microstructure that also adds retained austenite and bainite to the DP microstructure. During deformation, the retained austenite is transformed into martensite which increases strength through the TRIP effect. This transformation continues with additional deformation as long as there is sufficient retained austenite, allowing TRIP steel to maintain very high n-value of 0.23 to 0.25 throughout the entire deformation process (Figure 2). This characteristic allows for the forming of more complex geometries, potentially at reduced thickness achieving mass reduction. After the part is formed, additional retained austenite remaining in the microstructure can subsequently transform into martensite in the event of a crash, making TRIP steels a good candidate for parts in crush zones on a vehicle.
Necking failure is related to global formability limitations, where the n-value plays an important role in the amount of allowable deformation at failure. Mild steels and conventional higher strength steels, such as HSLA grades, have an n-value which stays relatively constant with deformation. The n-value is strongly related to the yield strength of the conventional steels (Figure 3).

Figure 3: Experimental relationship between n-value and engineering yield stress for a wide range of mild and conventional HSS types and grades.K-2
N-value influences two specific modes of stretch forming:
- Increasing n-value suppresses the highly localized deformation found in strain gradients (Figure 1).
A stress concentration created by character lines, embossments, or other small features can trigger a strain gradient. Usually formed in the plane strain mode, the major (peak) strain can climb rapidly as the thickness of the steel within the gradient becomes thinner. This peak strain can increase more rapidly than the general deformation in the stamping, causing failure early in the press stroke. Prior to failure, the gradient has increased sensitivity to variations in process inputs. The change in peak strains causes variations in elastic stresses, which can cause dimensional variations in the stamping. The corresponding thinning at the gradient site can reduce corrosion life, fatigue life, crash management and stiffness. As the gradient begins to form, low n-value metal within the gradient undergoes less work hardening, accelerating the peak strain growth within the gradient – leading to early failure. In contrast, higher n-values create greater work hardening, thereby keeping the peak strain low and well below the forming limits. This allows the stamping to reach completion.
- The n-value determines the allowable biaxial stretch within the stamping as defined by the forming limit curve (FLC).
The traditional n-value measurements over the strain range of 10% – 20% would show no difference between the DP 350/600 and HSLA 350/450 steels in Figure 2. The approximately constant n-value plateau extending beyond the 10% strain range provides the terminal or high strain n-value of approximately 0.17. This terminal n-value is a significant input in determining the maximum allowable strain in stretching as defined by the forming limit curve. Experimental FLC curves (Figure 4) for the two steels show this overlap.

Figure 4: Experimentally determined Forming Limit Curves for mils steel, HSLA 350/450, and DP 350/600, each with a thickness of 1.2mm.K-1
Whereas the terminal n-value for DP 350/600 and HSLA 350/450 are both around 0.17, the terminal n-value for TRIP 350/600 is approximately 0.23 – which is comparable to values for deep drawing steels (DDS). This is not to say that TRIP steels and DDS grades necessarily have similar Forming Limit Curves. The terminal n-value of TRIP grades depends strongly on the different chemistries and processing routes used by different steelmakers. In addition, the terminal n-value is a function of the strain history of the stamping that influences the transformation of retained austenite to martensite. Since different locations in a stamping follow different strain paths with varying amounts of deformation, the terminal n-value for TRIP steel could vary with both part design and location within the part. The modified microstructures of the AHSS allow different property relationships to tailor each steel type and grade to specific application needs.
Methods to calculate n-value are described in Citations A-43, I-14, J-13.
