Resistance Spot Welding, Resistance Welding Processes
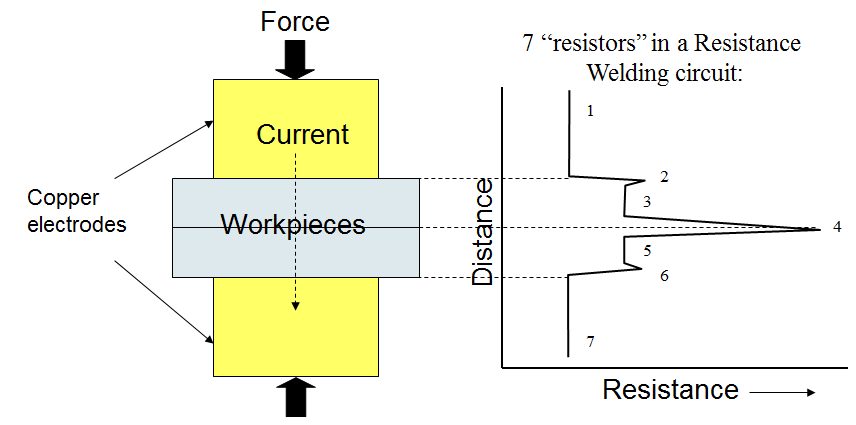
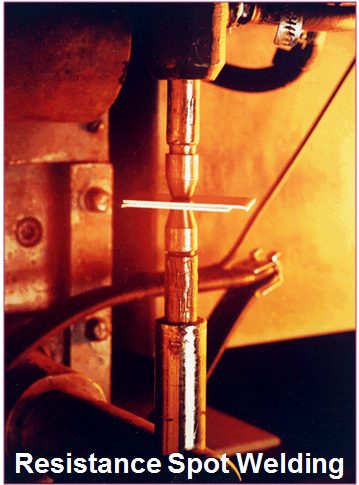
The Resistance Spot Welding (RSW) process is often used as a model to explain the fundamental concepts behind most resistance welding processes. Figure 1 shows a standard Resistance Spot Welding arrangement in which two copper electrodes apply force and pass current through the sheets being welded. If the sheets are steel, the resistance to the flow of current of the sheets will be much higher than the copper electrodes, so the steel will get hot while the electrodes remain relatively cool. But another important characteristic exists that is critical to most resistance welding processes – the contact resistance between the parts (or sheets) being welded. As indicated on the figure, the highest resistance to the flow of current is where the sheets meet (“Resistance” 4). This fact allows a weld nugget to begin forming and grow exactly where it is needed – between the sheets.
The figure depicts the flow of current from one electrode to the other as an electrical circuit that contains seven “resistors”. Resistors 1 and 7 represent the bulk resistance of the copper electrodes, Resistors 2 and 6 represent the contact resistance between the electrodes and the sheets, Resistors 3 and 5 represent the bulk resistance of the sheets, and Resistor 4, as mentioned, represents the contact resistance between the sheets. Another fact that works strongly in the favor of resistance welding of steel is that as the steel is heated, its resistivity relative to copper increases even more. So, the initial contact resistance effectively heats the surrounding area which is in turn heated more rapidly because its resistance is higher since it is hotter. As a result, heating and weld nugget formation can occur quite rapidly. A typical weld time for RSW of steel is approximately 1/5 of a second. The current required in resistance welding is much higher than arc welding, and it is in the range of 8-15 kA.

Figure 1: Resistances associated with steel Resistance Spot Welding.
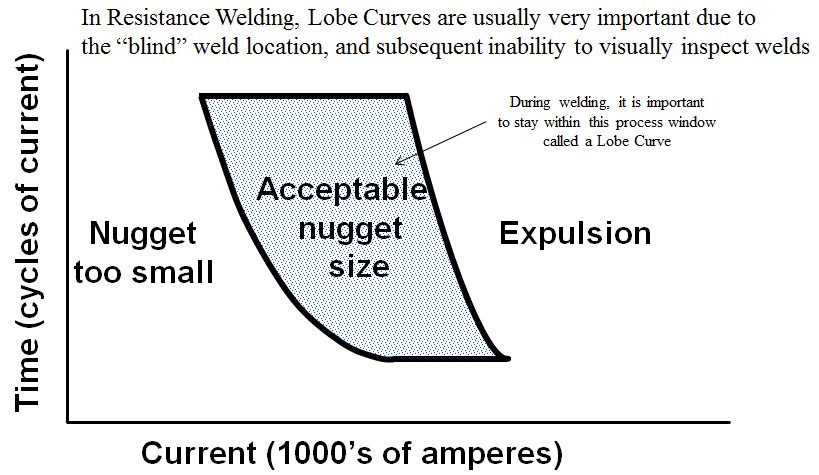
Most welding processes produce welds that provide strong visible evidence of weld quality, so visual examination is often an important approach to verifying the quality of the weld. However, with most resistance welding processes visible examination is not possible due to the “blind” weld location between the sheets or parts being welded. As a result, maintaining weld quality with processes such as Resistance Spot Welding is highly dependent on what is known as a lobe curve (Figure 2), which is basically a process window for Resistance Spot Welding. The lobe curve represents ranges of weld current and time that will produce a spot weld nugget size that has acceptable mechanical properties for the intended application. So, weld quality monitoring with resistance welding processes relies highly on the ability to monitor parameters such as current and time. During production, if a weld is made with parameters that fall outside of the lobe curve, the weld is considered unacceptable. Ultrasonic testing is also often used in the automotive industry for Nondestructive Testing (NDT) of the blind location of Resistance Spot Welding.

Figure 2: Resistance welding lobe curve.
RSW Electrode Geometry
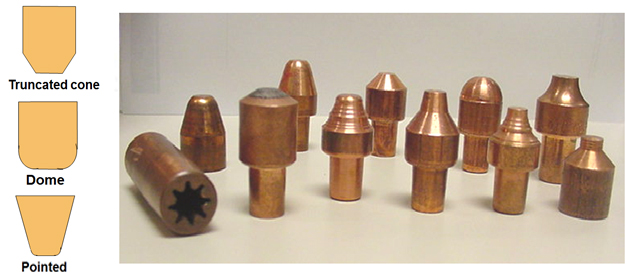
Electrode geometry is a very important consideration with RSW. Figure 3 shows three common shapes, but there are many more options available including unique custom designs for specific applications. The basic electrode geometry is usually selected to improve the electrical-thermal-mechanical performance of an electrode. This is generally a geometry in which the cross-sectional area increases rapidly with distance from the workpiece, thereby providing a good heat sink. The choice of shape may also include considerations such as accessibility to the part and how much surface marking of the part is acceptable. The diameter of the electrode contact area is also a consideration. Too small an area will produce undersized welds with insufficient strength, while too large an area will lead to unstable and inconsistent weld growth characteristics.

Figure 3: Typical RSW electrode geometries (left), example geometries used by automotive manufacturers (right).
Electrodes must be able to conduct current to the part, mechanically constrain the part, and conduct heat from the part. They must be able to sustain high loads at elevated temperatures, while maintaining adequate thermal and electrical conductivity. The choice of electrode alloy for a given application is often dictated by the need to minimize electrode wear. When electrodes wear, they typically begin to “mushroom”, or grow larger in diameter. Electrode wear is accelerated when there is an alloying reaction between the electrode and the part, a common problem when welding Aluminum (Al) and coated steels. As the electrode diameter increases, the current density decreases, resulting in a decrease in the size of the weld. Since the strength of a spot-welded joint is directly related to the size of the weld nugget, electrode wear can be a big problem.
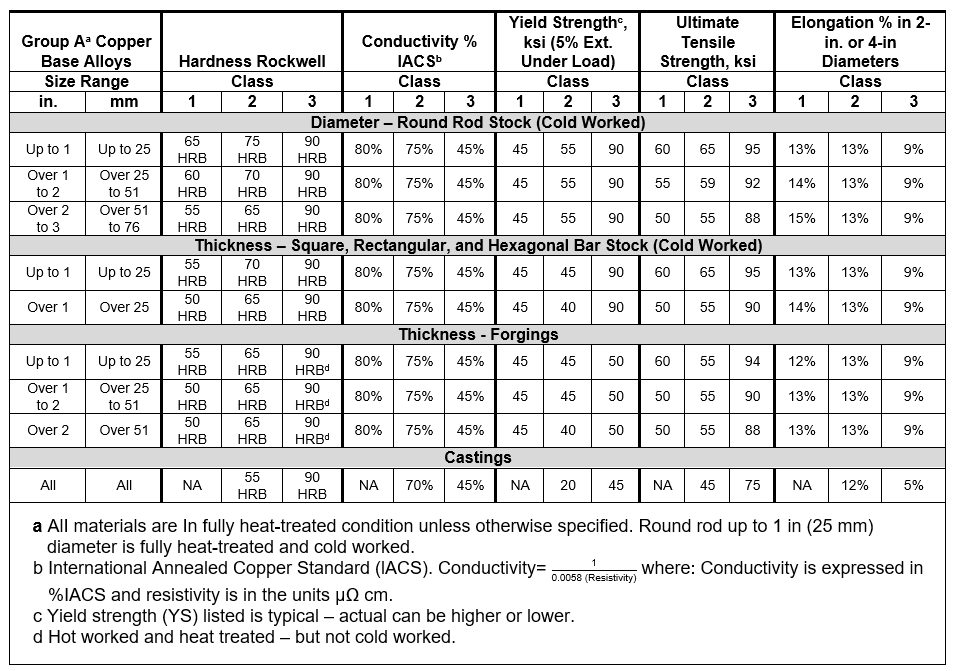
A range of Copper (Cu)-based or refractory-based electrode materials are used depending on the application. The Resistance Welding Manufacturers Association (RWMA) sorts electrode materials into three groups: A, B, and C. Group A contains the most common Cu-based alloys (see Table 1), Group B contains refractory metals and refractory metal composites, and Group C contains specialty materials such as dispersion-strengthened copper. Within the groups, they are further categorized by a class number. The general rule of thumb is as the class number goes up, the electrode strength goes up but the electrical conductivity goes down. When electrical conductivity goes down, the electrode heats more easily, resulting in premature electrode wear. The choice of electrode material involves many factors, but generally higher strength electrodes will be selected when higher strength materials are being welded. It is also important that the electrical and thermal conductivities of the electrode are much higher than those of the material being welded.

Table 1: Minimum mechanical and physical properties of Cu-based alloys for RWMA electrodes.A-18
The two most commonly used electrodes are the Class 1 and 2 electrodes of Group A. Class 1 electrodes [99% copper, 1% cadmium; 60 ksi UTS (forged); conductivity 92% International Annealed Copper Standard (IACS)] offer the highest electrical and thermal conductivity, and are typically used for spot welding Al alloys, magnesium alloys, brass, and bronze. Class 2 [99.2% copper, 0.8% chromium; 62 ksi UTS (forged), 82% IACS] electrodes are general-purpose electrodes for production spot and seam welding of most materials. IACS refers to a copper standard to which the electrodes are compared. Pure Cu has an IACS number of 100%.A-11, P-6, O-1

Joining, Resistance Welding Processes
Fundamentals and Principles of Resistance Welding

Figure 1: Resistance Spot Welding
Resistance welding processes represent a family of industrial welding processes that produce the heat required for welding through what is known as joule (J = I Rt) heating. Much in the way a piece of wire will heat up when current is passed through it, a resistance weld is based on the heating that occurs due to the resistance of current passing through the parts being welded. Since steel is not a very good conductor of electricity, it is easily heated by the flow of current and is an ideal metal for resistance welding processes. There are many resistance welding processes, but the most common is Resistance Spot Welding (RSW) (Figure 1). All resistance welding processes use three primary process variables – current, time, and pressure (or force). The automotive industry makes extensive use of resistance welding, but it is also used in a variety of other industry sectors including aerospace, medical, light manufacturing, tubing, appliances, and electrical.
Types of Resistance Welding
In addition to RSW, three other common resistance welding processes are Resistance Seam (RSEW), Projection (RPW), and Flash Welding (RFW) (Figure 2). The RSEW process uses two rolling electrodes to produce a continuous-welded seam between two sheets. It is often the process of choice for welding leak tight seams needed for automotive fuel tanks. RPW relies on geometrical features machined or formed on the part known as projections to create the required weld current density. RFW is very different from the other processes in that it relies on a rapid succession of high-current-density short current pulses which create what is known as flashing. During flashing, molten metal is violently expelled as the parts are moved together. The flashing action heats the surrounding material which allows a weld to be created when the parts are later brought together with significant pressure. Other important resistance welding processes which are not shown include High-Frequency Resistance Welding (HFRW) (used for producing the seams in welded pipe), and Resistance Upset Welding (RUW).

Figure 2: Common resistance welding processes.
In summary, most resistance welding processes offer the following advantages and limitations:
- Advantages:
- Can weld most metals, but works best with steel
- Extremely fast welding speeds are possible (a typical spot weld is produced in 1/5 of a second)
- Very good for automation and production because of the “self-clamping” aspect of the electrodes
- No filler materials required
- RSW and RSEW are ideal for welding of thin sheets
- Limitations:
- Equipment is much more expensive than arc welding equipment
- Welds cannot be visually inspected (except for RFW and RUW welds)
- The requirement for extremely high currents creates high power line demands
- Equipment is not portable
- Mechanical properties such as tensile and fatigue of welds made from processes such as spot welding can be poor due to the sharp geometrical features at the edge of the weld
- Electrode wear

Joining Dissimilar Materials
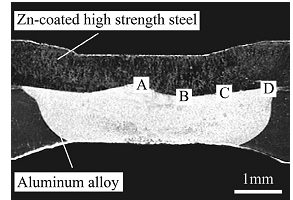
Figure 1 shows a typical cross-section of a resistance spot weld (RSW) joint of 1 mm-thick H220 Zn-coated High-Strength Steel and 1.5 mm-thick 6008-T66 aluminium alloy. Based on resistance spot welding process simulation by ANSYS, the Al/Steel interface temperature is 1120 oC with welding current of 9 kA and welding time of 300 ms. The high interfacial temperature at the Al/Steel interface melts Al alloys and liquid Al alloy wet and spread on the solid steel surface which creates a special brazed joint.

Figure 1: Cross-sectional macrostructure of typical Al/Steel resistance spot welds.Z-4
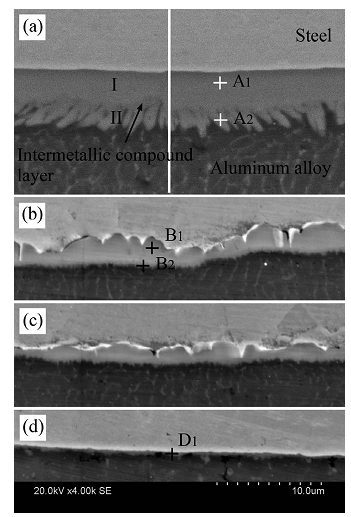
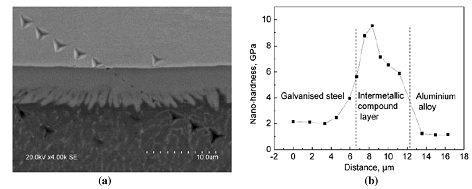
The interaction of liquid Al alloy with solid steel results in the formation of Fe-Al intermetallics (IMCs), which are mainly composed of lath-like/tongue-like shaped η-Fe2Al5 on steel side and coarse/fine needle-like shaped θ-FeAl3/Fe4Al13 on Al alloy side. For the morphology shown in Figure 2, IMCs have higher hardness compared to the Al or steel base metal, with average hardness of approximately 8.7 and 6.5 GPa for Fe2Al5 and Fe4Al13 respectively, while the average hardness of Al and steel near to the interface were 1.1 and 2.1 GPa respectively.Z-2 The distribution of IMCs at the Al/steel interface is non-uniform, with the thickest IMCs at the center of the weld and a reduced IMCs thickness observed approaching the weld periphery.
The formation and growth of IMCs at the Al/Steel interface are mainly affected by the temperature at the Al/Steel interface and reactive diffusion time. With constant welding current of 9 kA, the thickness of the IMCs increase from 2.9 µm to 13 µm as welding time increases from 100 ms to 300 ms. With constant welding time of 250 ms, a rapid increase of the IMCs from 1.5 to 5.6 µm is observed as welding current increases from 5 to 9 kA. Thus, with increasing welding time and/or welding current, IMCs thickness increase due to the higher interfacial temperature and longer reaction time of liquid Al alloy with solid steel. Resistance spot welding of A6008 andH220 Zn-coated High-Strength Steel can achieve a peak strength of 3.3 kN at welding current of 9 kN and welding time of 250 ms with interfacial fracture at the Al/steel interface, since the crack initiates at the brittle IMC compound layer (Fe2Al5) and tends to propagate along the IMC layer.Z-3

Figure 2: SEM images of Al/Steel interface regions in previous figure. (a)-(d) corresponds to region A-D respectively.Z-4

Figure 3: Nanoindentation across H22YD GI high strength steel/A6008-T66 resistance spot weld: (a) Nanoindents; (b) Nanohardness profile.Z-4
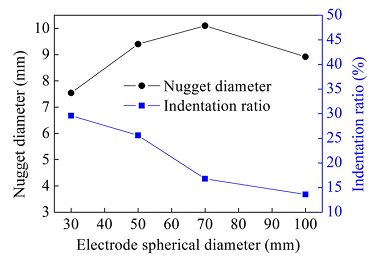
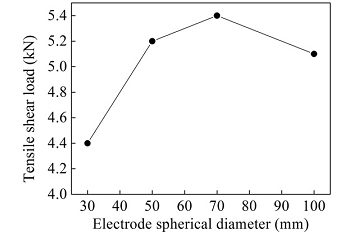
The nugget diameter, IMC compound layer thickness and mechanical properties of Al/steel weld joints can be affected by electrode morphology. For resistance spot welding of A6008-T66 and H22YD galvanized High- Strength Steel, the optimized electrodes were a planar circular electrode with a surface diameter of 10 mm on steel side and a spherical tip with a spherical diameter of 70 mm on Al side.Z-4 Compared to the conventional F type electrode used in the reference studyZ-3, a flat Al/steel interface can be obtained with larger nugget diameter and less welding defects, including shrinkage void and cracks, as shown in Figure 4. A maximum nugget size of 10 mm can be obtained with the optimized electrode morphology with a reduced intermetallic compound thickness of 4 µm (Figure 5). A peak tensile shear strength of 5.4 kN can be achieved with a nugget pull-out failure mode (Figure 6).

Figure 4: Cross-sectional macrostructure of resistance spot weld Al/steel joint with an electrode spherical diameter of 100 mm on Al alloy side.Z-4

Figure 5: Effects of electrode spherical diameter on nugget diameter and indentation ratio of resistance spot weld joints.Z-4

Figure 6: Effects of electrode spherical diameter on tensile shear load of resistance spot weld joints.Z-4
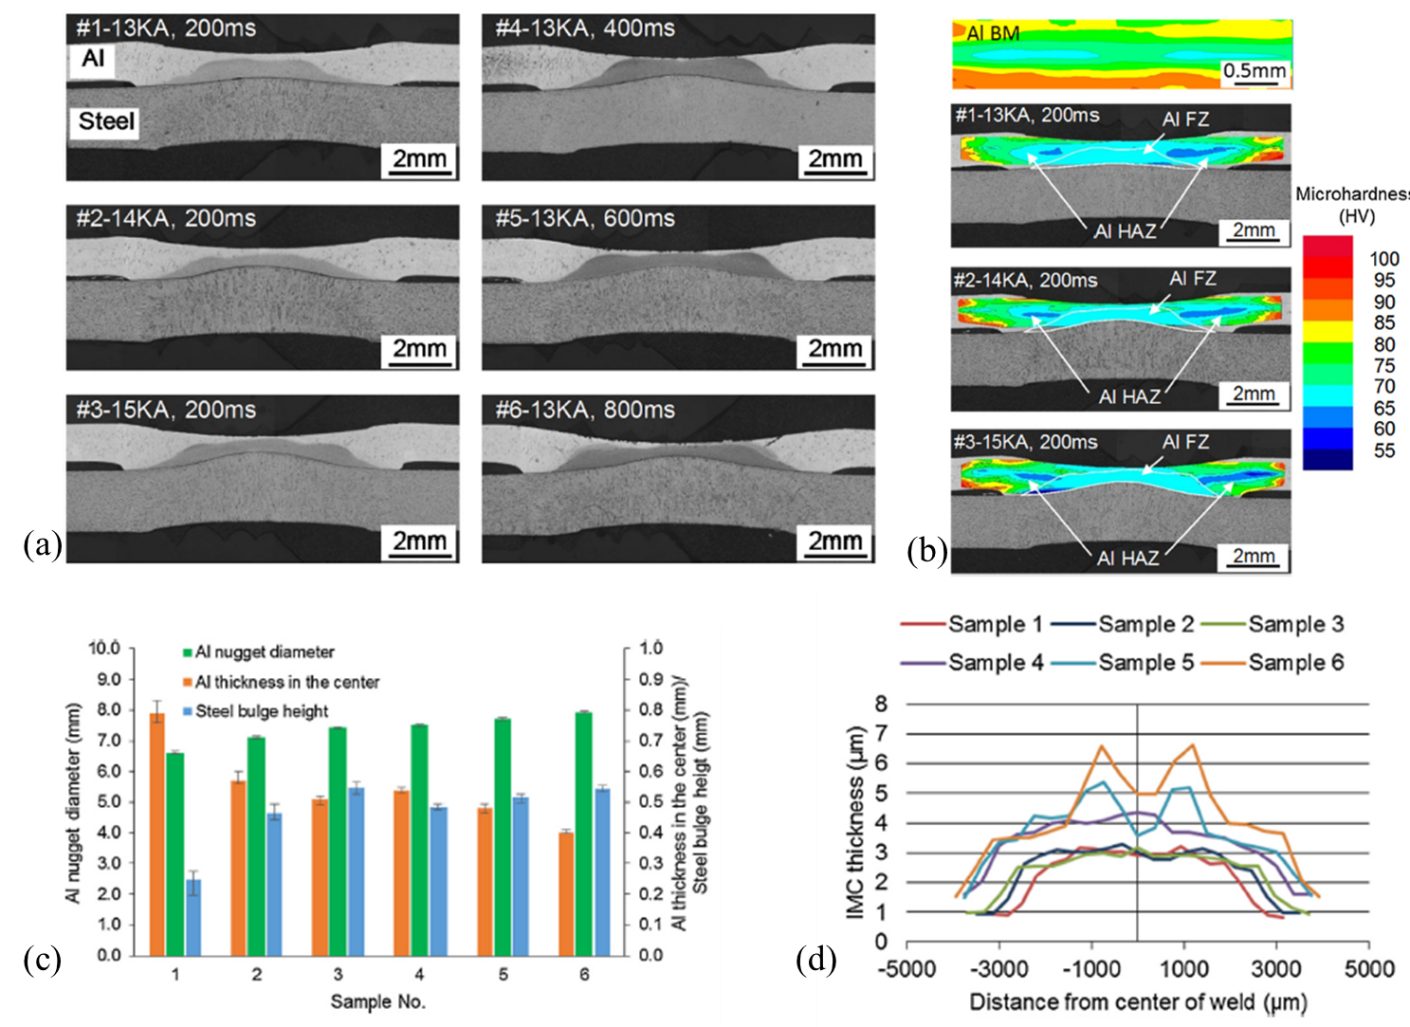
Sigler et al., from General Motors, have shown considerable improvement in the Al/Steel RSW joints that includes multi step direct RSW welding and multi ring, domed-shaped electrodes.S-15, W-14 Welds were carried out using a medium frequency direct current (MFDC) RSW machine via two current pulses, i.e. pre heat pulse of 5 kA and main pulse of 13 kA, 14 kA and 15 kA at various times. Their methodology has shown an importance in the IMC layer thickness and aluminium nugget. Figure 7(a) shows the cross sections of the welds made at the various parameters. More indentation and larger Al nugget diameter are seen at higher times. Figure 7(b) shows that the hardness mapping and the softened region on the both sides of the nugget is observed due to excessive recrystallization. Figure 7(c) shows that the greater the aluminium nugget diameter in the center, the less is the aluminium thickness in the center. Also the IMC layer, as shown in Figure 12(d) increases with the longer weld times. Overall, it was found that the larger aluminium nugget diameter and thicker IMC layer is detrimental for Al/Steel joint integrity.

Figure 7: (a). Cross section micrographs of Al/steel RSWs generated by different welding schedules. ,(b) Microhardness contours of Al BM and Al sheets of Al/steel welds. ,(c) Comparison of Al/steel weld dimensions. & (d) Comparison between lap shear stress and average IMC thickness.S-15
Figure 8 shows the relationship between the IMC layer thickness and peak load failure. At 13 kA, 14 kA and 15 kA as indicated by Sample 1, Sample 2 and Sample 3, respectively, in Figure 8(a). Moreover, it is reported that the thinner IMC layer (<3 µm) resulted in bottom pullout failure. Figure 8(b) shows the governing parameters for interfacial or nugget pull out failure.

Figure 8: (a) Relationship between peak strength and IMC layer, (b) Model depicting the governing failure mode.S-15

Joining Dissimilar Materials
Multi-material design approach involves using High-Strength Steels and low-density materials, such as aluminium. The key idea is to utilize the right material for the right application in such a way that it should fulfill the service requirements and achieve mass efficiency at the same time. However, it is challenging to fully utilize multi-material design concepts due to joining issues.
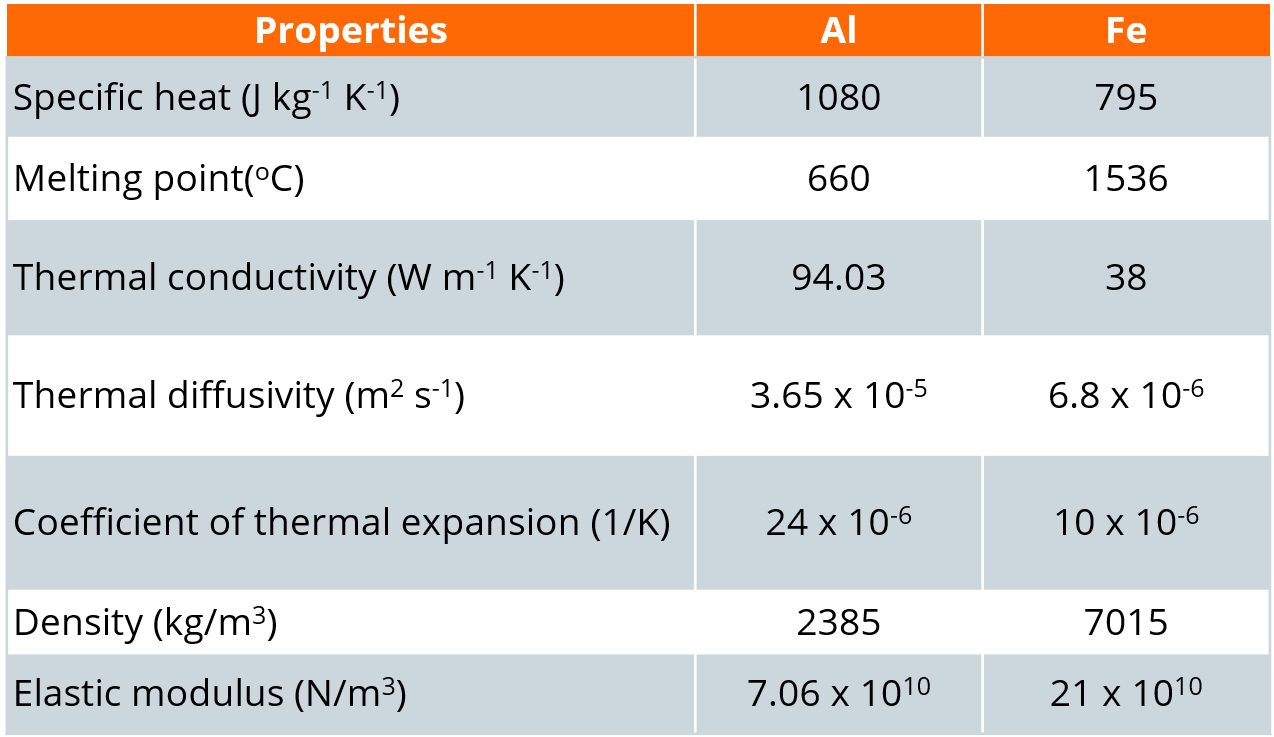
Joining is considered a backbone of any manufactured assembly, since the ultimate reliability and integrity of the manufactured product relies on these joints. Dissimilar materials are difficult to join due to the difference in the physical and thermal properties. For example, one of the most desired combinations is aluminium to steel joints, which is challenging due to the large mismatch in the mechanical properties as shown in Table 1. This Joining section is dedicated specifically to the key joining issues between aluminium and steel.

Table 1: Aluminium vs. Steel Material Mechanical Properties
Currently there are three approaches to joining dissimilar materials: solid-state joining, partial solid-state joining and arc joining. During solid state welding, the peak temperature of the process remains below the melting temperatures of the materials to be joined. Examples include diffusion bonding, ultrasonic welding, magnetic pulse welding, friction stir welding and vaporizing foil actuator welding. In partial solid-state welding processes, the peak temperature goes beyond the melting temperature of one of the materials to be joined (e.g. arc brazing & resistance spot welding). The last process (arc welding) has a peak temperature above the melting temperature of both materials to be joined. Practically it is not used anywhere however, it can be utilized in certain applications where the mismatch between the physical properties of the materials to be joined is little.
Among various joining processes, resistance spot welding (RSW) is one of the most widely used joining process in the automotive and aerospace industry due to its ease of automation and high productivity. Browse the topics below to learn more about joining dissimilar materials.

homepage-featured-top, main-blog
In this edition of AHSS Insights, George Coates and Menachem Kimchi get back to basics with important fundamentals in forming and joining AHSS.
As the global steel industry continues its development of Advanced High-Strength Steels (AHSS), including 3rd Gen products with enhanced formability, we’re reminded that successful application is still dependent on the fundamentals, both in forming and joining. In this blog article, we address some of those forming considerations, as well as highlighting common joining issues in manufacturing.
Forming Considerations
The somewhat lower formability of AHSS compared to mild steels can almost always be compensated for by modifying the design of the component and optimizing blank shape and the forming process.
In stamping plants, we’ve observed inconsistent practices in die set-up and maintenance, surface treatments and lubrication application. Some of these inconsistencies can be addressed through education, via training programs on AHSS Application Guidelines. These Guidelines share best practices and lessons learned to inform new users on different behaviors of specific AHSS products, and the necessary modifications to assist their application success. In addition to new practices, we’ve learned that applying process control fundamentals become more critical as one transitions from mild steels to AHSS, because the forming windows are smaller and less forgiving, meaning these processes don’t tolerate variation well. If your present die shop is reflective of housekeeping issues, such as oil and die scrap on the floor or die beds, you are a candidate for a shop floor renovation or you will struggle forming AHSS products.
Each stamping operation combines three main elements to achieve a part meeting its desired functional requirements:
There is good news, in that our industry is responding with new products and services to improve manufacturing performance and save costs.
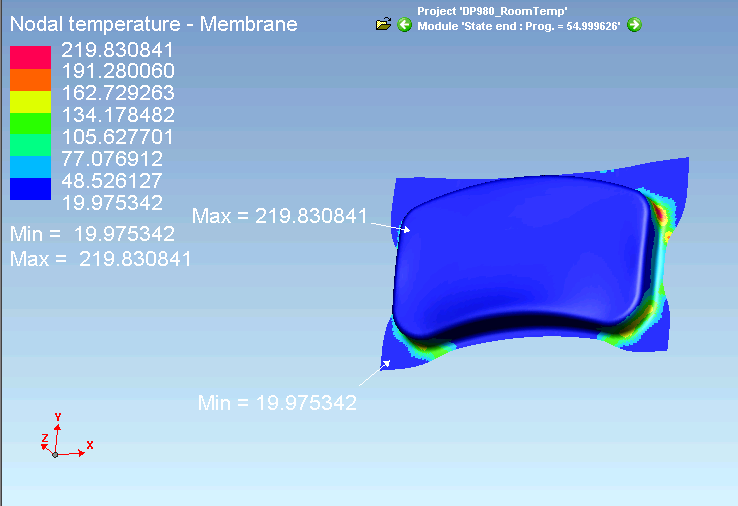
As an example, lubrication application is often overlooked, and old systems may be ineffective. In the forming of AHSS, part temperatures can become excessive, and break down lubricant performance. Figure 1 shows an example of part temperatures from an Ohio State University study conducted with DP 980 steels.O-1

Figure 1: Example Temperature distribution for DP 980 Steel.O-1
Stampers often respond by “flooding” the process with extra lubricant, thinking this will solve their problem. Instead, lubricant viscosity and high temperature stability are the most important considerations in the lubricant selection, and new types exist to meet these challenges. Also, today there are new lubrication controllers that can finely control and disperse wet lubricants evenly across the steel strip, or in very specific locations, if forming requirements are localized. These enable better performance while minimizing lubricant waste (saving cost), a win-win for the pressroom.
Similarly, AHSS places higher demands on tool steels used in forming and cutting operations. In forming applications, galling, adhesive wear and plastic deformation are the most common failure mechanisms. Surface treatments such as PVD, CVD and TD coatings applied to the forming tool are effective at preventing galling. Selection of the tool steel and coating process used for forming AHSS will largely depend on the:
- Strength and thickness of the AHSS product,
- Steel coating,
- Complexity of the forming process, and
- Number of parts to be produced.
New die materials such as “enhanced D2” are available from many suppliers. These improve the balance between toughness, hardness and wear resistance for longer life. These materials can be thru-hardened, and thus become an excellent base material for PVD or secondary surface treatments necessary in the AHSS processing. And new tool steels have been developed specifically for hot forming applications.
Joining Considerations
In high-volume production different Resistance Spot Welding (RSW) process parameters can be used depending on the application and the specifications applied. Assuming you chose the appropriate welding parameters that allows for a large process window, manufacturing variables may ruin your operation as they strongly effect the RSW weld quality and performance.
Material fit-up
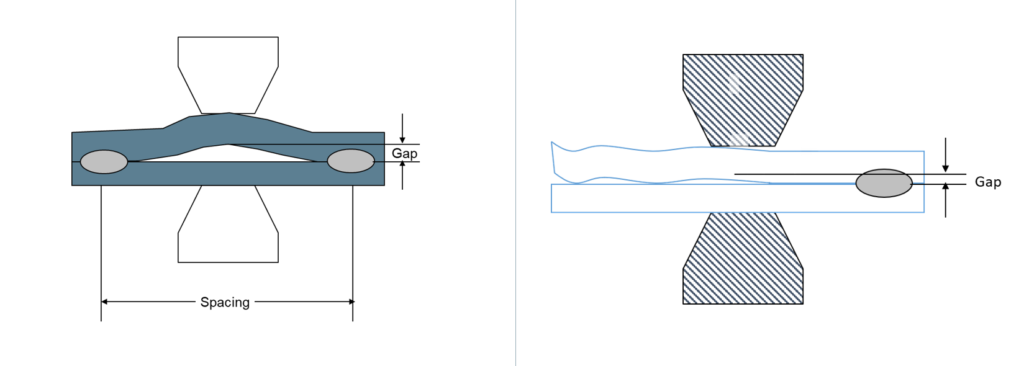
One of the great advantages of the RSW process is the action of clamping the material together via the electrode force applied during the process. However due to the pre-welding condition/processing such as the stamping operation, this fit-up issue, as shown in Figure 2, can be very significant especially in welding an AHSS product. In this case the effective required force specified during the process setup for the application is significantly reduced and can result in an unacceptable weld, over-heating, and severe metal expulsion. If the steels are coated, higher probability for Liquid Metal Embrittlement (LME) cracking is possible.

Figure 2: Examples of Pre-Welding Condition/Processing Fit-Up Issues.
For welding AHSS, higher forces are generally required as a large part of the force is being used to force the parts together in addition to the force required for welding. Also, welding parameters may be set for pre-heating with lower current pulses or current up-slope to soften the material for easier material forming and to close the gap.
Electrodes Misalignment
During machine set up, the RSW electrodes need to be carefully aligned as shown in Figure 3A. However, in many production applications, electrode misalignment is a common problem.
Electrode misalignment in the configurations shown in Figure 3B may be detrimental to weld quality of any RSW application. Of course, the electrode misalignment shown in this figure is exaggerated but the point is that it happens frequently on manufacturing welding lines.
In these cases, the intendent contact between the electrodes is not achieved and thus the current density and the force density (pressure) required for producing an acceptable weld cannot be achieved. With such conditions, overheating, expulsion, sub-size welds and extensive electrode wear will result. Again, if coated steels are involved, the probability for LME cracking is higher.
Note also that following specifications or recommendations for water cooling the electrode is always important for process stability and extending electrode life.

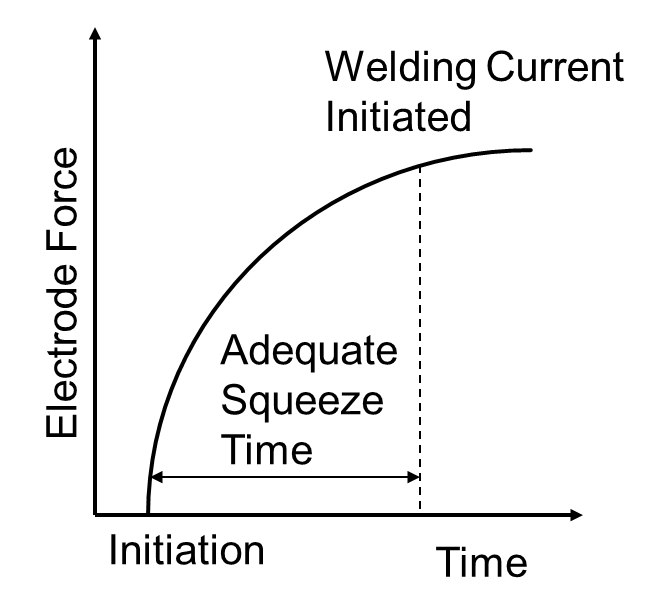
Figure 4: Sequence of Squeeze Time and Welding Current Initiation.
Squeeze Time
The squeeze time is the time required for the force to reach the level needed for the specific application. Welding current should be applied only after reaching this force, as indicated in Figure 4. All RSW controllers enable the easy control of squeeze time, just as with the weld time, for example. In many production operations, a squeeze time is used that is too low due to lack of understanding of its function. If squeeze time is too low, high variability in weld quality in addition to severe expulsion will be the result.
The squeeze time required for an application depends on the machine type and characteristics (not an actual welding parameter such as weld time or welding current for example).
Some of the more modern force gauges have the capability to produce the curve shown in the Figure so adequate squeeze time will be used. If you do not know what the required squeeze time for your machine/application is, it is recommended to use a longer time.
For more on these topics, browse the Forming and Joining menus of these Guidelines.
