A common problem in every stamping plant is trim edge burrs. As new materials have been introduced, special trim breakage (clearance) or entry amounts may be required. Researchers are still trying to understand the edge stretching limits of these new materials. Edge stretching limits are directly linked to the reduction of the work hardening exponent (n-value) due to the cutting operation. As the material is cut during the coil slitting, blanking, trimming, or piercing operations, the tensile stretching on the sheared edge reduces the amount of formability remaining in the material. Finding the proper trim breakage and trim edge condition is critical. New test studies help steel producers understand the maximum stretch limits of the material they produce.
The Hole Expansion Test (HET) is the accepted form of measuring edge stretching limits. The test is performed by punching a hole in the center of a flat blank which is then clamped down, while a conical punch is pushed up through the hole, creating a stretch-flanged edge (see Figures 1 & 2). The output is the ratio of final hole diameter/initial hole diameter. The hole in the blank can be produced by various processes, to simulate manufacturing conditions. Some of the best results are produced by utilizing milled edges, laser cutting, EDM, and water jet.
In the world of stamping operations, reduced formability of a trim or pierced edge can equate to downtime, scrap, or rework. Since the use of EDM and Waterjets are not practical solutions, we evaluate current methods and materials that are available. The intention is to provide information to the people on the shop floor who might deal with this issue on any given day. Worn or chipped trim steels, improper clearances, and worn punches need to be repaired and maintained. New Advanced High-Strength Steels have lower forming limits compared to mild steel, and the introduction of a worn tool will reduce that forming range significantly. The use of powder metallurgy or cutting steels can help improve the number of hits between preventive maintenance intervals significantly. Some surface treatments can also extend tool life, achieving the same relative tool wear as conventional mild steels.

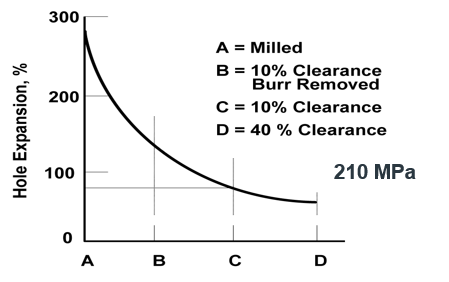
Figure 2: Schematic showing hole expansion capability for a 200 MPa mild steel for various punch conditions.
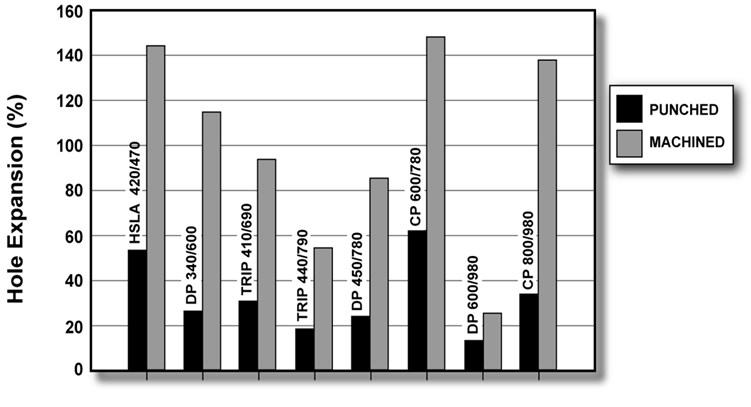
New grades such as Complex Phase (CP) steels have great strength, but also perform well in edge or stretch flange conditions because of bainite and grain refinement due to thermo-mechanical processing in the steel mill. Yet, the lack of proper tool maintenance can strip these steels of their performance advantage, as shown in Figure 3.
Understanding the effects of tool wear rates, trim breakage, surface coating, and surface treatments will reduce downtime, scrap, and extend preventive maintenance intervals on trim and pierce dies. Providing training to the die makers on the newest materials, die components, and surface treatments available will help them make longer lasting corrections to stamping dies. Research and processes are evolving every day, resulting in new methods, products, and information for the successful stamping of Advanced High-Strength Steels.
Note: AHSS Application Guidelines Section 3.C.2 – Tool Materials and Die Wear contains more information that you may find helpful. Download the Guidelines free at www.worldautosteel.org.
Image References:
- Figure 1: (Schematic): H. Mohrbacher, “Advanced metallurgical concepts for DP steels with improved formability and damage resistance” – NiobelCon bvba
- Figure 2: R. Hilsen et al, “Stamping Potential of Hot-Rolled, Columbium-Bearing High-Strength Steels,” Proceedings of Microalloying 75 (1977).
- Figure 3: Courtesy of C. Walch, voestalpine Stahl GmbH.
Contributions made by Phoenix Group.

