Industry 4.0 and AHSS Applications
The manufacturing industry is currently experiencing a significant transformation of digitalization, connectivity, and higher flexibility of the manufacturing process. Recently, several studies were conducted by different researchers and companies on developing more complicated control systems with new sensors and applying a machine-learning algorithm to analyze the collected data from the sensors. Therefore, an extensive literature review was conducted to address the applications of Industry 4.0 (sensor, process control, and forming equipment control) for sheet metal forming.
This article introduces the latest information and provides insight on how to practically implement newly introduced technologies and tools for industrial sheet metal forming processes to make the forming processes more efficient and robust.
Needs for Industry 4.0 in Manufacturing
Manufacturing processes have become more efficient and productive with help from smart machines, intelligent systems, and data analytics. This rapid change in manufacturing leads to a new industrial revolution, frequently called Industry 4.0.
Industry 4.0 has been defined as “a name for the current trend of automation and data exchange in manufacturing technologies. It includes cyber-physical systems, the Internet of things (IoT) and cloud computing and cognitive computing and creating the smart factory”.I-17
Three key factors — connectivity, intelligentization, and automation (Figure 1) — characterize this new industrial revolution. The combination of these factors changes conventional production to a more customized, flexible, and on-demand manufacturing production, creating significant technical challenges.Y-13 To overcome these challenges, the integration of the three key factors highlighted in Figure 1 becomes essential for the manufacturing industry.

Figure 1: Key factors for Industry 4.0.Y-13
There is interest in the sheet metal industry on how to adopt Industry 4.0 into their legacy forming practices to significantly improve productivity and product quality. Figure 2 illustrates four important variables influencing the part quality: material properties, die friction response, elastic deflection of the tool, and press dynamic characteristics. These variables are usually difficult to measure or track during the production runs. When these variables significantly influence the part quality and the scrap rate increases, the operators manually adjust the forming press parameters (speed and pressure), lubricant amount, and tooling setup. However, these manual adjustments are not always possible or effective and can be costly for the increased part complexity. The use of new advanced high-strength and light-weight materials often escalates technical challenges associated with formability and robustness of the current forming process as well.

Figure 2: Important variables influencing the stamping quality.H-35
The ultimate vision for Industry 4.0 in sheet metal forming is an autonomous forming process with maximum process efficiency and minimum scrap rate. This is very similar to the full self-driving (FSD) vision of the electric vehicle today.
The workflow of the current forming process starts by supplying the incoming coil or blank to the forming press where the material is formed and ends with the inspector assessing the part quality manually (Figure 2).K-27 Implementing Industry 4.0 technology will significantly change the workflow of the future forming process as illustrated in Figure 3. More sensors will be used to measure and monitor the variations of the incoming material, gauge, lubricant, temperature, and part quality. The digital data from the sensors will be analyzed using the data analytic method such as ‘machine learning’ and ‘deep learning.’ The analyzed data will be used to create a digital twin model or an algorithm for intelligently controlling the machines such as the part transfer system, forming press, and quality inspection robots. Likewise, the electronic vehicle progressively evolves in different levels of the FSD. In the early development stage, the prediction results of the artificial intelligence (AI) model will be checked and implemented by the machine operators for controlling the machine. When the AI model is sufficiently trained with the enormous production data, the autonomous forming process will be developed. This will be valuable for the automotive industry that has to process large production volumes with various steel grades. For example, the automotive industry increasingly experiences variations of the incoming material properties for Advanced High-Strength Steel (AHSS) and the significant effect on part quality associated with necking, wrinkling, and cracking, which drastically increases the production cost.

Figure 3: Comparison of the workflow of the current and future forming process with Industry 4.0.K-27
State-of-Art Sensors, Process Control, and Machine Control
Sensors for sheet metal forming: In-line monitoring of the incoming material properties using NDE sensors
The variation of the incoming material properties increases uncertainty in sheet metal forming by decreasing the consistent quality and increasing the overall manufacturing cost. A nondestructive evaluation (NDE) can be a useful tool to measure incoming material properties.
There are several types of NDE sensors. Most of the sensors need further development or are not suitable for production applications. However, some of the NDE sensors, such as the eddy current tools, laser triangulation sensors equipment, and equipment developed by Fraunhofer called 3MA (micromagnetic, multiparametric microstructure, and stress analysis), have already been applied to a few limited production applications. These sensors can be used to provide data during production to select the optimal parameters. They also can be used to obtain material properties for finite element model (FEM) analysis. Studies in deep drawing of a kitchen sink production used a laser triangulation sensor to measure the sheet thickness and an eddy-current sensor to measure the yield strength, tensile strength, uniform elongation, elongation to break, and grain size of the incoming material. The material data is used as an input for simulations to generate the metamodels to determine the process window, and it is used as an input for the feed-forward control during the process.K-27 Figure 4 shows how NDE tools are used for feed-forward controls and cameras for feedback control to determine the optimum press setting on sink forming production.

Figure 4: Process control for sheet metal forming of kitchen sink production.H-36
Another study proposed the use of Fraunhofer’s 3MA equipment to determine the mechanical properties of incoming blanks for a sheet forming process. The 3MA sensor correlates the magnetic properties of the material with the mechanical properties and calibrates the system with the procedure outlined in Figure 5. The study showed a good correlation between the measurements from the sensor and the tensile testing results; however, the sensor should be calibrated for each material. Also, the study proposed to use a machine-learning algorithm instead of a feed-forward control to predict the most effective parameters during the drawing process.K-28

Figure 5: Calibration procedure for 3MA sensors.K-28
Sensors for sheet metal forming: Real-time monitoring of part quality
Many researchers studied the control of the material flow by measuring the draw-in since the strain field of the blank is directly related to the failure. However, it is difficult to measure draw-in over the entire blank during the process so few locations on the blank can be measured. Figure 6 shows various sensors to monitor and control the material draw-in during forming. An extensive list of sensors applicable to metal forming was introduced.P-23

Figure 6: Sensors to monitor (left) and actuators to control (right) material flow and drawn-in for sheet metal forming.A-57
Sensors for real-time monitoring of part quality: Linear variable differential transducer (LVDT)
A LVDT was used to measure the material draw-in (sensor j in Figure 6 – double clicking the image will open it in a new window for ease of reference). However, it has several limitations. First, additional effort is needed for initial setup and maintenance in service which is difficult to apply for stamping productions that are exposed to tool vibration and tool temperature change. Secondly, they are not reliable if splitting or cracking occurs in the process. Finally, when the edge of the blank starts to wrinkle, the sensor could lose the edge and the measurement will be incorrect.L-33, M-29
Sensors for real-time monitoring of part quality: Roller-ball sensor
The roller-ball sensor (sensor b in Figure 6) is a computer mouse-type draw-in sensor based on a rotatory contact between the blank and the sensor. This sensor can measure the direction of the material flow; however, the contacting ball and roller might have wear issues, which can lead to incorrect measurements and high risk of any dirt contaminating the roller-ball contact surfaces. The roller-ball sensors are integrated into the tool, which increases the maintenance and development cost.L-33, M-29
Sensors for real-time monitoring of part quality: Inductance-based transducer
An inductance-based transducer sensor was developed to measure the draw-in during the forming process (Figure 7).M-29 This non-contact sensor has a thick cover of epoxy, protecting it from wear. It is also relatively easy to use and has a low cost. However, it must be calibrated for each material and the measurement error can increase considerably if wrinkling occurs during the forming process. Same as the roller-ball sensor, the inductance-based transducer is integrated into the tool, which increases the maintenance and development cost.

Figure 7: Principle of the inductance-based transducer sensor.M-29
Sensors for real-time monitoring of part quality: Vision sensor
A non-contact in-line sensor was developed to measure the material flow of a deep drawing process.D-25 This sensor has no risk of wear because it is non-contact. This sensor also detects the material flow direction. However, the sensor is integrated into the tool, thus there is a risk of degrading the performance of the sensor due to contamination on the lens with dirt and oil.
Cameras have been used to measure the draw-in between a 2-step drawing process of sink production.F-22 Cameras have a great advantage to measure material draw-in compared with other sensors because they are not integrated into the tool. For example, cameras can be used in different dies to measure the draw-in of the edge of the blank as shown in Figure 8. However, the draw-in cannot be measured continuously while the die is closed. It can only be measured after the die is opened and before the part is transferred to the next station. This is still an in-line control because it allows the adjustment of the planned schedule during the production. Nevertheless, for a single drawing stage process, it is an off-line close-loop control since it only allows adjustment between parts.

Figure 8: Image of the draw-in measurement taken with a camera.F-22
Similarly, a machine vision system with four cameras was used for real-time monitoring of the stamping part quality immediately after the die opened as shown in Figure 9.K-29 The system is capable of not only capturing the part quality with multiple images but also measuring the flange draw-in length of the part.

Figure 9: Real-time monitoring of the stamping quality using camera system.K-29
Recent advancements in optical measurement techniques, including high-resolution imaging and laser displacement sensors, have enabled the direct tracking of blank deformation at multiple locations around the part edges. Integrating experimental data into data-driven models, enhance prediction accuracy and support adaptive process control strategies. Advances in computing power allow for identification of model discrepancies caused by real-world variables such as non-uniform lubrication, tooling compliance, and blank positioning.
Laser displacement sensors of the blank edge having a resolution of ±1 µm can provide high-precision displacement data that can be synchronized with video recordings of every stamping during a production run to enable direct correlation between time-resolved and part-specific draw-in variations.
Citation C-46 describes capturing the draw-in behavior of 1630 consecutively stamped parts using both laser displacement sensors as well as video recordings. There was a strong correlation between both measurement methods (correlation coefficient of 0.96), suggesting that optical systems can be a cost-effective approach to monitor and analyze sheet metal forming processes in an industrial setting.
By correlating measured draw-in variations with part quality assessments, reliable control limits can be defined. These limits can be integrated into a part quality control strategy, providing operators with clear, data-driven guidance for adjusting process parameters to maintain consistent product quality.
In tandem, finite element analysis can model the forming process to numerically estimate the effect of blank holder force variations on draw-in behavior. The physical measurements as described above provide the basis by which to judge whether the model sufficiently replicates real-world forming conditions. Differences may suggest that additional variables, such as material property variability, friction inhomogeneity, and local contact pressures, contribute to the measured fluctuations. Artificial Neural Networks (ANN) may be appropriate to capture the complex relationships between material flow, friction conditions, and part geometry.
Sensors for real-time monitoring of part quality: Piezoelectric sensor
Piezoelectric sensors were used to measure the structural deformation of the punch corner as a result of part wall stresses.B-38 A closed-loop control system with part wall stress was proposed as a state variable. The part wall stress correlates directly with the strain distribution of the part, which is directly related to quality and failure. Multiple sensors must be located within the die or punch structure 10 or 15 mm below the contact surface; therefore, its implementation is complicated and expensive.B-38
Sensors for real-time monitoring of part quality: Wrinkling sensor
Opposing linear transducers were used to measure the wrinkle heightL-33 as shown in Figure 10. A closed-loop control sheet forming process was developed by measuring the wrinkle height with two linear displacement transducers positioned in the upper and lower binders. However, this sensor has two important limitations. First, the change in the blank thickness induces errors in the height measurement. Second, the sensor is limited to use for specific applications because failures can occur with the friction at the sensor tip that contact the blank and the sensor, and the sensor cannot detect wrinkles in the local area where it is mounted.

Figure 10: Opposing linear transducers for measuring wrinkle height.L-33
Forming Process Control
In the sheet metal forming industry, demand for high quality and cost-effective production is constantly growing. However, there are several uncertainties in forming that affect the robustness and reliability of the process. Some of these uncertainties are, for example, the variations of the incoming material properties and thickness, and die friction. One way to achieve a more robust production is to eliminate or reduce these variations, like, for example, improving the prediction of the material composition to reduce properties variations. However, this approach is not economical and not even possible in some cases. The other approach is to measure and compensate the uncertainties with feedback closed-loop control.
In the last two decades, several closed-loop control approaches have been developed to overcome these uncertainties in forming, to improve the quality of parts, and make the process more robust. Most of the effort has been on adjusting the blank holder force (BHF) and were proven successful in the laboratory environment; however, the feasibility of the proposed ideas was not proven for industrial applications.
The control and monitoring of process variables in sheet metal forming are essential to improve the quality and reduce the cost and time. Therefore, most studies focused on controlling different process variables such as punch force, punch speed, and blank holder force in sheet metal forming processes.
Control of Process Variables: Punch Force
The punch force is a process variable that is directly involved with failure. Many studies were conducted in monitoring and controlling the punch force during the 1990s and beginning of the 2000s.M-30,H-37 Today, most commercial presses have a built-in loadcell to measure the punch force during stamping. Therefore, the control of punch force is relatively easy to implement; however, its control in most applications is not enough to overcome all the uncertainties of the processes.
Control of Process Variables: Blank holder force (BHF)
Several studies showed the effectiveness of BHF control in sheet metal forming based on the measured or predicted material flow and draw-in. Previous studies on improving the actuators of the blank holder accurately implemented the desired BHF changes during the stroke with a Proportional–Integral–Derivative (PID) controller. This can be beneficial for reducing wrinkling and tearing by applying a uniform force around the binder.O-9 More recent studies used fuzzy control algorithmsM-31, artificial neural networksM-32, and more sophisticated controllers to improve formability. The draw-in data was used in a conventional closed-loop controller to adjust the BHF (Figure 11) and was suggested to integrate these empirical results in a fuzzy controller in the future.D-25

Figure 11: Block diagram of the closed-loop control system with an optical sensor.D-25
A controller based on classical state space control theory and time series was introduced to control the magnitude and distribution of the BHF.E-5 A unique blank holder plate with four cavities was designed to adjust contact pressure to locally change the BHF in one specific area (Figure 12). Experimental results showed that the novel feedback control system was able to eliminate process instabilities, such as tearing. Tearing happened consistently in an open-loop process, but it was avoided when the novel feedback control was implemented in the same process. However, the study also found that the reaction speed of the system is not fast enough for typical stamping production rates.

Figure 12: Block diagram of the closed-loop control (left) and schematic of the blank-holder plate with adjusted cavity pressure (right).E-5
In stamping, the forming speed can be changed by programming different strokes per minute (SPM) in the press. Depending on the tool design, the speed of either the punch or die can be altered with different SPM inputs. Most stamping presses output the value of SPM and depending on whether it is a mechanical or hydraulic press, the forming speed can be estimated with the SPM value. A faster forming speed can give larger productivity of the stamping process. However, it can also influence the material formability and heat generations on the tool, particularly for high-strength steel. Therefore, the forming speed is usually determined considering the press capacity (i.e., available mechanical energy), lubricant behavior, and sheet materials (gauges and strength). A novel study used intelligent technology to process the control and optimization of a deep drawing process.M-31 A new punch speed and BHF in-line fuzzy control (Figure 11) increased the productivity of the process with a 25% reduction of the cycle time.
Control of Process Variables: Part Wall Stress
A closed-loop control system with part wall stress as a state variable was used.B-38 A piezoelectric sensor was used to measure elastic deformation of the punch corner as a result of the part wall stresses. A tool was equipped with a segmented elastic blank holder with 10 hydraulic pistons that control the blank holder pressure in each segment using a proportional-integral (PI) controller. Figure 13 shows the block diagram of the closed-loop control loop, where y(s) is the reference part wall stress, w(s) is the input of the feedforward controller, u(s) is the hydraulic piston’s pressure, and s is the punch displacement. This closed-loop control showed higher robustness to disturbances, such as the incorrectly positioned blank that caused wrinkling or tearing on conventional processes compared to a conventional deep drawing process by increasing the possible draw-in depth and producing successful parts.

Figure 13: Closed-loop control using the part wall stress as a state variable.B-38
Feedback control vs. Machine-learning control for sheet metal forming processes
Several studies have been recently conducted to improve the quality and robustness of a deep drawing kitchen sink production. These studies have implemented a feed-forward and feedback control successfully, improving part quality significantly. The block diagram of the process is shown in Figure 14. First, the feed-forward control is used to gain knowledge about the blank to reduce the uncertainties of the incoming material. NDE sensors were used to measure the variations of the incoming material properties. Second, the feedback control is used to compensate for the other non-measurable uncertainties. Cameras were used to measure the draw-in of the part between the first and second drawing stages of the 2-step forming process. A PID controller is used to control the press setting during forming, where the process variable is the draw-in of the blanks. This control approach integrated with FEM, stochastic simulations, metamodels, and new and sophisticated intelligent data processor systems has considerably improved the robustness of small to medium batch productions.H-35, F-22, F-24, F-25, F-26, F-27

Figure 14: Block diagram of closed-loop control with feed-forward and feedback controls for sheet metal production.H-36
An intelligent system known as “Q-Guard” was introduced to link the product and process design to production, covering the entire production process from the raw material to the final product.H-36 Stochastic simulations were used to generate metamodel to obtain the process window for the control system. The block diagram of the Q-Guard system is given in Figure 15.

Figure 15: Schematic of the Q-Guard intelligent control system.H-36
Recent advances in servo presses have the potential to expand the capability of close-loop controls in sheet metal forming. Servo presses have more flexible slide motions and more precise control compared to conventional presses, allowing new combinations of more sophisticated motion of the press slide and BHF control. Servo presses have many features that have a positive impact on different forming applications. First, they have a flexible slide motion. The slide motion can be modified to follow different numerical control servo programs shown in Figure 16. A recent study has shown that using different servo motions can drastically improve part quality in production. The servo motion was chosen based on the variation of the incoming material properties.K-28 Also, a flexible slide motion can improve production productivity and make it more consistent. Second, the die cushion can vary the BHF and back-pressure loads during a sheet forming process. Finally, internet-of-things (IoT) tools and artificial intelligence (AI) can be combined with the control systems of the servo press to manage the machine conditions or parameters. A possibility is to combine IoT and AI with a monitoring system to predict and manage maintenance needs.K-30

Figure 16: Slide servo press motion examples (a) normal, (b) coining, (c) step, and (d) pulse.K-30
Industrial Applications for stamping AHSS/3rd Gen steels
The effects of the incoming material properties for part quality were investigated in a study which analyzed bake-hardenable 210Y/340T steel and a 3rd Gen steel with 980 MPa minimum tensile strength using a 300-ton servo press and the cross-form tool as shown in Figure 17.K-28 Samples from three coils each of 0.75mm BH340 and 1.2mm 980 3rd Gen were obtained from the same steel mill and tested. The results indicated the variation of the incoming material properties can significantly influence the part quality. A servo press is also capable of adapting to this variation by implementing an advanced slide motion or conventional crank motion to obtain consistent quality parts depending on the strength and formability of the sheet materials.

Figure 17: The cross-form test tool operated with a 300-ton servo press (left) and the machine vision system for inspecting the part quality (right).K-28
Industrial Applications for stamping of the body panels in the transfer press line
Recently, six different sensors and machine vision systems were applied to an automotive transfer press line in the US.R-13 These sensors are monitoring the blank properties, blank dimensions (width and thickness), lubricant oil film thickness, and the draw panel geometry and quality as shown in Figure 18. The sensor data can be used for data analytics for feedback to control the die cushion and lubrication system.

Figure 18: Applications of various sensors and camera system for the transfer press line.R-13
Industrial Applications for hot stamping of PHS
The automotive industry is adopting the use of press-hardening steels (PHS) in vehicle structural components to maximize crashworthiness. In the hot stamping process, press hardening steels are initially heated to 900°C in the furnace, and the heated blank is transferred to the forming press. The die immediately closes and keeps the part under pressure for 5 to 10 seconds for quenching by circulating water through the cooling channels inside the die. In this thermal-mechanical process, precise control of the blank temperature and time is essential to obtain the ultra-high-strength part up to 1,500 – 2,000 MPa tensile strength. Various vision sensors and thermal cameras are applied for the hot stamping production line as shown in Figure 19. The data from the sensors and cameras are used for controlling the press machine and transfer system. It is expected that a machine-learning control algorithm will be implemented with these sensors for hot stamping production shortly.K-29

Figure 19: Application of the thermal sensors and camera system in hot stamping production.K-29
Key Points
The sheet metal forming industry is implementing Industry 4.0 practices to stay competitive and overcome the production challenges of forming new AHSS and more complex part geometries. In summary:
- Industry 4.0 is being adopted in sheet metal stamping process.
- The incorporation of Industry 4.0 practices using in-line sensors and process control has improved the productivity and product quality in the sheet metal forming industry.
- The development of the draw-in sensors has significantly improved part quality as well as the robustness of the forming process.
- Sensors that are embedded in the tool have several limitations for industry application because of high maintenance cost.
- Cameras can be used to measure the draw-in with more flexibility than sensors embedded in the tool.
- NDE tools can be used to measure the variation of the incoming material properties and reduce the scrap rate.
- Fuzzy control algorithms, artificial neural networks, intelligent control software, and more sophisticated controllers can be used to improve the quality of the parts; however, some control systems are not fast enough for production rates.
- The implementation of new intelligent systems to control parts for the entire production process will lead to more efficient, consistent, and robust production. These systems include Q-Guard control, machine learning, and artificial networks.
- Servo-motor presses have several competitive advantages over conventional hydraulic and mechanical presses for closed-loop controls in sheet metal forming in terms of the more options for the machine control.
- As introduced with the case studies of this report as well as the literature, Industry 4.0 technology have been implemented in applications such as cold stamping of AHSS structural members and mild steel closures, as well as hot stamped parts, all of which consistently obtains high-quality panels.A-58
Back To Top

Coil Processing
Steel production and processing are continuous operations where the last step is coiling. Steelmakers and processors use tension when coiling to avoid producing “soft” or collapsing coils. Coiling induces tensile and compressive stresses into the strip, and these stresses can contribute to blank or part distortion in subsequent processes. Unless sufficient winding tension adjustments are made, the degree of these stresses change throughout the coil – whereas the outer laps of the coil may be on the order of 6 feet (1800 mm) in diameter, the inner laps typically are wound on a 20 inch to 24 inch (500 mm to 600 mm) diameter mandrel. In addition, the magnitude of these stresses increases with higher strength products, leading to coil shape imperfections like coil set and crossbow.
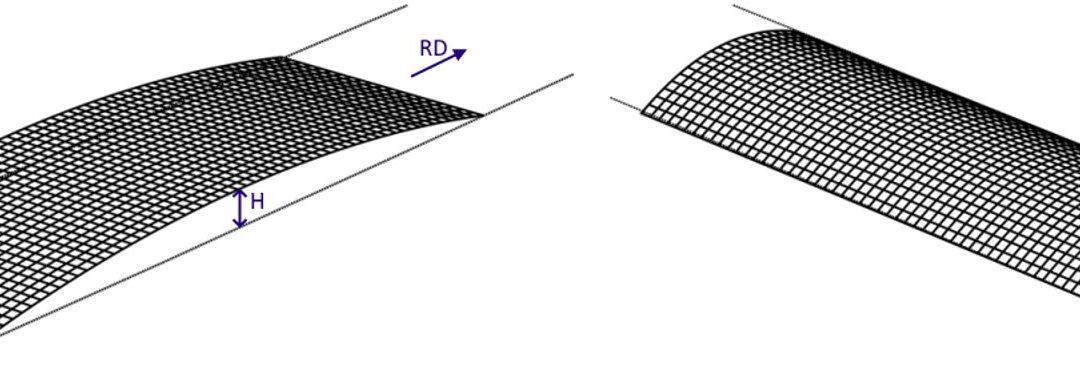
Coil set is a bow condition parallel with the rolling direction, and curves downward in the same direction as the upper outside lap of an overwound coil (Figure 1a). Here, the top surface of the coil or strip is stretched more than the bottom surface, and typically becomes more severe as the coil is processed and the lap diameter decreases. Crossbow is a bow condition perpendicular to the rolling direction, and curves downward in the same direction as the upper outside lap of an overwound coil, with the center portion of the sheet raised a measurable amount above the sheet edges (Figure 1b).

Figure 1: Coil shape imperfections – A) Coil set and B) CrossbowA-30
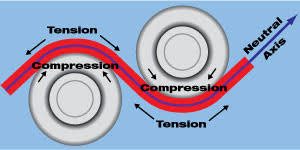
The first operation when unwinding a coil is some type of shape correction to ensure flatness before further processing. There are two main types of equipment used to create a flat coil – a straightener and a precision leveler. While these two types of equipment are similar, a precision leveler has additional capabilities. Both bend the coil back and forth over a series of work rolls to alternately stretch and compress the upper and lower surfaces (Figure 2). Critical equipment parameters include roll diameter, roll spacing, backup rolls, roll material type, gear design, backup rolls, overall system rigidity, and power requirements. The amount of force required to relieve the residual stresses is a function of the sheet thickness and yield strength. Equipment sufficient for shape correction on conventional grades may not be sufficient to completely flatten the advanced steel grades available now and in the future.

Figure 2: Alternately stretching and compressing the upper and lower sheet surfaces by passing the coil through work rolls.C-8
Straighteners and levelers have a series of rolls that progressively flex the strip to remove the residual stresses. Each successive roll pair has an adjustable gap to deform the sheet to a targeted amount with the goal of resulting in a flat coil once the steel passes through all the rolls. The entry end has the smallest gap, putting in the most deformation. The last pair of rolls has the largest gap, usually set for metal thickness. The gap profile varies based on thickness, yield strength, and equipment (Figure 3). Many equipment manufacturers have generated tables to guide the operator as to the best settings for various yield strength/thickness combinations.

Figure 3: The severity of the bending and unbending around the work changes with the roll gap, roll diameter, and roll spacing.
Removing coil set requires permanent yielding in the outer 20 percent of the top and bottom surfaces of the metal. The central 80 percent of the thickness remains unchanged.T-14 Straighteners are appropriate for this type of shape correction (Figure 4). Only end bearings support the simplest straighteners, with no backup rolls used. Closing the entry roll gap risks deflection of the unsupported center, potentially leading to creating edge waves in the coil.

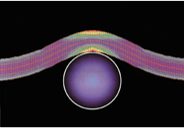
Figure 4: Computer generated analysis showing a straightener roll working the outer 20% of the steel strip. The different colors indicate the bending force, which is symmetrical the neutral fiber (the center part that is neither compressed nor stretched). Red areas indicate stresses beyond the yield point, and yellow areas indicate material is at the yield point. Other areas are in the elastic range.T-15
Eliminating crossbow and other shape imperfections like buckles or waves requires permanent yielding in the outer 80 percent of the top and bottom surfaces, with only the central core — 20 percent — remaining in the elastic range.T-14 Precision levelers, which applies tension to the strip as it bends around more smaller diameter rolls, can achieve this deformation (Figure 5). While this deformation can get the coil shape closer to flat, it also reduces the inherent formability of the grade. Processors should use only the least amount of deformation necessary to correct the shape to retain sufficient formability for stamping or other operations.

Figure 5: Computer generated analysis showing a leveler roll working the outer 80% of the steel strip while it is under tension. The stress pattern is not symmetrical, with higher stresses seen on the outside of each bend. Passing through the multiple small-diameter rolls under tension results in stresses exceeding the yield point through most or all of the cross section.T-15
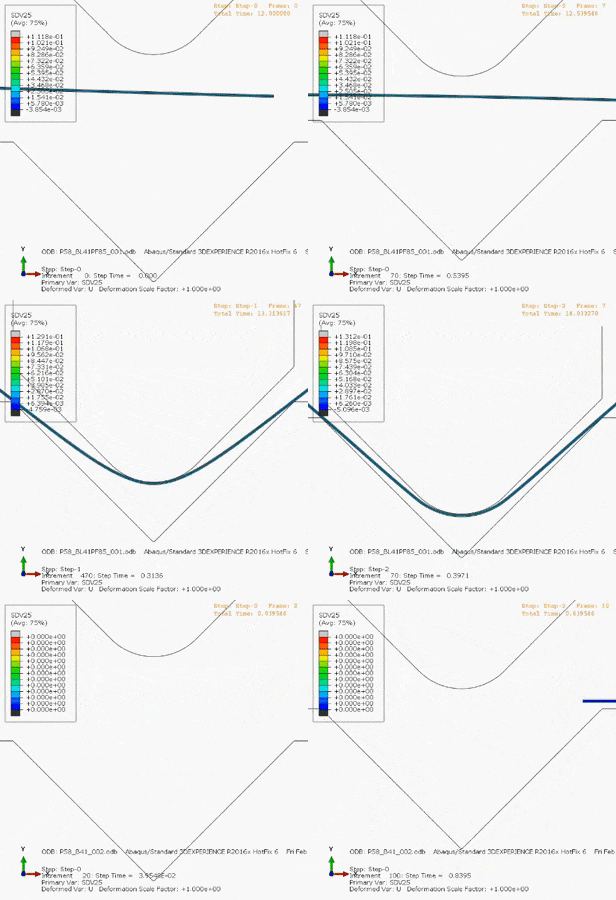
Yield point elongation (YPE), Lüders lines, and stretcher strains are names describing the same phenomenon seen in some annealed or aged metals. A related defect called fluting occurs in V-bending. Leveling at-risk coils with repeated cycles of bending and unbending, like shown in Figure 3, may be an effective way to minimize stretcher strains or fluting. However, process control is critical, since excessive leveling work hardens the coil and results in increased strength and reduced ductility. On the other hand, insufficient leveling does not address the defects related to the yield-point phenomenon.
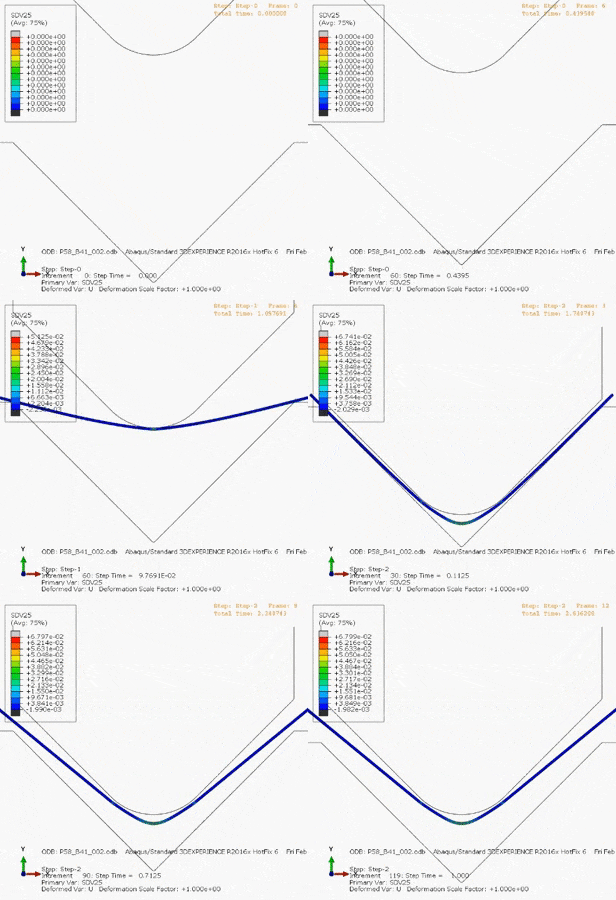
Recent studies K-24, K-48, K-49 describe the importance of sufficient leveling, using real-world examples as well as simulation to model the phenomena and show potential corrective actions, as shown in the following animations.K-50
Figure 6 shows an animation of V-bending without any roller leveling. The fluting defect occurs, since the formed panel shape does not conform to the punch. Figure 7 is an animation of leveling with roller penetration deep enough to produce deformation equivalent to an 85% plastic fraction. Figure 8 presents a closer view of the V-bending, highlighting improved formed panel shape conformance to the punch. The references cited above detail the simulation methodology.

Figure 6: V-bending without roller leveling leads to fluting.K-50

Figure 7: Leveling to produce 85% plastic fraction.K-50

Figure 8: V-bending after leveling to produce 85% plastic fraction minimizes the fluting defect.K-50
Design and Processing Implications
The progressively higher yield strengths for AHSS are challenging the capabilities of straighteners and precision levelers that were not designed for flattening these high strength materials. Equipment manufacturers have been studying and developing solutions to address this issue. There are a series of factors related to the design of straighteners and precision levelers affected by advanced steel grades:
Roll Diameter – Leveling rolls for AHSS generally are smaller in diameter than those used for mild steel, providing a smaller radius around which to bend the material. This is because exceeding the higher yield strength of Advanced High Strength Steels requires a more aggressive bend.
Roll Spacing – Work roll center-spacing will be closer for AHSS than for comparable mild steels. Closer spacing leads to the requirement of more force to reverse-bend the material, resulting in greater power requirements for processing.
Roll Support – Larger journal diameters with larger radii and bearing capacity will withstand the greater forces and higher power required to straighten AHSS.
Roll Depth Penetration – The upper rolls must have enough travel to be able to penetrate the lower fixed rolls sufficiently so the deformation exceeds the yield strength of the AHSS grade. This penetration may need to be as much as 50 to 60 percent greater than for mild steels.
Roll Deflection – Given the greater force requirements for straightening AHSS, work roll deflection becomes a concern especially with smaller-diameter rolls more likely to flex and deflect. Processing wider sheet also increases the deflection risk. Excessive work roll deflection results in undesirable side effects such as edge waves, increased journal stresses and premature gear failure. Backup rollers prevent excessive work roll deflection.
Roll Material – Higher strength materials and special heat treatment should be employed to ensure rolls can withstand greater stresses for longer periods without experiencing fatigue failure.
Gear Materials – Gears that drive the rolls should be produced from heat treated high strength materials to produce smooth running, chatter free roll drive for long life under high loads.
Gear Positioning – Closer roll center spacing requires higher power transmission and results in a smaller gear-pitch ratio, which reduces gear power ratings.
Gear Sizes – To compensate for the gear positioning issue, flattening AHSS grades requires wider gear faces as well as stronger outboard support of journals and idler shafts to produce higher gear power ratings.
Frame Rigidity – The higher strength of advanced steels results in stresses throughout all the components of the processing unit. Frame rigidity is vital to prevent work roll deflection.
Equipment manufacturers have also developed design solutions that address processing of AHSS. As an example, several manufacturers have designed equipment with removable cartridges allowing for swapping between sets containing differently sized rolls, gears, and support structures. As they switch jobs from AHSS to conventional steels, they swap in the appropriate cartridge. This also allows for off-line roll cleaning and maintenance.
Remember that the likelihood of coil set and residual stresses in the coil increases with strength. Operators must take proper precautions when cutting the strapping banks used in coil shipment to avoid “clock-springing.”
Newer processing equipment may contain additional hold-down arms or other features to protect both plant personnel and equipment from damage.E-11
Material Handling Considerations When Working With Higher Strength Steels (U-13)
Stamping AHSS materials can affect the size, strength, power and overall configuration of every major piece of the press line, including material-handling equipment, coil straighteners, feed systems and presses.
Higher-strength materials, due to their greater yield strengths, have a greater tendency to retain coil set. This requires greater horsepower to straighten the material to an acceptable level of flatness. Straightening higher-strength coils requires larger-diameter rolls and wider roll spacing in order to work the stronger material more effectively. But increasing roll diameter and center distances on straighteners to accommodate higher-strength steels limits the range of materials that can effectively be straightened. A straightener capable of processing 600-mm-wide coils to 10 mm thick in mild steel may still straighten 1.5-mm-thick material successfully. But a straightener sized to run the same width and thickness of DP steel might only be capable of straightening 2.5 mm or 3.0-mm thick mild steel. This limitation is primarily due to the larger rolls and broadly spaced centers necessary to run AHSS materials. The larger rolls, journals and broader center distances safeguard the straightener from potential damage caused by the higher stresses.
![Mechanical Properties]()
Mechanical Properties
Introduction to Mechanical Properties
Tensile property characterization of mild and High Strength Low Alloy steel (HSLA) traditionally was tested only in the rolling direction and included only yield strength, tensile strength, and total elongation. Properties vary as a function of orientation relative to the rolling (grain) direction, so testing in the longitudinal (0°), transverse (90°), and diagonal (45°) orientations relative to the rolling direction is done to obtain a better understanding of metal properties (Figure 1).
A more complete perspective of forming characteristics is obtained by also considering work hardening exponents (n-values) and anisotropy ratios (r-values), both of which are important to achieve improved and consistent formability.

Figure 1. Tensile Test Sample Orientation Relative to Rolling Direction
Hardness readings are sometimes included in this characterization, but hardness readings are of little use in assessing formability requirements for sheet steel. Hardness testing is best used to assess the heat treatment quality and durability of the tools used to roll, stamp, and cut sheet metal.
The formability limits of different grades of conventional mild and HSLA steels were learned by correlating press performance with as-received mechanical properties. This information can be fed into computer forming simulation packages to run tryouts and troubleshooting in a virtual environment. Many important parameters can be measured in a tensile test, where the output is a stress-strain curve (Figure 2).

Figure 2: Representative Stress-Strain Curve Showing Some Mechanical Properties
Press shop behavior of Advanced High-Strength Steels is more complex. AHSS properties are modified by changing chemistry, annealing temperature, amount of deformation, time, and even deformation path. With new microstructures, these steels become “Designer Steels” with properties tailored not only for initial forming of the stamping but in-service performance requirements for crash resistance, energy absorption, fatigue life, and other needs. An extended list of properties beyond a conventional tensile test is now needed to evaluate total performance with virtual forming prior to cutting the first die, to ensure ordering and receipt of the correct steel, and to enable successful troubleshooting if problems occur.
With increasing use of advanced steels for value-added applications, combined with the natural flow of more manufacturing occurring down the supply chain, it is critical that all levels of suppliers and users understand both how to measure the parameters and how they affect the forming process.
Highlights
-
- The multiphase microstructure in Advanced High Strength Steels results in properties that change as the steel is deformed. An in-depth understanding of formability properties is necessary for proper application of these steels.
- Tensile test data characterizes the ability of a steel grade to perform with respect to global (tensile and necking) formability. Different tests like hole expansion and bending characterize performance at cut edges or bend radii.
- DP steels have higher n-values in the initial stages of deformation compared to conventional HSLA grades. These higher n-values help distribute deformation more uniformly in the presence of a stress gradient and thereby help minimize strain localization that would otherwise reduce the local thickness of the formed part.
- The n-value of certain AHSS grades, including dual phase steels, is not constant: there is a higher n-value at lower strains followed by a drop as strain increases.
- TRIP steels have a smaller initial increase in n-value than DP steels during forming but sustain the increase throughout the entire deformation process. Part designers can use these steels to achieve more complex geometries or further reduce part thickness for weight savings.
- TRIP steels have retained austenite after forming that transforms into martensite during a crash event, enabling improved crash performance.
- Normal anisotropy values (rm) approximately equal to 1 are a characteristic of all hot-rolled steels and most cold-rolled and coated AHSS and conventional HSLA steels.
- AHSS work hardens with increasing strain rate, but the effect is less than observed with mild steel. The n-value changes very little over a 105 (100,000x) increase in strain rate.
- As-received AHSS does not age-harden in storage.
- DP and TRIP steels have substantial increase in YS due to a bake hardening effect, while conventional HSLA steels have almost none.
![Mechanical Properties]()
Formability
Automotive product designers target small radii for springback control, sectional stiffness, packaging constraints, and design features. These small radii lead to new challenges as applications for AHSS grades continue to increase. One of these challenges is an increased sensitivity to crack formation in those designs with small die radius to material thickness (R/T) ratios. Cracks forming at small R/T in AHSS grades are known as shear fractures.
General forming limit curves or other press shop criteria cannot predict shear fractures, nor are they flagged when traditional approaches are used in forming simulation packages. However, these shear fractures do occur in die tryout. Shear fractures are another form of local formability failure associated with multiphase AHSS such as DP and TRIP.
Shear fractures on AHSS may exhibit similarities to edge fracture, specifically the absence of necking prior to failure. This is in contrast with global formability failures, which are characterized by significant thinning near the fracture. Shear fractures occur almost immediately (within 1 mm of displacement) after reaching maximum load, meaning there is essentially no post-uniform elongation. This is contrary to the tensile behavior where significant post-uniform ductility remains prior to fracture.K-9
Figures 1 and 2 highlight the appearance of a crack on the bend radius caused by shear fracture. No thinning is observed, which is consistent with failures limited by local formability concerns.

Figure 1: Shear fracture in DP780.F-5

Figure 2: Shear fracture in DP980.D-7
Figure 3 shows a typical shear fracture on a DP780 part viewed from different angles. The shear fracture occurred on the sharp radius on the left whereas the larger radius on the right experienced no failure. Depth of draw and draw bead configuration were the same on both sides of the draw panel. Restraining force was also similar on both sides of the blankholder. The significant variable was the die radius.

Figure 3: Different Views of a DP780 Part with Small R/T Leading to Shear Fracture at Bead Radius. An R/T = 1.67 led to shear fracture on the left side of the image, while the symmetric area on the right side had an R/T = 4.4, with no shear fracture even though it had the same depth of draw, draw bead configuration, and restraining force.U-6
It is helpful to describe the characteristic differences between conventional tensile fracture and shear fracture, as shown in Figure 4. A conventional tensile fracture is called a Type I fracture, and has been the typical fracture type historically encountered. Type I fractures occur off the radius, and is preceded by necking or metal thinning. Successful prediction of this type of fracture occurs with conventional application of strain analysis and Forming Limit Diagrams. This is in contrast with shear fracture – categorized as a Type III fracture – which occurs within the die radius, with no thinning from necking (typical for local formability failures). Type II fractures occur at or near the tangent of the radius in metal drawn over the radius.

Figure 4: Schematic descriptions of different fracture types ranging from shear fracture to conventional tensile fracture.S-19
Numerous studies show that radius to thickness ratios (R/T) are significant indicators of performance with respect to shear fracture on AHSS. This research led to the establishment of R/T ratio guidelines. While bend testing also categorizes products based on achievable R/T, the significant difference is that the ends are not restrained in a standard bend test. Shear fracture testing typically involves some type of restraining force, such as that seen in a Bending Under Tension test.
As with edge fracture, AHSS grades may be available at a similar strength but with improved minimum R/T ratio. Guidelines have been established for minimum R/T ratios based on bend test results as well as real world case studies. For DP340/590 and above, the R/T ratio should be at least 3T for product features such as embossments where there is relatively limited metal motion. Pulling these grades across a radius or through a draw bead under tension increases the minimum R/T ratio to at least 5T.
As strength levels increase, it is necessary to increase R/T ratios to avoid shear fractures. One study recommended a minimum R/T of 8 for DP800W-4 while another has a critical R/T of at least 7T for DP980S-19. Differences such as these are likely due to different test conditions such as the tension applied during bending, test speed and lubrication. Higher deformation rates (forming speed) and better lubrication tends to promote shear fracture and cause fracture on material close to the die radius.S-19 A combination of high forming speed and back tension leads to DP590 and DP780 having a critical R/T value of 12, with DP980 having a critical R/T of over 16.S-20
Shear fracture is sensitive to rolling direction. If the radius is running in the rolling direction, the bend will be transverse to the rolling direction which is the worst-case scenario when trying to avoid shear fracture. Understanding the directionality of minimum R/T ratios when designing the part to avoid shear fractures is therefore important. One study evaluated DP780, which discovered a critical minimum R/T of 5 to avoid shear fracture, although this varied with back tension and pulling speed. At all R/T ratios tested, the samples oriented so the bend radius was parallel to the rolling direction failed at lower stress than if the bend radius was perpendicular (transverse) to the rolling direction. Tighter R/T magnifies this effect, as does a higher strength grade. At 1.5 R/T, shear fracture with bends perpendicular to the rolling direction occurred when the stress reached 81% of the tensile strength, where in samples with the bend parallel to the rolling direction, failure occurred at 66% of the tensile strength.S-21
Microstructure also plays a role. Phase distribution uniformity, fine microstructural phases, and a decrease in hardness ratio between martensite and ferrite all increase formability as measured by the smallest achievable R/T resulting in split-free panels.W-4, H-6 These are the same factors that result in improved hole expansion values.
Forming Limit Curves are the limiting strain states based on the onset localized deformation, or necking. Generating conventional FLCs typically involves using a 100mm diameter hemispherical punch to deform 1mm to 2mm thick sheet steels, resulting in R/T ratios of 25 or higher. Many decades of use have shown that conventional FLC approaches can be used to assess part robustness and predict failure in areas having large R/T ratios and failure modes affected by global formability. These show up as Type I fractures.
When the R/T ratio is within the shear fracture limit but above the simple bending limit (no stretching imposed to bending), failure may occur in the radius or outside the radius, depending upon the tension level applied during forming. If the failure occurs inside the radius, the failure limit derived from the shear fracture tests should be used as the criterion to predict failure. Finally, when the R/T ratio is smaller than the limit from the simple bending test, the failure occurs in the radius.
In addition to large R/T, most Forming Limit Curves are generated from tests are conducted at a very low strain rate, maintaining an isothermal condition (no heat generated from deforming the sheets). While these conditions are consistent with those adopted for the simulations, they differ significantly from those encountered in industrial practice.
Ignoring the role of deformation-induced heating is one of the most significant reason for the limited success of shear fracture prediction in conventional forming simulation. Strain rates for stamping are typically 1,000x to 10,000x greater than the strain rates for tensile testing. Contact between the sheet metal and the tooling at tight radii also drives up the local temperature. Maximum temperature at the die-sheet interface of 70°C has been found on DP590, but 105°C for CP800.F-6 Stamping DP780 leads to die temperatures of 180°C and blank temperatures of 108°C.P-11 Stamping DP980 produces contact temperatures of over 200°C in certain conditions.F-28
Using a simulation model that accounts for the thermal effects of forming and the associated response in the sheet metal, along with the traditional mechanical deformation response, has been shown to dramatically improve simulation accuracy to predict when shear fracture will occur.K-9, S-20, S-22
Therefore, it is important for the part designer to design an appropriate die radius for a given AHSS product and forming conditions / processes used to manufacture the part. Forming simulation is an excellent tool to derive an appropriate die radius for the specified part and forming process, recognizing that the failure criterion in the simulation must incorporate all conditions and failure modes encountered, including shear fracture.
Key Points
-
- AHSS grades are at risk of crack formation in designs with small die radius to material thickness (R/T) ratios. These cracks are known as shear fracture.
- The strains associated with shear fracture are below that which are associated with the Forming Limit Curve.
- As with edge fractures, shear fractures are also a function of microstructure, strength level, and rolling direction. Consider these variables when designing parts and conducting die try-outs with prototype steel.
![Mechanical Properties]()
Forming Modes
top-of-page
The usual mode of bending is curvature around a straight-line radius (Figure 1). Through the thickness is a gradient of strains from maximum outer fiber tension (the outermost surface) through a neutral axis to inner fiber compression (the surface closest to the punch or bend axis). No strain occurs along the bend axis in the direction parallel to the bend axis, and therefore is in plane strain. The discussion below considers only bulk deformation, and excludes the implications of any edge effects. Bend testing procedures are linked here.

Figure 1: Typical bend where the outer surface is in tension, and the inner surface is in compression. A neutral axis lies in between.S-23
When sheet metal flows through draw beads or over the die radius into the punch opening, it is bent, straightened, and in the case of draw beads re-bent in the opposite direction. The net strain after this process may be relatively small. However, each of the sequential bending and unbending steps strain hardens the sheet metal, which reduces the ability for further deformation of the metal in subsequent operations.
Deformation at the outer surface during three-point bending depends on the stretchability capacity of the metal. The failure strain in the bend is related to the total elongation of conventional steel, but AHSS grades with multiphase microstructures such as DP and TRIP experience shear fracture that severely reduces the bendability before failure occurs. A higher total elongation helps sustain a larger outer fiber stretch of the bend before surface fracture, thereby permitting a smaller bend radius. Since total elongation decreases with increasing strength for a given sheet thickness, the minimum design bend radius must be increased (Figure 2).

Figure 2: Larger bend radius is needed as the total elongation decreases.S-23
The ratio of punch radius to sheet thickness, or the r/t ratio, allows for calculation of the amount of elongation on the outermost surface. This value can be compared against the total elongation of the metal as determined in a tensile test, or against the minimum elongation value allowed in the specification. If the part geometry will not allow for sufficient elongation for the selected metal grade, then either the part, process, or steel grade must change. [Note that this is not a perfect assessment, since elongation in a tensile test is measured relative to a 50 or 80 mm gauge length, which is likely different than the dimensions of the bent section.]
For design and springback control, usually a smaller r/t ratio is desirable. However, this may not be suitable in terms of formability. Increased material strength usually is associated with a reduction in total elongation, which in turn means a successful bend requires a larger r/t ratio.
For equal strengths, most AHSS grades have higher total elongations than conventional HSLA steels. However, several AHSS grades have limited local formability based on their microstructure, and may be at risk for cracking during edge expansion.
Cracking in production stamping conditions at stress levels below what is predicted with Forming Limit Diagrams may be attributed to these local formability failures. As an illustration, physical bend tests and simulations were performed for both HSLA and DP780 steels.S-11 The HSLA global formability failure aligned with simulation predictions (Figure 3), and was accompanied by a visible neck (Figure 4). In contrast, the DP780 showed no visible neck at the failure site (Figure 5) and no correlation between the simulation and actual test results (Figure 6).
Like hole expansion, bending limits in AHSS products are further lowered by shear fracture associated with the interfaces between the ductile ferrite and the hard martensite phase in the microstructure. This reduction becomes more severe as the strength increases, since increasing strength is achieved by increasing the volume of the hard martensite phase. More about shear fracture is found here.

Figure 3: Forming simulation of HSLA with strong correlation to actual testing.S-11

Figure 4: Close-up of visible necking before tensile failure in HSLA.S-11

Figure 5: Comparison of forming simulation with actual testing of the DP780. Note lack of correlation.S-11

Figure 6: Close-up of local formability failure on DP780 with no visible necking before failure.S-11
Rotary Bending
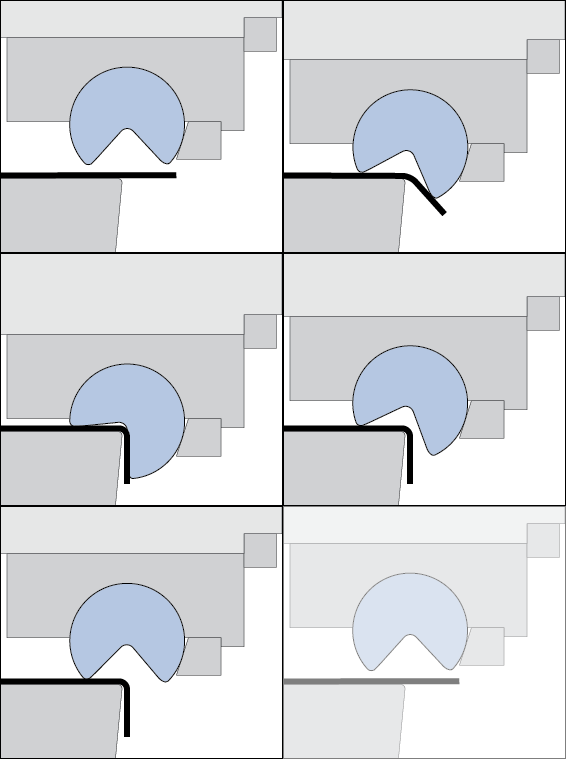
One way to address springback involves the use of rotary benders. Rotary benders transfer the vertical movement of a press stroke into a precise, rotary forming motion. A rocker or rotating die can simultaneously hold, bend, and overbend the sheet past 90° to counter material springback (Figure 7).

Figure 7: The rotation of the rocker bends the sheet metal around the anvil with less pressure than needed for wipe toolsD-8
Use rotary bending tooling where possible instead of flange wipe dies. Rotary bending allows for easy adjustment of the bending angle to correct for changes in springback due to variations in steel properties, die set, lubrication, and other process parameters. In addition, the tensile loading generated by the wiping shoe is absent.
There are four sequential steps to the process:
1) Downward pressure from the rocker clamps the part with the bending lobes before bending starts
2) Induced rotation of the rocker bends material around the anvil
3) The rocker bends the sheet metal past final angle to compensate for springback
4) The rocker releases the sheet metal to allow springback to desired angle
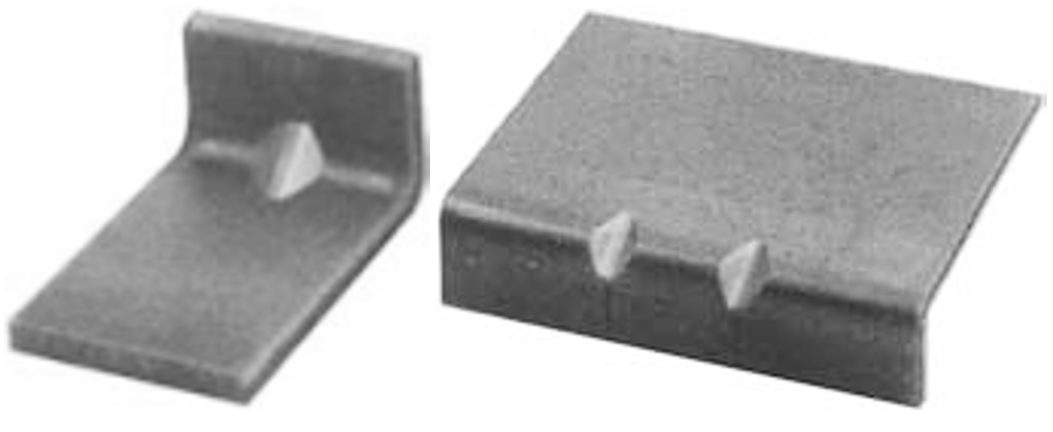
Using rotary benders to roll darts into the part during bending provides another way to reduce springback and stiffen the part (Figure 8).

Figure 8: Stiffening darts can be created as part of the rotary bending operation.R-7
Back to the Top

Simulation
Evaluating sheet metal formability using computer software has been in common industrial use for more than two decades. The current sheet metal forming programs are part of the transition to virtual manufacturing that includes analysis of casting solidification and rolling at the metal production facility, welding, moulding of sheet/fiber composites, automation, and other manufacturing processes. Computer simulation of sheet metal forming is known by several terms, including computerized forming process development and computerized die tryout.
Many highly developed software programs closely replicate the physical press shop forming of sheet metal stampings. These programs have proven to be accurate in predictions of blank movement, strains, thinning within the blank, wrinkles, buckles, and global formability concerns of necking strains and forming severity as defined by conventional forming limit curves. Accurate prediction of local formability related failures such as cut edge expansion is more challenging due to modeling of the production process influence as opposed to the ideal laboratory edge. Prediction of springback generally provides helpful results in understanding the trends and effects. The quality of springback predictions vary with the specific stamping geometry, the selected metal grade, the input information, and user experience, as discussed in Simulation Inputs.
Virtual forming-process development is ideally suited to the needs of current and potential users of AHSS grades. A full range of analysis capabilities is available to evaluate AHSS behavior in a new stamping. These programs allow rapid “what-if” scenarios to explore the impacts of different grades of AHSS, alternative processing, or even design optimization. A Design of Experiments on actual tooling in a physical press shop is limited to only a few variables and may be subject to noise variables clouding the results. In the virtual press shop, changing variables is done with a stroke of the keyboard, and is far easier to undo than permanent changes to the tooling.
Virtual die tryout has numerous advantages, allowing for assessing the viability of part, process, and die design all before cutting the first hard die. Addressing problems before costly and time-consuming die construction starts leads to improved quality and a better use of resources.
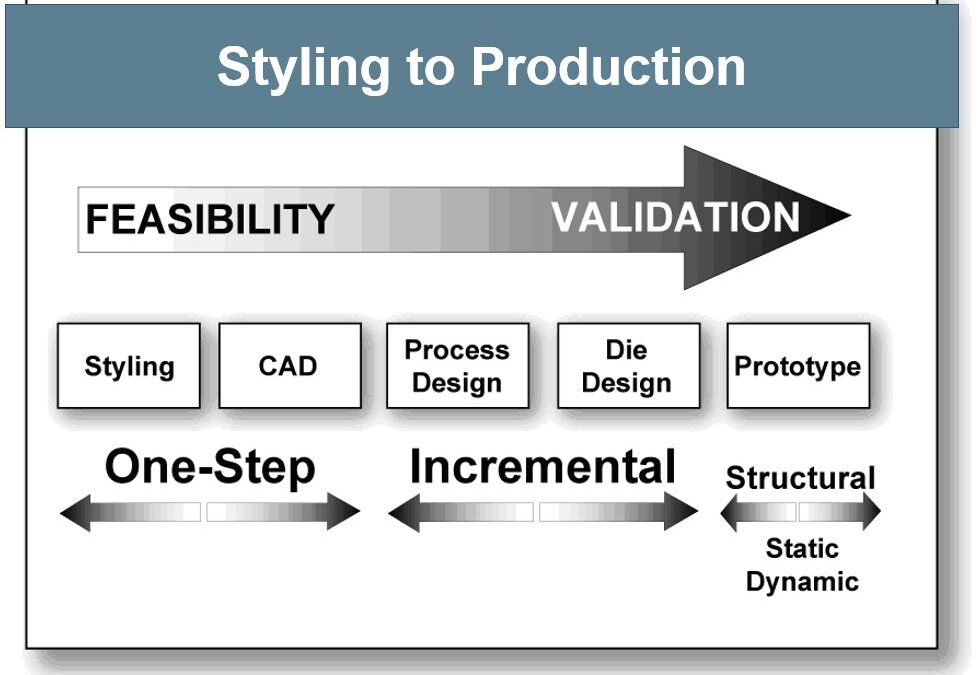
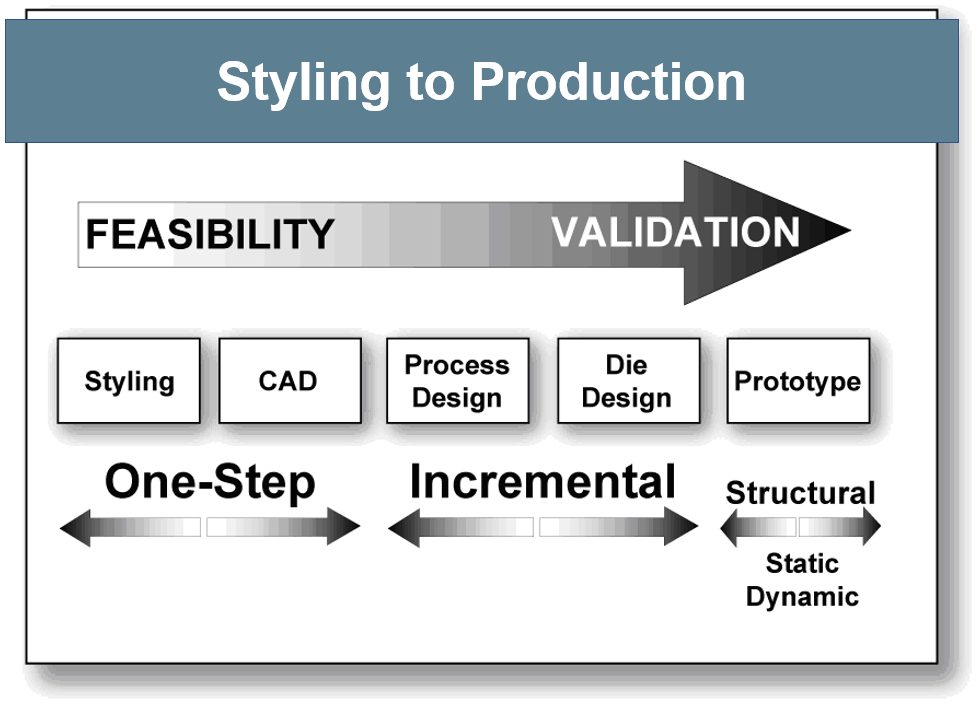
The type of software used depends on the goals and available information at each stage of the process, shown in Figure 1. At the beginning of the styling to production cycle, feasibility – whether the stamping can even be manufactured – is the key question. With only the 3D CAD file of the final part and material properties, One-Step or inverse codes can rapidly ascertain strain along section lines, thinning, forming severity, trim line-to-blank, hot spots, blank contour, and other key information. This approach takes the finished part geometry and unfolds that shape to generate a starting blank, calculating the strain between the two shapes (formed vs. flat). Since it starts with the finished geometry rather than the blank, the process is the inverse of reality. All deformation takes place in a single step, or one step, leading to the description of a one step inverse code. Although this takes reduced computing time, only some simulation packages allow incorporation of the forming process, tooling geometry, and the changes in metal properties associated with deformation.

Figure 1: Software types change during processing stage.
Achieving more accurate results involves incremental simulation, where the virtual forming process attempts to replicate reality. This approach models the tools (punch, die, and blankholder) and process parameters (like the blankholder forces, blank shape, and bead geometry, location and restraining forces). Each increment, or time-step, reflects the sheet metal deformation at a different position of the press stroke. Subsequent increments rely on the output from the prior increments. As the quality of the inputs increase, so does the precision of the results.
During selection of process and die design parameters, software evaluates how each new input affects the strains and blank movement (including wrinkles and splits), and generates a press-loading curve. The analysis creates a visual record of the blank deformation into the final part through a transparent die. Each frame of the video is equivalent to an incremental hit or breakdown stamping. Problem areas or defects in the final increment of forming can be traced backwards through the forming stages to the initiation of the problem, allowing problems to be addressed when before they even occur. Some software packages allow analysis of multi-stage forming, such as progressive dies, transfer presses, or tandem presses. This virtual environment also shows the effects of trimming and other offal removal on dimensional precision and springback.
AHSS grades are suited for load bearing or crash-sensitive applications, and forming simulation helps to optimize performance. Previously, the static and dynamic capabilities of part and assembly designs were analyzed using CAD-generated stamping designs with inputs of initial sheet thickness and as-received yield strength. Often the tests results from real parts did not agree with these early analyses because the effects from forming were not incorporated. State-of-the-art applications now model the forming operation first, allowing for local thinning and work hardening to occur. That point-to-point sheet thickness and strength levels are mapped to the crash simulation inputs, resulting in crash models nearly identical to physical test outputs. Correcting deficiencies of the virtual parts by tool, process, or even part design occurs before tool construction has even begun.
Many simulation packages can evaluate the performance of AHSS grades in many forming environments. A simple constitutive equation with a single n-value sufficiently approximated the stress-strain response of older grades. The n-value of AHSS grades changes with strain, so when simulating AHSS grades, input the full stress-strain curve instead of choosing just one n-value. However, this capability may not be present in some proprietary industrial and university software. Use caution when using these programs to analyze AHSS stampings.
Today’s AHSS grades are not the commodities of yesteryear, but instead are highly engineered products unique to the production equipment and processing route chosen by the steelmaker. Although many companies may be capable of meeting the minimum and maximum mechanical properties associated with a specific grade, different suppliers may take up a different portion of the acceptable window. Working with your production steel supplier helps ensure you are using company-specific forming data.
Also remember that there are multiple products associated with a targeted tensile strength. For example, not only are there different families of 980 MPa minimum tensile strength steels (like dual phase, TRIP, and Q&P), but within each family there are multiple options. A grade designated as “DP980” may have enhanced global formability as measured with total elongation, enhanced local formability as measured in a hole expansion test, or have a balance between those properties. The associated material card for simulation will be different, and use of the incorrect card in development could lead to an under-engineered process when attempting to run with production steel.
Optimization Measures Applicable To Higher Strength Grades
- Simulation-driven compensation: Predict springback trends using metal forming simulation tools and apply geometric compensation to tooling surfaces based on sectional springback analysis.
- Process parameter optimization: Adjust blank holder force, drawbead resistance, and forming angles to balance material flow and reduce stress concentration.
- Post-forming correction: Add restriking or calibration processes to mitigate residual springback.
- Tooling design enhancements: Incorporate friction-reducing coatings and optimize mold geometry (e.g., increased draft angles) to control metal flow.
Key Points
- A virtual tryout evaluates the stamping and die design, and can detail areas of severe forming, buckles, excessive blank movement, and other undesirable deformation before starting tool construction.
- Evaluating alternative “what-if” scenarios in a virtual environment is faster and more efficient than grinding and welding on physical tooling, and mistakes have no permanent impact.
- Design of Experiments (DOE) studies are challenging to do in the physical press shop. The large number input changes required by the process makes it difficult to attribute changes to the intended variables tested or to some noise factor. Simulation allows for easier and faster evaluations when changing one or more parameters.
- AHSS grades change properties when deformed under different forming conditions. Forming simulation captures these changes to show how the final product will react.
- Observing the sheet metal transition from a flat blank to the engineered stamping in a transparent die is a valuable troubleshooting tool provided by virtual forming.
- Simulation codes accurately capture blank motion, thinning strains within the body of the stamping, and other global formability issues like severity compared with the conventional forming limit curve. However, prediction of local formability concerns like sheared edge stretchability is lacking due to the challenges of capturing all the effects related to creating that cut edge.
- The virtual forming codes do not accurately predict springback or the success of springback correction procedures because of the lack of pertinent data within a basic material card combined with the lack of accurate data everywhere in the stamping during the entire forming operation. However, users report reduction in recuts of the die from 12 or more to three or four based on information from the code.
A well-defined material card and accurate descriptions of metal flow throughout the stamping are critical for precise springback predictions, as discussed in the section on Simulation Inputs. Lacking that, many simulation packages can at least provide guidance on the trends which may help guide springback countermeasures.


