Formability, true fracture strain
topofpage
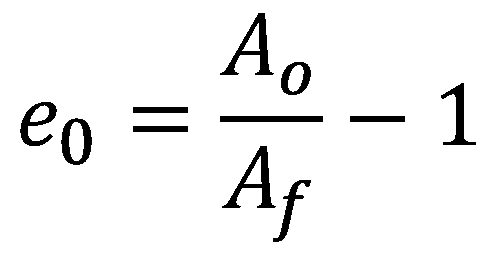
Fracture strain values derived from standard uniaxial tension tests can be used to evaluate automotive crashworthiness and forming behavior of aluminum alloys and Advanced High-Strength Steels (AHSS).Y-10, W-24, W-25, L-22, L-23, T-22, H-15, L-24 The true fracture strain (TFS) and similar concepts have emerged recently as intrinsic measures of local formability for AHSS. TFS is the true (logarithmic) strain associated with the “zero-gage-length” elongation at fracture (e0), where e0 is a conceptual engineering strain value based on an infinitesimal gage length in a tension test, where:
 |
Equation 1 |
and Ao and Af are the cross-section area before testing and the fracture area after testing, respectively (constant volume assumed).D-13 It follows that TFS is defined as:
 |
Equation 2 |
TFS is related to percent reduction of area at fracture (Z, %), where:
 |
Equation 3 |
True Fracture Strain (TFS) Measurement Methods:
Fracture Area (Af)
Tensile test samples have a rectangular cross section before testing, indicated in the left image in Figure 1. The right image shows an idealized tension test specimen fracture surface, where five thickness measurement locations are indicated: two at the edges (ta, te); one at the center (tc), and two at the quarter-width positions (tb, td). Measured approximately at mid-thickness, wf is the fracture width. The dashed outline indicates the original specimen cross-section before testing (to·wo = Ao), and a 10-sided polygon (decagon) approximates the projected fracture area (Af), where the corners of the polygon correspond width-wise to the five thickness measurement locations.

Figure 1: Schematic representation of a tension test specimen before testing (left) and after fracture (right) viewed along the tensile axis.
From the dimensions portrayed in Figure 1, four possible methods to determine Af are indicated in Table 1—three lineal methods and one areal method.H-17 Method A uses a single thickness measurement at mid-width. Alternatively, for Method A the minimum thickness (tmin) may be used in cases where tc ≠ tmin. Method B uses a weighted three-thickness average A-24 —also known as the ASTM parabolic method.H-14, H-16 Method C uses a five-thickness average. For Method D, Af is the area of the polygon depicted in the left image of Figure 1.

Table 1. Fracture Area Measurement Methods.H-17
Dimensional measurements may be made quickly and conveniently with a calibrated digital microscope equipped with focal stacking capability and linked to image analysis software. Note that tf, wf and Af are respectively: the projected thickness, the projected width, and the projected area of the fracture surface. That is, to accommodate irregular and angled fracture surface features, measurements are made with respect to a virtual plane normal to the tensile axis. Alternatively, lineal measurements may be made with a conventional microscope equipped with a dial indicator or measuring stage. In this case, continual manual refocusing may be necessary to ensure true projected dimensional measurements.
Recently the effects of fracture area measurement method and tension test specimen type on fracture strain values were evaluated H-17. It was concluded that specimen type (i.e., width-to-thickness ratio) has a far greater impact on the consequent fracture strain value in contrast to that of measurement method. It was also advised that, when reporting fracture strain values derived from tension tests, the specimen type, the material thickness, and the fracture area measurement method be clearly indicated.
True Fracture Strain (TFS) Measurement Methods:
Fracture Types
Based solely on fracture appearance, various fracture types may be observed, with examples shown in Figure 2. H-17 The fracture type changes from Type 1 to Type 2 to Type 3 as the tension test specimen width-to-thickness ratio (wo/to) increases (left to right). Type 1 fracture is perpendicular to the tensile axis across the specimen width; Type 2 fracture is an irregular transition from Type 1 fracture to Type 3 fracture; and Type 3 fracture is aligned at an angle across the specimen width (~50-60° from the tensile axis).

Figure 2: Various fracture types observed in uniaxial tension testing, from left to right: Type 1 fracture (wo/to = 4.5—ASTM Standard Sub-size specimen); Type 2 fracture (wo/to = 12.8—ASTM Standard specimen); and Type 3 fracture (wo/to = 16.8—JIS No. 5 Standard specimen); The original width-to-thickness ratio (wo/to) is measured within the gage section of the test specimen.H-17
A similar fracture orientation dependence on specimen width was reported for Dual Phase (DP) steels more than thirty years ago by researchers at the Colorado School of Mines.S-49 A 2018 publication W-23 confirmed this behavior for other AHSS types, and illustrated that the transitional behavior—in terms of critical width-to-thickness ratio—is material dependent.
Figure 3 shows example Type 1 and Type 3 fractures in cross-section at the mid-width position (corresponding to position tc in Figure 1). Type 1 fractures typically run at an angle through thickness (~50-55° from the tensile axis). While most Type 1 fractures resemble that shown in Figure 2 (left) and that shown in Figure 3a, occasional through-thickness chevron profiles and “cup and cone” W-23 type fractures have been observed for Type 1 fractures. Nevertheless, Type 1 fractures are roughly symmetric about a plane normal to the sheet surface at the mid-width position.

Figure 3. Examples of (A) Type 1 fracture, and (B) Type 3 fracture; Polished through-thickness cross-sections at the mid-width position; Tensile axis is horizontal.
Type 3 fractures invariably show localized necking in through-thickness cross-section as in Figure 3b. Therefore, Type 3 fractures are roughly symmetric about a plane parallel to the sheet surface at the mid-thickness position. Type 2 fractures have both Type 1 and Type 3 characteristics at different positions across the width and thus have no overall plane of symmetry. Various degrees of damage (void formation) are observed in through-thickness cross-sections of fractured specimens— for example, Figure 3. Citation H-18 contains a detailed compendium with more information on this topic.
ElsewhereW-23, L-21 it was explained that the idealized fracture thickness profile—as depicted in the right image in Figure 1—is applicable only to smaller width-to-thickness ratios (thicker, hot-rolled materials or narrower gage sections). For thinner, cold-rolled materials, or for wider gage sections, there is often no clear fracture thickness minimum at the mid-width position. In fact, in some cases a fracture thickness maximum at mid-width has been observed. Furthermore, occasional mid-thickness delamination renders the volume-constancy assumption in question, with associated implications in Equation 1
Formability Classification and Rating System
In 2016 the foundation for a formability classification and rating system was introduced for AHSSH-14, where formability performance expectations are distinguished by the relationships between true fracture strain (TFS) and true uniform strain in a tension test. Such performance mapping concepts continue to be explored and modified by steelmakersH-16, W-23, L-21, D-12, W-22, V-5, R-6, S-48 by automakersH-18, H-19 and by international industry consortiums.G-20 Traditionally AHSS performance has been represented by the product of ultimate tensile strength and total elongation (UTS x TE) and relative position on the so-called “banana diagram” or Global Formability Diagram. While this conventional methodology discriminates behavioral extremes, much is lost regarding the nuances of local formability.
Intrinsic Formability Parameters
Widely considered an intrinsic measure of global formability, the true uniform strain (εu) is the logarithmic strain associated with uniform elongation (UE, %) in a uniaxial tension test, where:
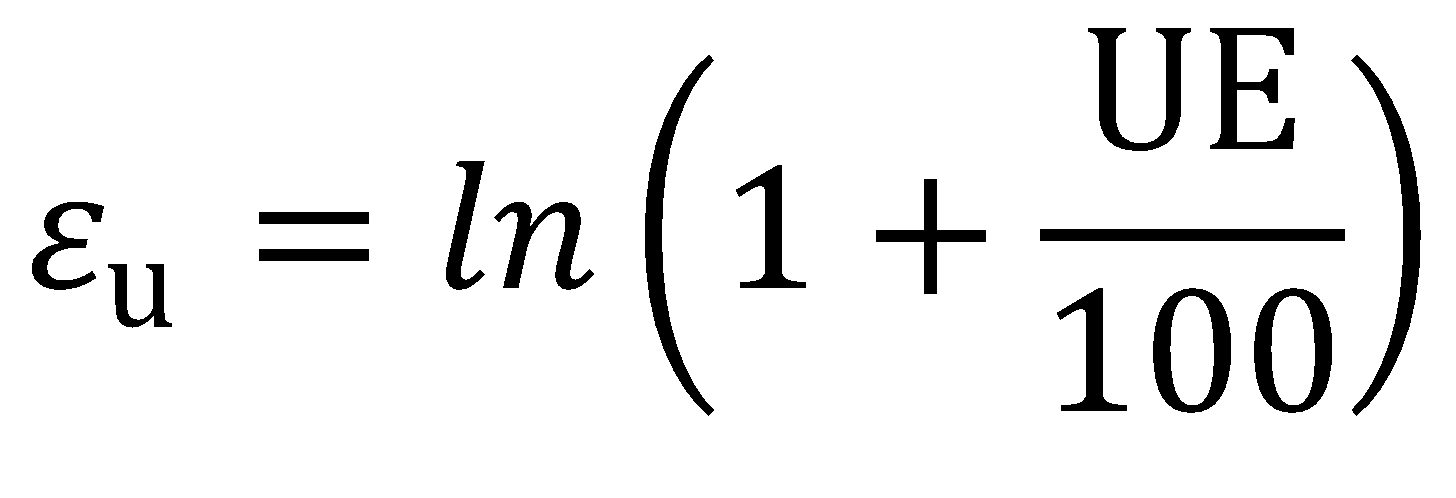 |
Equation 4 |
Example TFS and εu values are shown for a series of 980-class AHSS (980 MPa minimum tensile strength) in Figure 4H-14. In this analysis, TFS values ranged from less than 0.5 [DP 980 (LSi)] to more than 1.0 (CP 980), and εu values ranged from 0.05 (CP 980) to 0.15 (GEN3 980). The Third Generation AHSS materials (GEN3-type) have the largest εu values, and the Multi-Phase/Complex-Phase steels (MP/CP-type) have the largest TFS values. As a group the Dual Phase steels (DP-type) have intermediate εu values and a wide range of TFS values. As illustrated in Figure 4, TFS is far greater than εu. A similar disparity between fracture strain and uniform strain was shown in Citation D-14, and no consistent relationship between the two parameters was determined.

Figure 4: True uniform strain (εu) and true fracture strain (TFS) values for a series of 980-class AHSS; Error bars show the range among three test specimens for each material.H-14
The local/global strain ratio (L/GSR) and the formability index are key parameters to guide application-specific material selection and to help set targets for future AHSS grade developments.H-14, H-16 The L/GSR reflects the relative preponderance of local formability to global formability and is defined as:
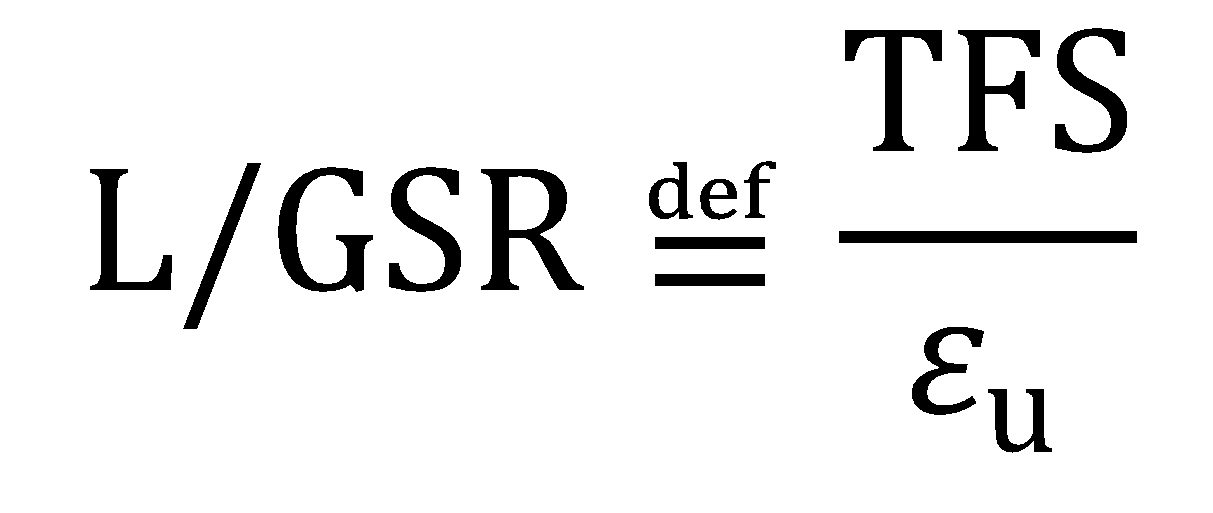 |
Equation 5 |
The L/GSR is useful in understanding relative intrinsic formability “character”. Materials with higher relative TFS values are naturally expected to perform better under flanging, edge stretching and tight-radius bending conditions [e.g., MP 980 (LCE) and CP 980 in Figure 4], while materials with higher relative uniform strain values (i.e., higher terminal n values) are better suited for stretch forming and are able to distribute strain more uniformly (e.g., GEN3 980 and GEN3 980-HY in Figure 4).
Furthermore, the formability index (F.I. in the formula) is defined as:
 |
Equation 6 |
This index represents an intermediate strain value between εu and TFS and provides a convenient measure of the overall formability expectation, where both local formability and global formability are considered. As an example, Figure 5 shows an exponential relationship between F.I., and the limiting bend ratio (r/t) determined from 90° V-bend testing for the same series of 980-class AHSS represented in Figure 4.H-14 It was reasoned that in the early stages of deformation, global formability (εu) dictates the strain distribution around the punch nose, while fracture resistance is governed by local formability (TFS) in the latter stages of deformation.

Figure 5. Correlation between the limiting bend ratio (f) and the formability index (F.I.) for a series of 980-class AHSS. A higher formability index corresponds to a lower (better) limiting bend ratio in 90° V-bend testing.H-14
Local/Global Formability Map
Figure 6 illustrates the essential framework of the local/global formability map—known eponymously as the Hance diagram.H-14, D-12, G-20 Here, the dashed lines represent the boundaries between global character (L/GSR < 5), balanced character (5 < L/GSR < 10), and local character (L/GSR > 10). The continuous curves represent arbitrary iso-F.I. contours corresponding to the values indicated (in parentheses). The qualitative assessments (Poor through Excellent) indicated for each formability level are also arbitrary; however, these performance level monikers were chosen to reflect real-world experience. Portrayed in this way (in contrast to Figure 4, for example), the relationships between true fracture strain and true uniform strain are more discernable, and both the formability character and the formability level become apparent.

Figure 6: Essential framework of the local/global formability map concept.H-16
Case Study Using the Local/Global Formability MapH-15
The basic utility of the local/global formability map concept was demonstrated for an automotive seating system development program.H-15 In this case study, stamping trials were conducted with two 980-class AHSS (980 MPa minimum UTS designation):
- 1.6mm 980DP(LSi): A classic Dual Phase (DP) ferrite/martensite steel with low silicon content (LSi), and
- 1.6mm 980MP(LCE)—a Multi-Phase (MP) steel with high yield strength and low carbon equivalent (LCE).
Basic formability parameters are summarized in Table 2 for the trial materials. Based solely on elongation values (UE, TE), one might have concluded that the formability of 980DP(LSi) would exceed that of 980MP(LCE).

Table 2. Formability Parameters for Two 980-Class AHSS.
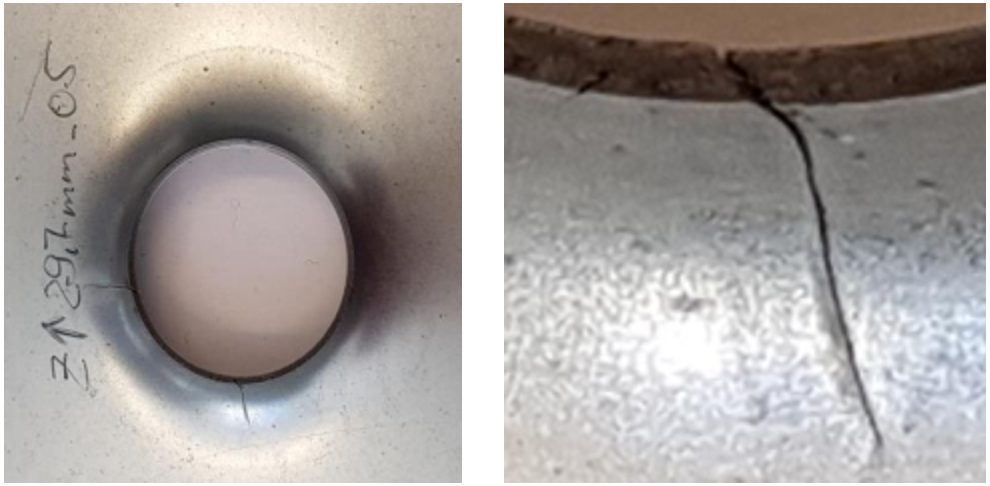
However, the stamping trial results were counterintuitive and drastically different among the two trial materials. The 980DP(LSi) material exhibited severe edge-cracking in multiple locations, while the 980MP(LCE) material ran without issue. Both materials were free of necking-type failures as predicted by computer simulations (sufficient global formability). An example part overview is shown in Figure 7. Typical 980DP(LSi) edge cracks are shown in Figure 8 for a pierced/extruded hole (Location 1) and for a blanked/stretched perimetric edge (Location 2). Clearly, relative sheared-edge ductility may not simply be deduced from conventional tensile elongation values.
![Figure 7: Overview of a stamped automotive seating component [length ~ 480 mm (19 in.)]. H-15](https://ahssinsights.org/wp-content/uploads/2020/10/2.3.5a-Figure7.svg)
Figure 7: Overview of a stamped automotive seating component [length ~ 480 mm (19 in.)].H-15
![Figure 8: Close-up views of Location 1 (left) and Location 2 (right) identified in Figure 7 [material: 980DP(LSi)]; Location 1 is a pierced hole that was extruded during forming, and Location 2 is a blanked perimetric edge that was stretched during forming (underside with respect to Figure 7). H-15](https://ahssinsights.org/wp-content/uploads/2020/10/2.3.5-Fig8.jpg)
Figure 8: Close-up views of Location 1 (left) and Location 2 (right) identified in Figure 7 [material: 980DP(LSi)]; Location 1 is a pierced hole that was extruded during forming, and Location 2 is a blanked perimetric edge that was stretched during forming (underside with respect to Figure 7).H-15
The local/global formability map coordinates of the 980DP(LSi) and 980MP(LCE) trial materials are shown in Figure 9. With reference to the framework described in Figure 6, 980DP(LSi) exhibits global/balanced character with an overall borderline rating of Fair/Good (F.I. = 0.20); while 980MP(LCE) has decidedly local character with an overall rating of Good (F.I. = 0.26). Furthermore, the TFS value of 980MP(LCE) is more than twice that of 980DP(LSi).

Figure 9: Local/global formability map featuring three 980-class AHSS—980DP(LSi), a classic DP ferrite/martensite steel with low silicon content (LSi); 980MP(LCE), an MP steel with high yield strength and low carbon equivalent (LCE); and 980GEN3, a third generation AHSS. Image based on Citations H-15 and H-17.
As an independent confirmation of the local formability advantage of 980MP(LCE), the hole expansion ratio (HER, λ) is more than four times that of 980DP(LSi) (Table 2). A strong correlation between TFS and λ has been confirmed by several authors L-22 L-23 T-22 H-15 As the component featured in this case study is dominated by extremely challenging edge-stretching conditions, 980MP(LCE) is the clear wiser material selection. However, in applications with more demanding global formability requirements, other issues such as intolerable strain localization could arise, and a third generation AHSS might be the best choice. As an example, when contrasting 980GEN3 AHSS (third generation AHSS) to 980DP(LSi) in Figure 9, the intrinsic global and local formability parameters (εu and TFS), as well as the F.I, are approximately 50% greater.
True Fracture Strain (TFS): Alternatives to TFS
While the local/global formability map methodology was developed in the context of true fracture strain (TFS), there are other ways to represent intrinsic local formability (fracture resistance) with data derived from standard uniaxial tension tests. In the original conception (Hance diagram), true uniform strain (εu) and TFS are two points along a logarithmic strain continuum from zero to fracture, and the relationships between these values elegantly describe the formability character (local/global strain ratio) and the overall formability level (formability index). The “best” local formability parameter may be a matter of practicality or applicability, or simply a matter of preference. Each method has its strengths and weaknesses, and such fracture strain concepts continue to evolve.
True Thinning Strain at Fracture
The true fracture strain (TFS) value is an area-based measurement of fracture strain and thus reflects the tension test specimen width change as well as the thickness change, for better or for worse. Citation H-18 suggests that the true thinning strain at fracture (ε3f) is a more appropriate measure of local formability, where:
 |
Equation 7 |
and to and tf are the original thickness (before testing) and final thickness (after fracture). By convention ε3f is a positive value and represents the absolute value of the true thickness strain at fracture (a negative value). Furthermore, the post-uniform portion of the fracture strain may be isolated by subtracting the uniform component of thinning strain, where:
 |
Equation 8 |
and εu and r are the true axial uniform strain and the plastic strain ratio (normal anisotropy) measured during the tension test, respectively. Post-uniform fracture strain components might be more relevant to materials with high uniform elongation values such as TWIP steels H-18. In a similar way, the post-uniform portion of the area-based TFS value may be expressed as:
 |
Equation 9 |
Another study W-23 concluded that: (1) area-based fracture strain measurements such as TFS result in less experimental scatter when compared to thickness-based fracture strain measurements such as ε3f, and (2) area-based measurements show less dependence upon the method by which fracture strains are determined. It appears that a single thickness measurement may misrepresent the fracture strain and that a multiple-thickness (average thickness) or area measurement approach may be more stable.
Critical Fracture Strain
Perhaps a lesser-known and under-exploited representation of fracture strain is the so-called critical fracture strain value (CFS)—introduced in 1999 for aluminum alloys in Citation Y-10 and re-visited in 2007 in the context of High-Strength Steel in Citation W-24. In concept CFS is the estimated true thinning strain at fracture, where:
 |
Equation 10 |
In determining CFS, only the engineering stress-strain data from a uniaxial tension test are needed—that is, no post-fracture area or thickness measurements are required: eu is the engineering uniform strain value (% uniform elongation/100); sf is the engineering fracture stress; and su is the ultimate tensile strength or UTS. Figure 10 shows an example engineering stress-strain curve for a 980-class AHSS, where the parameters relevant to CFS are marked. In this example, CFS = -ln[(1-0.07/2)·(787/1015)] = 0.29.

Figure 10: Example engineering stress-strain curve for a 980-class AHSS. Here, eu is the engineering uniform strain, su is the ultimate tensile strength (UTS), sf is the engineering fracture stress, CFS is the critical fracture strain, and ε3f is the true thinning strain at fracture.
True Fracture Strain (TFS):
Correlation to Hole Expansion Ratio
In a recent studyL-5, tensile properties (80 mm gage length) and hole expansion ratio were measure for AHSS with minimum tensile strength designations ranging from 600 to 1200 MPa, and thickness between 1 and 2 mm. No particular correlation was found between the hole expansion ratio and conventional tensile properties such as uniform elongation, total elongation, n-value, and so on.
The most promising relationship was found between the hole expansion ratio (converted to logarithmic strain) and the true thinning strain at fracture in tension. This relationship is illustrated in Figure 11 for total thinning strain (ε3f, Equation 7) on the left, and for post-uniform thinning strain (ε*3f, Equation 8) on the right. In both cases, better correlation is shown for transverse tension tests rather than for longitudinal tension tests (linear fit through the origin).

Figure 11: Hole expansion ratio (logarithmic strain) as a function of true thinning strain at fracture. Left graph: total thinning strain (ε3f); Right graph: post-uniform thinning strain (ε*3f).L-5
While the above correlations are good, the inherent scatter associated with the hole expansion test, fracture strain measurements, and other local formability parameters may limit applicability in a production environment. Furthermore, various factors affect hole expansion in production environments, including hole preparation technique, edge condition, and cutting clearance.
 |
Thanks are given to Brandon Hance, Ph.D., who contributed this article. |
![Forming Limit Curves (FLC)]()
Formability
topofpage
If all stampings looked like a tensile dogbone and all deformation was in uniaxial tension, then a tensile test would be sufficient to characterize the formability of that metal. Obviously, engineered stampings are much more complex. Although a tensile test characterizes one specific strain path, a Forming Limit Curve (FLC) is necessary to have a map of strains indicating the onset of critical through-thickness necking for different linear strain paths. The strains which make up the FLC represent the limit of useful deformation. Calculations of safety margins are based on the FLC (Figure 1).

Figure 1: General graphical form of the Forming Limit Curve.E-2
Picturing a blank covered with circles helps visualize strain paths. After forming, the circles turn into ellipses, with the dimensions related to the major and minor strains. This forms the basis for Circle Grid Strain Analysis.
Generating Forming Limit Curves from Equations
Pioneering work by Keeler, Brazier, Goodwin and others contributed to the initial understanding of the shape of the Forming Limit Curve, with the classic equation for the lowest point on the FLC (termed FLC0) based on sheet thickness and n-value. Dr. Stuart Keeler was the Technical Editor of these AHSS Guidelines through Version 6.0, released in 2017.
 |
Equation 1 |
These studies generated the left hand side of the FLC as a line of constant thinning in true strain space, while the right hand side has a slope of +0.6, at least through minor (engineering) strains of 20%.
Evidence accumulated over many decades show that this approach to defining the Forming Limit Curve is sufficient for many applications of mild steels, conventional high strength steels, and some lower strength AHSS grades like CR340Y/590T-DP. However, this basic method is insufficient when it comes to creating the Forming Limit Curves for most AHSS grades and every other sheet metal alloy. Grades with significant amounts of retained austenite experience significant deviations from these simple estimates.H-23, S-61 In these cases, the FLC must be experimentally determined.
Additional studies found correlation with other properties including total elongation, tensile strength, and r-valueR-8, P-19, G-23, A-45, A-46, H-23 with some of these attempting to define the FLC by equations.
Experimental Determination of Forming Limit Curves
ASTM A-47 and ISO I-16 have published standards covering the creation of FLCs. Even within these standards, there are many nuances left for interpretation, primarily related to the precise definition of when a neck occurs and the associated limiting strains.
There are two steps in creating FLCs: Forming the samples and measuring the strains.
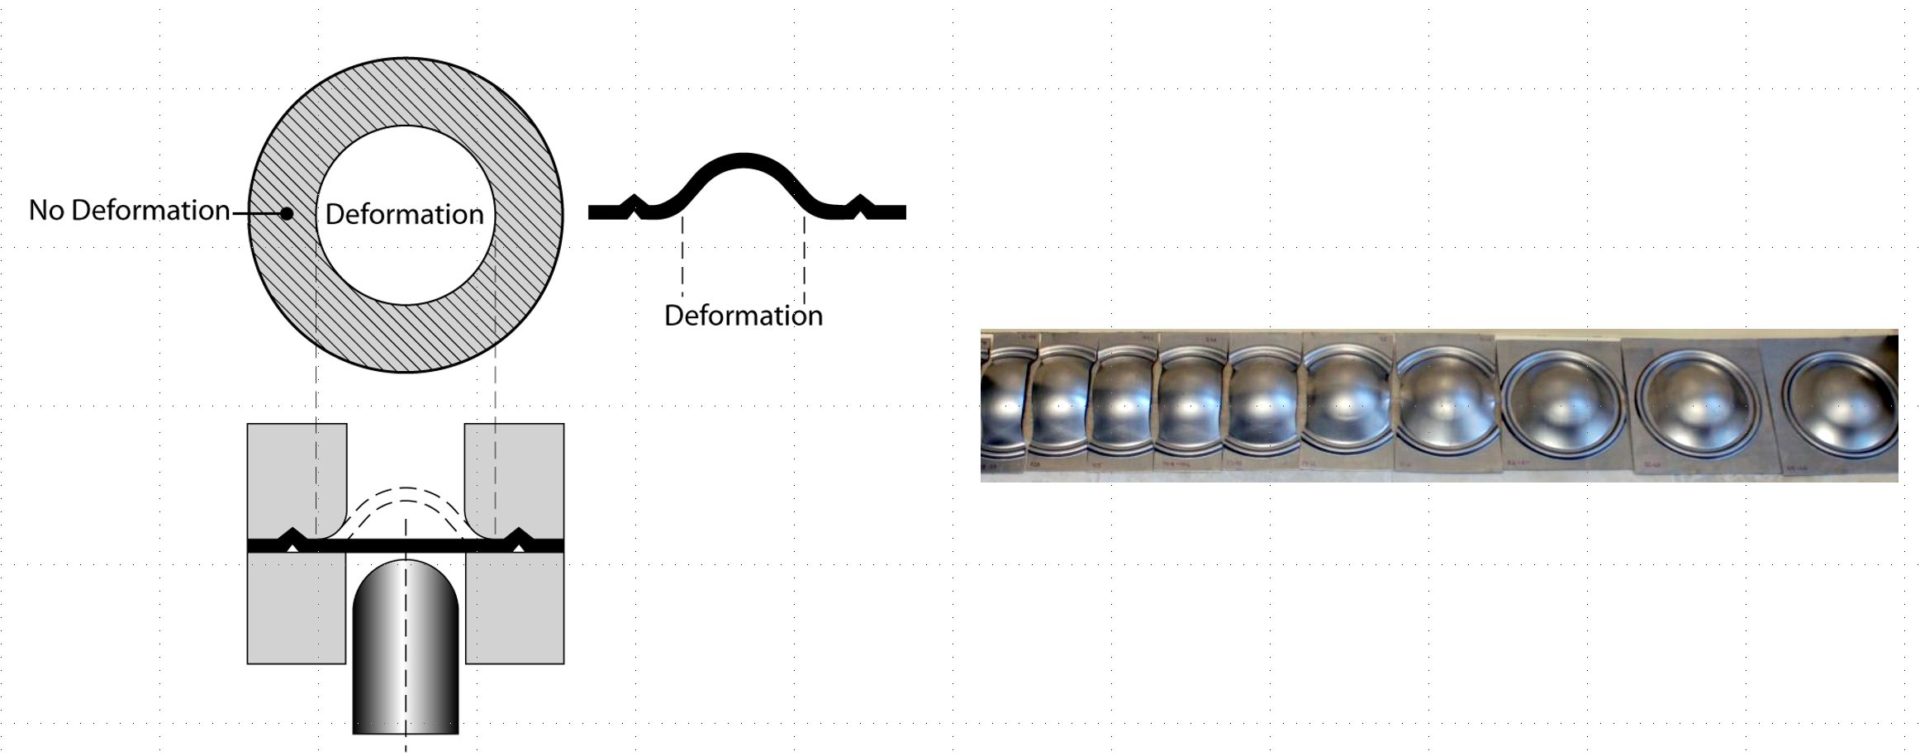
Forming sheet specimens of different widths uses either a hemispherical dome (Nakajima or Nakazima method N-14) or a flat-bottom punch (Marciniak method M-22) to generate different strain paths from which critical strains are determined. The two methods are not identical due to the different strain paths generated from the punch shape. These differences may not be significant for many lower strength and conventional High-Strength Steels, but may deviate from each other at higher strengths or with advanced microstructures. Figure 2 highlights samples formed with the Nakajima method.

Figure 2: Forming limit curves can be created by deforming multiple samples of different widths. Narrow strips on the left allow metal to flow in from the unconstrained edges, creating a draw deformation mode leading to strains that plot on the left side of the FLC. Fully constrained samples, shown on the rightE-2, create a stretch deformation mode leading to strains that plot on the right side of the FLC.
Generally, strains are measured using one of two methods. The first approach involves covering the initially flat test samples with a grid pattern of circles, squares, or dots of known diameter and spacing to measure the strains associated with deformation. An alternate approach is based on Digital Image Correlation (DIC), where a camera tracks the movement of a random speckle pattern applied prior to forming.W-26, H-22, M-21 DIC methods are directly suited for use with stress-based FLCs.
Differences between Forming Limit Curves
and Forming Limit Diagrams
Often, the terms Forming Limit Curve (FLC) and Forming Limit Diagram (FLD) are used interchangeably. Perhaps a better way of categorizing is to define the components and what they encompass. This is somewhat of a simplification, since detailed interactions are known to occur.
- The Forming Limit Curve is a material parameter reflecting of the limiting strains resulting in necking failure as a function of strain path. It is a function of the metal grade, thickness, and sheet surface conditions, as well as the methods used during its creation (hemispherical/flat punch, test speed, temperature). It is applicable to any part shape.
- Deforming a flat sheet into an engineered stamping results in a formed surface with strains as a function of the forming conditions like local radii, lubrication, friction, and of course part geometry. These strains are essentially independent of the chosen metal grade and thickness. Plotting these strains allows for a relative assessment of which strains are higher than others, but no judgment can be made on “how high is too high?”
- The Forming Limit Diagram is a combination of the Forming Limit Curve (a material property) and the strains (reflecting part geometry and forming conditions). The FLD provides guidance on which areas of the formed part requires additional attention to achieve robust stamping conditions. Creating a subsequent FLD may be warranted when conditions change, since changes to the sheet metal properties (FLC) and the forming conditions (radii, lubrication, beads, blank size) will change the FLD, potentially affecting the conclusions.
Key Points
-
- Conventional Forming Limit Curves characterize necking failure only. Fractures at cut edges and tight bends may occur at strains lower than that suggested by the Forming Limit Curve.
- Differences in determination and interpretation of FLCs exist in different regions of the world.
- This system of FLCs commonly used for low strength and conventional HSLA is generally applicable to experimental FLCs obtained for DP steels for global formability.
- The left side of the FLC (negative minor strains) is in good agreement with experimental data for DP and TRIP steels. The left side depicts a constant thinning strain as a forming limit.
- Determination of FLCs for TRIP, MS, TWIP, and other special steels typically requires an experimental approach, since conventional simple equations do not accurately reflect the forming limits for these advanced microstructures.
Back to the Top
Formability
A Forming Limit Curve (FLC) is a map of strains indicating the onset of critical through-thickness necking for different linear strain paths. The FLC is dependent on the metal grade and the specific methods used in its creation. When paired with the strains generated during forming of an engineered part, the associated Forming Limit Diagram (FLD) provides guidance on which areas of the part might be prone to necking failures during production stamping conditions that replicate those used in the analysis.
Several methods are available to measure the strains on formed parts. The earliest method is known as Circle Grid Strain Analysis (CGSA), with Dr. Stuart Keeler as its primary evangelist for nearly 50 years. Dr. Keeler was the Technical Editor of these AHSS Guidelines through Version 6.0, released in 2017.
As the name suggests, a flat blank is covered with a grid of circles of precisely known diameter, typically applied by electrochemical etching. Forming turns the circles into ellipses, with the dimensions related to the major and minor strains. Conventional measurement occurs after forming, and involves a calibrated Mylar™ strip marked with gradations indicating the expansion or contraction relative to the initial circle diameter. Typically, these are viewed through magnifiers, making it easier to discern the critical dimensional differences. Techniques and caveats are highlighted in Citations S-59 and S-60.
Instead of circles, most camera-based measurement techniques for analysis after forming use a regular grid pattern of squares or dots. Forming turns the squares into rectangles, and the camera/computer measures the expansion or contraction of the nodes at the corners of the squares to determine the strains. Similarly, forming changes the regular dot pattern, allowing for calculation of the strains.
These approaches determine only the strains after forming, and are constrained to assume linear strain paths. An alternate approach based on Digital Image Correlation (DIC), where a camera tracks the movement of a random speckle pattern applied prior to forming,W-26, H-22, M-21 follows the strain evolution which occurs during forming and is not affected by non-linear strain paths.
Although DIC strain analysis is more accurate and informative, it is a higher-cost approach best suited for laboratory environments. Circle-grid, square-grid, and dot-grid strain analysis are all lower cost options and readily applied on the shop floor. Each of these in-plant techniques have different merits and challenges, including ease of use, accuracy, and cost.
![Forming Limit Curves (FLC)]()
Formability
Automotive product designers target small radii for springback control, sectional stiffness, packaging constraints, and design features. These small radii lead to new challenges as applications for AHSS grades continue to increase. One of these challenges is an increased sensitivity to crack formation in those designs with small die radius to material thickness (R/T) ratios. Cracks forming at small R/T in AHSS grades are known as shear fractures.
General forming limit curves or other press shop criteria cannot predict shear fractures, nor are they flagged when traditional approaches are used in forming simulation packages. However, these shear fractures do occur in die tryout. Shear fractures are another form of local formability failure associated with multiphase AHSS such as DP and TRIP.
Shear fractures on AHSS may exhibit similarities to edge fracture, specifically the absence of necking prior to failure. This is in contrast with global formability failures, which are characterized by significant thinning near the fracture. Shear fractures occur almost immediately (within 1 mm of displacement) after reaching maximum load, meaning there is essentially no post-uniform elongation. This is contrary to the tensile behavior where significant post-uniform ductility remains prior to fracture.K-9
Figures 1 and 2 highlight the appearance of a crack on the bend radius caused by shear fracture. No thinning is observed, which is consistent with failures limited by local formability concerns.

Figure 1: Shear fracture in DP780.F-5

Figure 2: Shear fracture in DP980.D-7
Figure 3 shows a typical shear fracture on a DP780 part viewed from different angles. The shear fracture occurred on the sharp radius on the left whereas the larger radius on the right experienced no failure. Depth of draw and draw bead configuration were the same on both sides of the draw panel. Restraining force was also similar on both sides of the blankholder. The significant variable was the die radius.

Figure 3: Different Views of a DP780 Part with Small R/T Leading to Shear Fracture at Bead Radius. An R/T = 1.67 led to shear fracture on the left side of the image, while the symmetric area on the right side had an R/T = 4.4, with no shear fracture even though it had the same depth of draw, draw bead configuration, and restraining force.U-6
It is helpful to describe the characteristic differences between conventional tensile fracture and shear fracture, as shown in Figure 4. A conventional tensile fracture is called a Type I fracture, and has been the typical fracture type historically encountered. Type I fractures occur off the radius, and is preceded by necking or metal thinning. Successful prediction of this type of fracture occurs with conventional application of strain analysis and Forming Limit Diagrams. This is in contrast with shear fracture – categorized as a Type III fracture – which occurs within the die radius, with no thinning from necking (typical for local formability failures). Type II fractures occur at or near the tangent of the radius in metal drawn over the radius.

Figure 4: Schematic descriptions of different fracture types ranging from shear fracture to conventional tensile fracture.S-19
Numerous studies show that radius to thickness ratios (R/T) are significant indicators of performance with respect to shear fracture on AHSS. This research led to the establishment of R/T ratio guidelines. While bend testing also categorizes products based on achievable R/T, the significant difference is that the ends are not restrained in a standard bend test. Shear fracture testing typically involves some type of restraining force, such as that seen in a Bending Under Tension test.
As with edge fracture, AHSS grades may be available at a similar strength but with improved minimum R/T ratio. Guidelines have been established for minimum R/T ratios based on bend test results as well as real world case studies. For DP340/590 and above, the R/T ratio should be at least 3T for product features such as embossments where there is relatively limited metal motion. Pulling these grades across a radius or through a draw bead under tension increases the minimum R/T ratio to at least 5T.
As strength levels increase, it is necessary to increase R/T ratios to avoid shear fractures. One study recommended a minimum R/T of 8 for DP800W-4 while another has a critical R/T of at least 7T for DP980S-19. Differences such as these are likely due to different test conditions such as the tension applied during bending, test speed and lubrication. Higher deformation rates (forming speed) and better lubrication tends to promote shear fracture and cause fracture on material close to the die radius.S-19 A combination of high forming speed and back tension leads to DP590 and DP780 having a critical R/T value of 12, with DP980 having a critical R/T of over 16.S-20
Shear fracture is sensitive to rolling direction. If the radius is running in the rolling direction, the bend will be transverse to the rolling direction which is the worst-case scenario when trying to avoid shear fracture. Understanding the directionality of minimum R/T ratios when designing the part to avoid shear fractures is therefore important. One study evaluated DP780, which discovered a critical minimum R/T of 5 to avoid shear fracture, although this varied with back tension and pulling speed. At all R/T ratios tested, the samples oriented so the bend radius was parallel to the rolling direction failed at lower stress than if the bend radius was perpendicular (transverse) to the rolling direction. Tighter R/T magnifies this effect, as does a higher strength grade. At 1.5 R/T, shear fracture with bends perpendicular to the rolling direction occurred when the stress reached 81% of the tensile strength, where in samples with the bend parallel to the rolling direction, failure occurred at 66% of the tensile strength.S-21
Microstructure also plays a role. Phase distribution uniformity, fine microstructural phases, and a decrease in hardness ratio between martensite and ferrite all increase formability as measured by the smallest achievable R/T resulting in split-free panels.W-4, H-6 These are the same factors that result in improved hole expansion values.
Forming Limit Curves are the limiting strain states based on the onset localized deformation, or necking. Generating conventional FLCs typically involves using a 100mm diameter hemispherical punch to deform 1mm to 2mm thick sheet steels, resulting in R/T ratios of 25 or higher. Many decades of use have shown that conventional FLC approaches can be used to assess part robustness and predict failure in areas having large R/T ratios and failure modes affected by global formability. These show up as Type I fractures.
When the R/T ratio is within the shear fracture limit but above the simple bending limit (no stretching imposed to bending), failure may occur in the radius or outside the radius, depending upon the tension level applied during forming. If the failure occurs inside the radius, the failure limit derived from the shear fracture tests should be used as the criterion to predict failure. Finally, when the R/T ratio is smaller than the limit from the simple bending test, the failure occurs in the radius.
In addition to large R/T, most Forming Limit Curves are generated from tests are conducted at a very low strain rate, maintaining an isothermal condition (no heat generated from deforming the sheets). While these conditions are consistent with those adopted for the simulations, they differ significantly from those encountered in industrial practice.
Ignoring the role of deformation-induced heating is one of the most significant reason for the limited success of shear fracture prediction in conventional forming simulation. Strain rates for stamping are typically 1,000x to 10,000x greater than the strain rates for tensile testing. Contact between the sheet metal and the tooling at tight radii also drives up the local temperature. Maximum temperature at the die-sheet interface of 70°C has been found on DP590, but 105°C for CP800.F-6 Stamping DP780 leads to die temperatures of 180°C and blank temperatures of 108°C.P-11 Stamping DP980 produces contact temperatures of over 200°C in certain conditions.F-28
Using a simulation model that accounts for the thermal effects of forming and the associated response in the sheet metal, along with the traditional mechanical deformation response, has been shown to dramatically improve simulation accuracy to predict when shear fracture will occur.K-9, S-20, S-22
Therefore, it is important for the part designer to design an appropriate die radius for a given AHSS product and forming conditions / processes used to manufacture the part. Forming simulation is an excellent tool to derive an appropriate die radius for the specified part and forming process, recognizing that the failure criterion in the simulation must incorporate all conditions and failure modes encountered, including shear fracture.
Key Points
-
- AHSS grades are at risk of crack formation in designs with small die radius to material thickness (R/T) ratios. These cracks are known as shear fracture.
- The strains associated with shear fracture are below that which are associated with the Forming Limit Curve.
- As with edge fractures, shear fractures are also a function of microstructure, strength level, and rolling direction. Consider these variables when designing parts and conducting die try-outs with prototype steel.

Formability
Strength is defined as load divided by cross-sectional area. In a tensile test, the choice of when the cross-sectional area is measured influences the results.
It is easiest to measure the width and thickness of the test sample before starting the pull. At any load, the engineering stress is the load divided by this initial cross-sectional area. Engineering stress reaches a maximum at the Tensile Strength, which occurs at an engineering strain equal to Uniform Elongation. After that point, engineering stress decreases with increasing strain, progressing until the sample fractures.
However, metals get stronger with deformation through a process known as strain hardening or work hardening. As a tensile test progresses, additional load must be applied to achieve further deformation, even after the “ultimate” tensile strength is reached. Understanding true stress and true strain helps to address the need for additional load after the peak strength is reached.
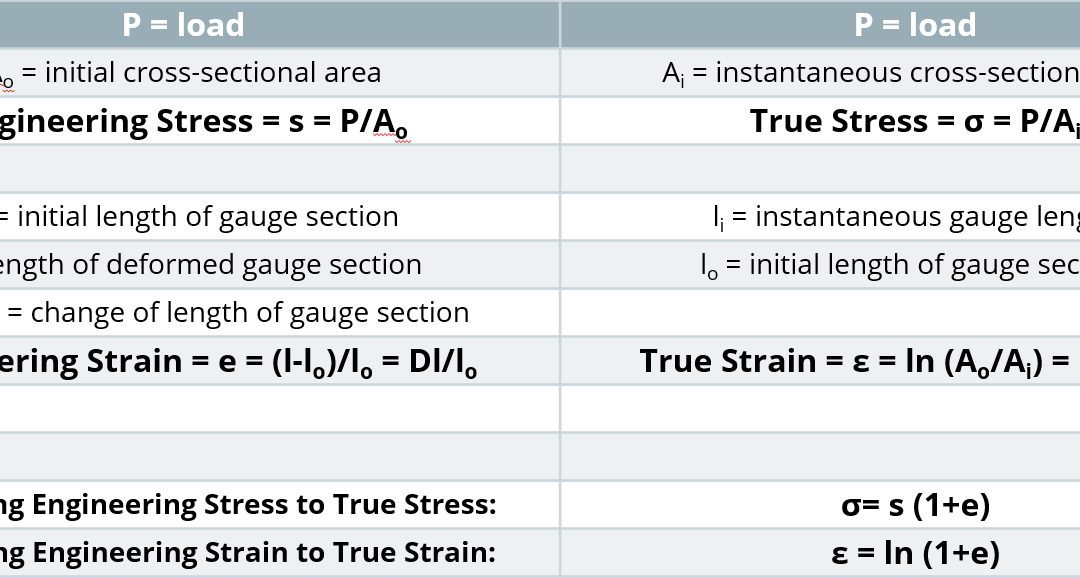
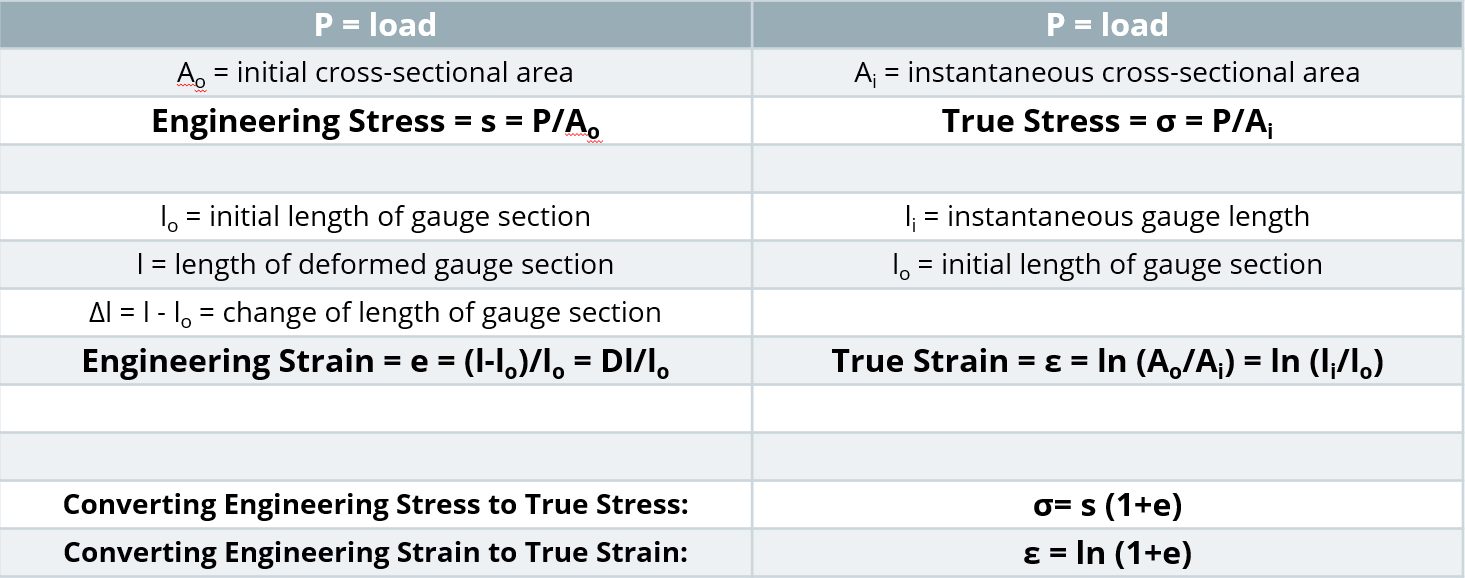
During the tensile test, the width and thickness shrink as the length of the test sample increases. Although these dimensional changes are not considered in determining the engineering stress, they are of primary importance when determining true stress. At any load, the true stress is the load divided by the cross-sectional area at that instant.
The true stress – true strain curve gives an accurate view of the stress-strain relationship, one where the stress is not dropping after exceeding the tensile strength stress level.
- True stress is determined by dividing the tensile load by the instantaneous area.
- True strain is the natural logarithm of the ratio of the instantaneous gauge length to the original gauge length.
True stress – true strain curves of low carbon steel can be approximated by the Holloman relationship:
σ = Kεn
where true stress = σ; true strain = ε, n is the n-value (work hardening exponent or strain hardening exponent), and the K-value is the true stress at a true strain value of 1.0 (called the Strength Coefficient).
True stress-strain curves obtained from tensile bars are valid only through uniform elongation due to the effects of necking and the associated strain state on the calculations. Inaccuracies are introduced if the true stress-true strain curve is extrapolated beyond uniform strain, and as such a different test is needed. Biaxial bulge testing has been used to determine stress-strain curves beyond uniform elongation. Optical measuring systems based on the principles of Digital Image Correlation (DIC) are used to measure strains. The method by which this test is performed is covered in ISO 16808.I-12
Stress-strain curves and associated parameters historically were based on engineering units, since starting dimensions are easily measured and incorporated into the calculations. True stress and true strain provide a much better representation of how the material behaves as it is being deformed, which explains its use in computer forming and crash simulations. Although sample dimensions are challenging to measure during a tensile test, there are equations that relate engineering units to true units. Conventional stress-strain curves generated in engineering units can be converted to true units for inclusion in simulation software packages.

Relationships Between Engineering and True Properties

Formability
Most sheet metals have different “Global” and “Local” forming capabilities, so it is critical to understand their meaning to optimize grade selection, processing, and usage.
Historically, most fabricators needed to consider only global formability when designing and stamping parts. Drawing, plane-strain tension, and stretch forming are “global” forming modes where deformation occurs in the plane of the sheet over relatively large regions of material. Tensile failures or necking failures, where the steel progressively thins during forming, are a characteristic of global formability failures. The strains across a stamped part start low and evenly distributed but begin to concentrate as the punch approaches bottom-dead-center. Critical thinning (also called necking) occurs if the strains induced by the part shape and forming process exceed the forming limit of the chosen sheet metal. Forming simulation software packages have reliably shown the ability to accurately predict global formability concerns and hot spots with the use of inputs like tensile test data and the correct forming limit curve.
Local formability failure modes are an entirely different failure condition, where fractures occur out of the plane of the sheet in response to concentrated deformation created when forming localized features like stretch flanges, extruded holes, or bends around a radius too small for the selected steel grade. These failures typically occur without any observable thinning or necking (Figure 1). Forming simulation software that considers only the forming limit curve or maximum thinning as the failure criteria cannot predict local formability failures.

Figure 1: A fracture related to insufficient local formability. Note the lack of thinning near the fracture. H-5
Cutting conditions and edge stresses developed in blanking and slitting operations play a significant role in limiting local formability. Trim steel clearances, shear angles, trim steel materials, tool sharpness and design, steel rolling direction, and part design considerations are all important (Figure 2).

Figure 2: Cut edge uniformity influences edge quality.U-6
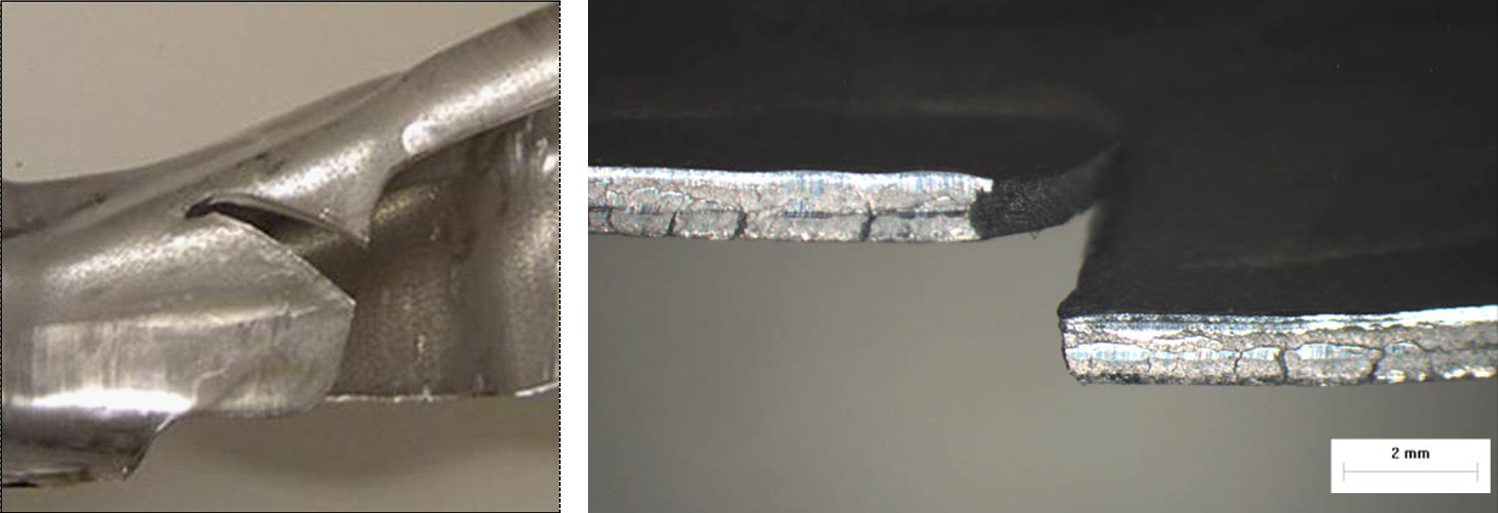
The absence of global thinning leading to the onset of localized necking highlights the importance of clearly defining the actual mode of failure before trying to identify possible solutions. Examination of the edge of the part where the failure is occurring is the best way to accomplish this. Figure 3 shows a photo of a typical local formability related edge fracture where no observable thinning/necking before fracture occurs.

Figure 3: A typical local formability edge fracture viewed from different angles, with no appreciable thinning prior to fracture.U-6
Some AHSS grades are more prone to these local formability failures. A reduced hardness difference between microstructural phases appears to improve local formability. At a given tensile strength level, there may be grades with improved global formability, improved local formability, or a balanced approach available. Choosing the optimum grade requires understanding of the manufacturing die process and the functionality requirements associated with the part and its application.
Figure 4 shows an edge fracture on a DP980 rocker panel. This panel experienced edge fractures during production, occurring in embossments along the edge of the part, with no evidence of necking at the fracture site. This is a classic local formability failure, reinforcing the need to inspect the conditions at the fracture zone of AHSS to determine whether the root failure is global or local formability. Process and die solutions differ based on the mode of failure.

Figure 4: Classic local formability related edge fracture on an embossment within a DP980 part.U-6
Grade dependency is highlighted in Figure 5, which compares edges of HSLA 50SK on the left and DP500Y/780T on the right after stretch-bend testing under conditions to produce fracture. The HSLA sample shows the characteristic thinning down associated with necking. The DP steel did not have a visible neck at the failure location.S-11

Figure 5: Left: HSLA 50SK, showing thinning at the fracture location, which is typical for global formability failures. Right: DP 500Y/780T, showing no thinning at the fracture location, which is typical for local formability failures.S-11
Mechanical tests now being employed to better quantify and characterize the unique local formability related failure modes associated with AHSS include:
Fracture-Limited Formability = Local Formability
In general, most sheet metal stamping failures result from exceeding the necking limit, and are termed global formability failures. However, there are important conditions which promote fracture before first developing a neck. These are of particular concern since such fractures cannot be predicted or anticipated based on conventional FLC and grid strain analysis techniques. Recent advances in metal forming software codes now allow input of appropriate data which substantially aids in these efforts. Still, there is no universally accepted shape of the Fracture Limit Curve.
Local Formability: Bending
Researchers discovered that all the steel through the sheet thickness must exceed the forming limit for necking to begin. In tight bends where the inner surface is compressed, strains never reach the critical strains in the conventional forming limit curve, which is why necking is not seen on the outer bend surface above a critical r/t level, or the ratio between the radius and the thickness.
However, as strength increases, the fracture limit is closer to the necking limit determined by the FLC. Advanced High Strength Steels are even more sensitive to local formability failures due to the localization of strains which occur at the interface between hard and soft phases in the microstructure.
On thin, wide sheet, bending strains on the metal surface plot along the axis of plane strain. The Fracture Limit Curve in this location is higher than the necking Failure Limit Curve, but since the critical strains only need to be reached on the outermost surface, higher-strength steels have a greater risk of experiencing bending fractures. In these cases, the material fracture limit becomes the effective forming limit in deformation modes with severe through-thickness strain gradients, and this is not considered in the traditional FLD.
Local Formability: Sheared Edge Expandability (Hole Expansion)
In a hole expansion test, the strains at the edge of the expanding hole follow a uniaxial strain path until reaching the fracture limit. In lower-strength steels with clean, machined (undamaged) edges, expansion ratios over 300% might be possible. As mentioned above, higher-strength steels have a lower fracture limit. Still, undamaged machined edges provide the best conditions for high hole expansion.
Cutting operations like blanking, shearing, and punching all damage the edge and lowers the fracture limit, meaning that the fracture limit might be reached at even lower strains. Strain localization occurring at the interface between hard and soft microstructural phases highlight why some grades have still lower critical strains.

Figure 6: Higher-strength steels have a smaller gap between the necking Forming Limit Curve and the Fracture Limit Curve.
Summary of Global Formability
- The resistance to localized thinning (necking) is the key to global formability.
- Stamped parts get progressively thinner as the press stroke approaches bottom-dead-center. Rapid thinning in critical areas lead to the onset of localized necking. Global formability promotes the ability to reach deeper draw depths before initiation of necking.
- Measures of global formability include the work-hardening exponent (n-value), the uniform elongation value, and the total elongation value determined in a tensile test, along with the forming limit curve (FLC).
- Global formability failures occur when a through-thickness volume of the formed sheet steel exceeds this forming limit and begins to neck.
Necking failure typically should not occur if the global formability limit is exceeded on only the outer surface of steel bent over a radius or expanded at a cut edge and not through the full thickness of the metal.
- Uniform elongation measures the resistance to local necking. The global formability limit corresponds to Uniform Elongation in the strain state achieved in a tensile test sample. The Forming Limit Curve (FLC) encompasses all strain states.
- For mild and conventional high strength steels, there is a large difference between the necking limit and the ultimate fracture limit. This corresponds to the difference between Uniform Elongation and Total Elongation in a tensile test, where the value of total elongation is typically twice that of uniform elongation.
Summary of Local Formability
- The resistance to fracture is the key to local formability.
- Local formability promotes fracture resistance in response to creating local product features like stretch flanges, extruded holes, and tight-radius bends.
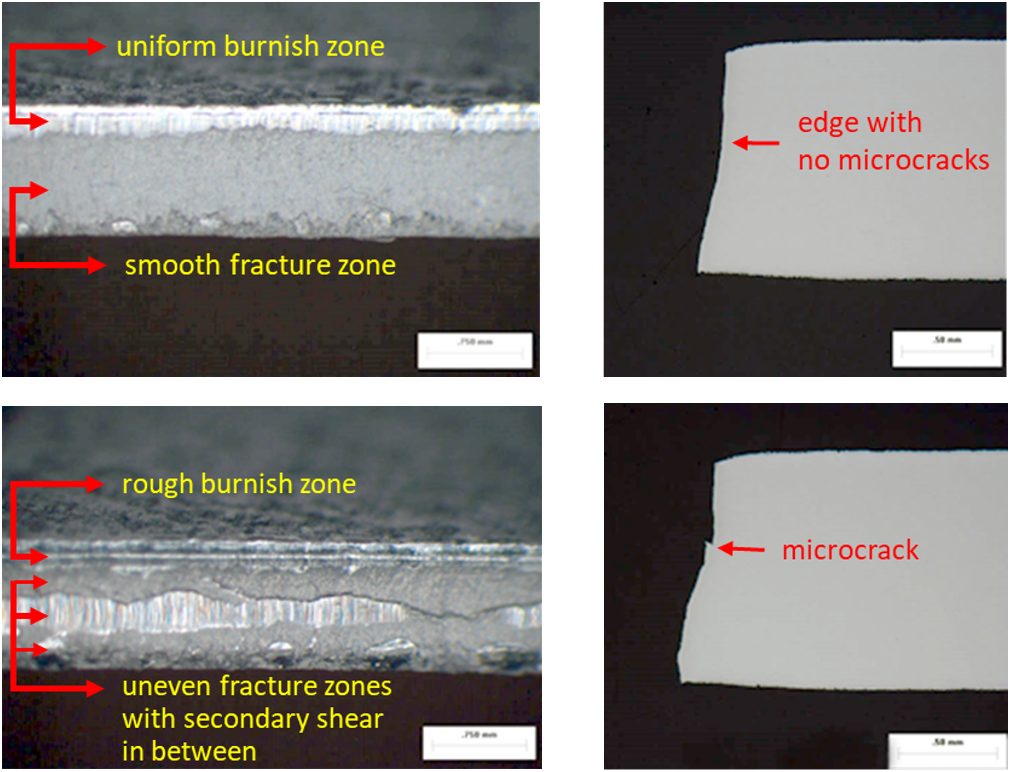
- Local formability tests which evaluate the stretchability of appropriately prepared edges by deforming them with a punch may have limited reproducibility between labs due to the influence of different sample preparation methods. Determining parameters like True Fracture Strain, Reduction in Area at Fracture, or Thickness Strain at Fracture with a well-defined tensile test typically results in repeatable and reproducible values.
- Local formability failure occurs when strains at the surface or edge exceed the ultimate fracture limit, a value that is higher than the necking limit determined by the Forming Limit Curve.
- Local formability failures occur more frequently on higher strength steels partly because of a smaller difference between the necking limit determined by the Forming Limit Curve and ultimate fracture limit.
- Work hardening and damage from edge preparation methods like shearing further reduce edge formability to values typically lower than indicated by the Forming Limit Curve, especially for AHSS. The strain localization at the interface between hard and soft phases in AHSS also contribute to an increased risk of local formability failures.
- The lack of a localized neck is a characteristic trait associated with of local formability failures.


![Figure 8: Close-up views of Location 1 (left) and Location 2 (right) identified in Figure 7 [material: 980DP(LSi)]; Location 1 is a pierced hole that was extruded during forming, and Location 2 is a blanked perimetric edge that was stretched during forming (underside with respect to Figure 7). H-15](https://ahssinsights.org/wp-content/uploads/2020/10/2.3.5-Fig8.jpg)


