Forming simulation of cold formed stampings has matured to the point where most commercial simulation software packages easily predict global formability concerns such as necking failures. The strain distribution and final mechanical properties in the formed part come from details such as the yield criteria, hardening curve, and constitutive laws, along with assumptions of tribology through the coefficient of friction.
In contrast, simulation of hot formed stampings is substantially more complex due to the interactions of temperature, metallurgical phase changes, and continuous cooling throughout forming. Cooling channels embedded in the tooling play a key role in heat extraction. The spacing, diameter, and distance from the surface of these channels all influence the heat transfer capabilities of the tool design. The tool material as well as the flow and heat transfer characteristics of the cooling fluid also plays a significant role. Many hot stamped parts achieve tailored properties across the part, through either using tailor welded/rolled/patch blanks or undergo differential heating or cooling to produce soft zones. Accurate simulation predictions require capturing the forming and cooling differences of these approaches. Further improvements occur when simulations incorporate how temperature influences the changes which occur to tool deformation and tooling thermal expansion.
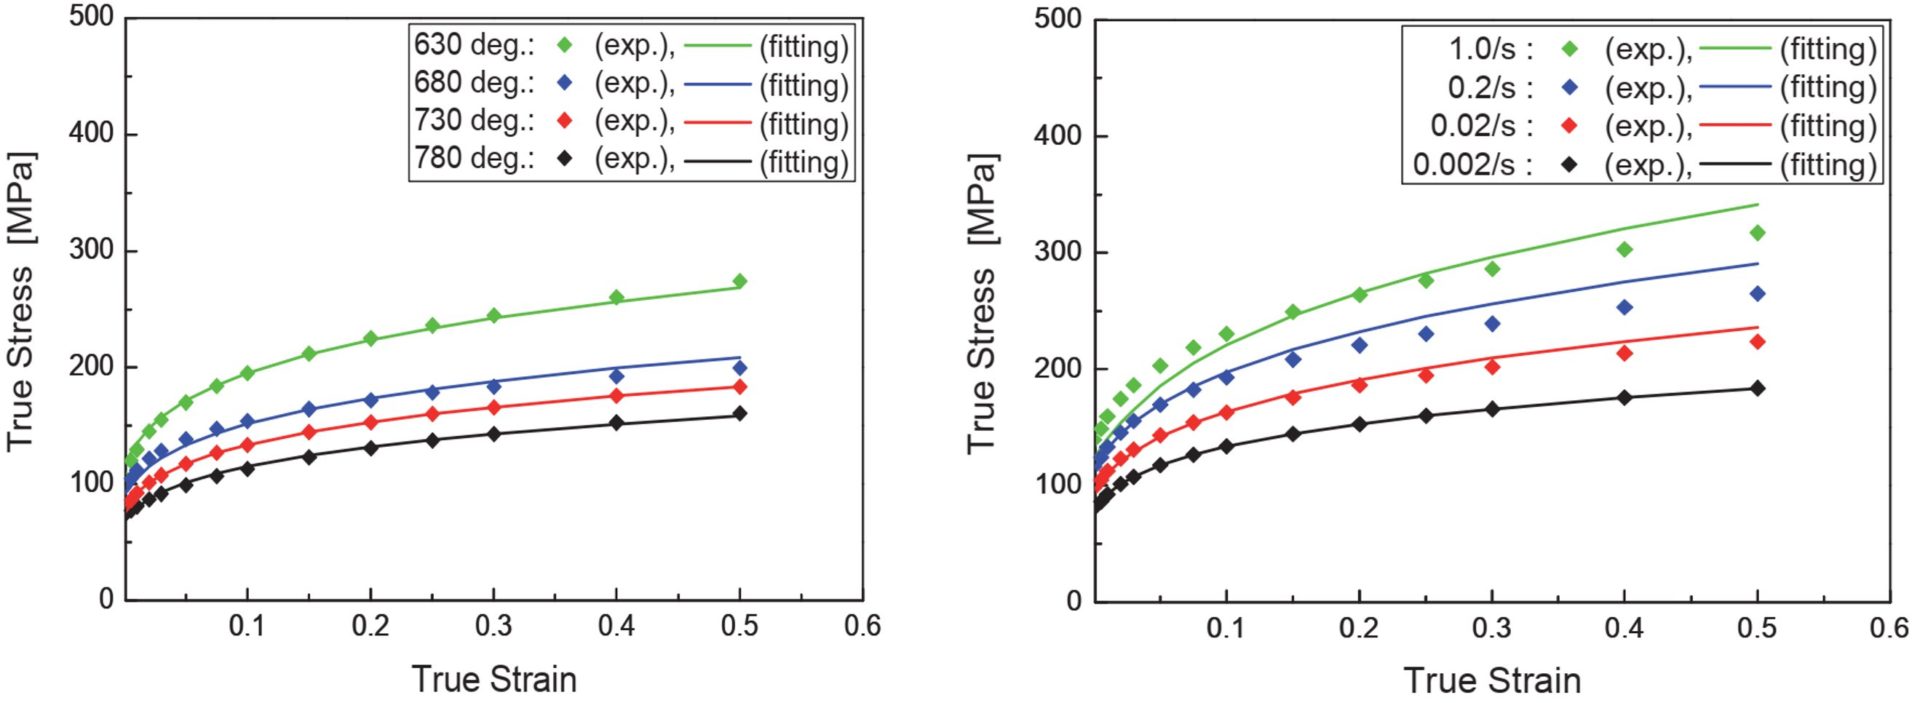
In terms of the material characterization, mechanical properties as determined in a tensile test are temperature dependent. Further influencing the stress-strain response is the strain rate at which the deformation occurs (Figure 1).

Figure 1: Influence of strain rate and temperature on the stress-strain curve of 22MnB5 press hardening steel. The left image are curves determined at a strain rate of 0.02/second; the right image are curves determined at 730 °C. S-91
Similarly, Forming Limit Curves are a function of the strain rate and temperature at which they are determined. The complex interactions of the many variables make it impossible to use a traditional FLC representation. One approach is to use a three-dimensional thermal forming limit diagramS-92, which may be more accurately described as a three-dimensional thermal forming limit surface (Figure 2).
Figure 2: Three-dimensional Thermal Forming Limit Surface for 22MnB5 Press Hardening Steel.S-92
Material properties such as the Elastic Modulus and Poisson’s ratio also change with temperature, along with heat conductivity and specific heat. These parameters are summarized in Table I using data from Citation S-93.

Table I: Thermal-mechanical material properties for 22MnB5 press hardening steel.S-93
Incorporating all details related to the forming and cooling of press hardened steels requires the use of coupled thermo-mechanical-metallurgical finite element models which capture the deformation and phase transformations which occur throughout the process. Improved accuracy occurs with additional refinement in the models, such as incorporating the effects of deformation occurring while the steel is still fully austenitic. Austenite grain boundaries are major nucleation sites for diffusional transformation to ferritic phases, and deformation increases dislocation density and reduces the grain size, promoting the conditions for at least some ferrite formation instead of martensite.
Key to heat extraction is good contact between the cooling sheet steel and the tool surfaces. However, this is challenging to achieve with vertical or near-vertical walls. These areas may be severely deformed, but are at risk of not achieving the desired microstructure and strength if the lack of tool contact prevents sufficient heat extraction. Locally, this also changes the residual stress distribution.
A 2014 study considered both conditions, where a grain refinement model included the effects of prior austenite deformation in the hot stamping simulation of a hat-shaped part.B-57 Without considering austenitic deformation, sidewall hardness remains above 450 HV and is therefore fully martensitic (Figure 3). Incorporating the influence of part deformation occurring while the steel is in the austenite region, the model shows a substantial strength reduction in the highly-deformed wall region (Figure 3b). The model projects hardness levels close to 200 HV on the surface layers where the deformation is more severe than the core layer of the part. In contrast, core layer hardness is projected to be slightly over 300 HV, as indicated in Figure 3C which shows the cross-sectional profile in the thickness direction. These hardness levels suggest that martensitic transformation has not fully occurred in this location along the sidewall, either at the surface or at the core.
Nonetheless, this phenomenon can be avoided by using proper die and process design capable of providing sufficiently rapid cooling rates.
Figure 3: Incorporating prior austenite grain size in simulation lowers predicted hardness in highly deformed areas.B-57