![Yield Strength]()
Mechanical Properties
Forming forces need to exceed the yield strength for plastic deformation to occur and an engineered stamping to be produced. If a metal structure is loaded to a level below the yield strength, only elastic deformation occurs, and the load can be removed. With no permanent (plastic) deformation, the metal returns to its original shape.
On the stress-strain curve, yielding occurs where the initial linear region transitions to the non-linear portion. This transition does not occur always at a clearly visible well-defined point. Consistent yield strength measurement is facilitated by defining how this parameter should be determined. Two techniques are used when working with sheet metals. The most common method is to draw a line parallel to the modulus line at an offset strain of 0.2%. The intersection stress becomes what is defined at the “0.2% offset yield strength” (Figure 1). This value is referred to as Rp0.2. The second technique is drawing a vertical line at the 0.5% strain value until it crosses the stress-strain curve. This determines the “yield strength at 0.5% extension under load,” abbreviated as Rt0.5 (Figure 2). These techniques result in similar – but not identical – values for yield strength.

Figure 1: 0.2% offset yield strength, determined by offset of a line parallel to the modulus line by 0.2% strain.

Figure 2: Yield strength at 0.5% extension under load, determined by a vertical line offset from the origin by 0.5% strain
Some metals have yield point elongation (YPE) or Lüders bands. Deforming metal is locked in place by interstitial carbon and nitrogen atoms and other restrictive features of the microstructure. Load increases with little corresponding deformation – or put another way, stress increases with only an incremental increase in strain. The highest stress reached is known as the upper yield strength or upper yield point. Once a band of deformed (yielded) metal breaks free from being pinned by dislocations in the microstructure, the stress drops and there is an increase in strain. The lowest stress reached is known as the lower yield strength or lower yield point (Figure 3). The bands of deforming metal are known as Lüders bands, named after one of the people first observing the phenomenon. Lüders deformation continues at approximately a constant stress until the entire sample has yielded, and the sample begins to work harden. The total strain associated with this type of deformation is known as yield point elongation, or YPE. Stabilized, interstitial-free, vacuum degassed steel, such as ULC EDDS are not at risk of aging, and will not exhibit YPE. For those grades susceptible to YPE, leveling prior to sheet forming will minimize this tendency.

Figure 3: Defining upper yield stress, lower yield stress, and yield point elongation.
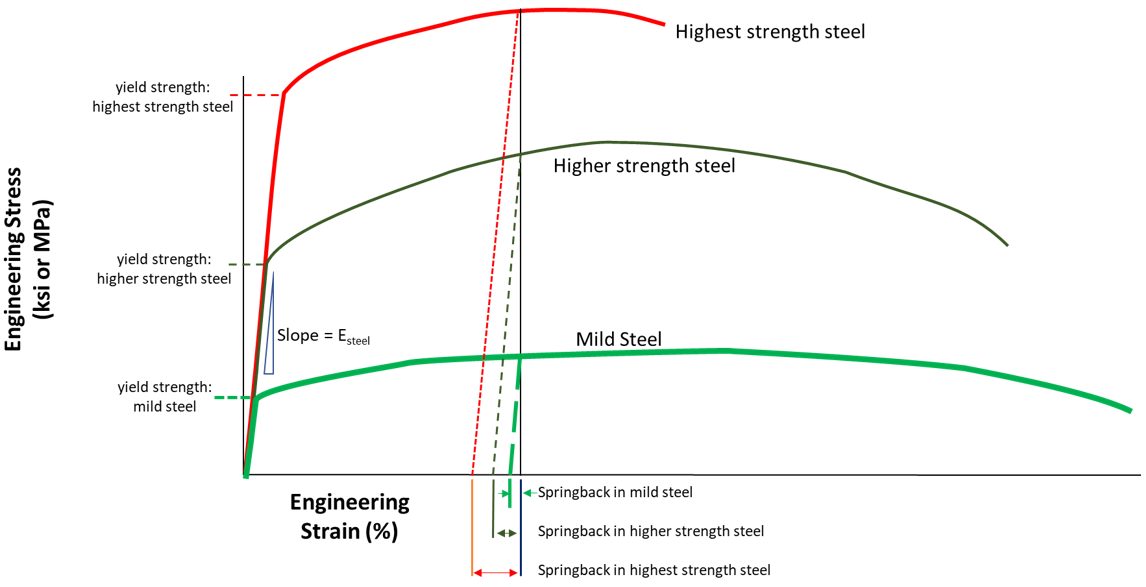
Since springback is proportional to the yield strength of the steel, knowing the yield strength allows some estimation of relative springback. Figure 4 compares mild steel, HSLA 700Y/800T, and MS 1500 AHSS having a 1400MPa yield strength. The relative magnitude of springback is indicated by the arrows shown on the horizontal axis, and reflects the increase of springback with yield strength.

Figure 4: Springback is proportional to yield strength.
![Yield Strength]()
Mechanical Properties
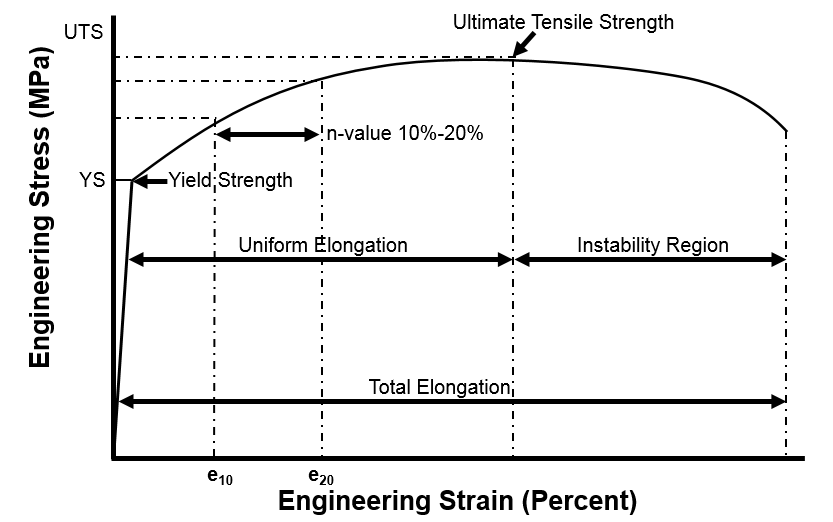
Engineering stress-strain units are based on the starting dimensions of the tensile test sample: Engineering stress is the load divided by the starting cross-sectional area, and engineering strain is the change in length relative to the starting gauge length (2 inches, 50mm, or 80mm for ASTM [ISO I], JIS [ISO III], or DIN [ISO II] tensile test samples, respectively.)
Metals get stronger with deformation through a process known as strain hardening or work hardening. This is represented on the stress strain curve by the parabolic shaped section after yielding.
Concurrent with the strengthening as the tensile test sample elongates is the reduction in the width and thickness of the test sample. This reduction is necessary to maintain consistency of volume of the test sample.
Initially the positive influence of the strengthening from work hardening is greater than the negative influence of the reduced cross-section, so the stress-strain curve has a positive slope. As the influence of the cross-section reduction begins to overpower the strengthening increase, the stress-strain curve slope approaches zero.
When the slope is zero, the maximum is reached on the vertical axis of strength. This point is known as the ultimate tensile strength, or simply the tensile strength. The strain at which this occurs is known as uniform elongation.
Strain concentration after uniform elongation results in the formation of diffuse necks and local necks and ultimately fracture.

Figure 1: Tensile Strength is the Strength at the Apex of the Engineering Stress – Engineering Strain Curve.

Blog

Typical Stress-Strain Curve
For many years, steel producers and stamping plants have gathered the mechanical properties of sheet metal. Individuals recorded properties such as yield strength, n-value and R-value to name a few. As new materials are introduced into the stamping plants, new mechanical properties tests are being discussed. The current use of aluminum and Dual Phase steels has highlighted issues that were insufficiently described by the typical or standard values provided by the tensile test: edge cracking and variation in springback from run to run are two examples. Resulting outcomes can encompass excessive scrap, excessive re-working of parts to remove edge cracks, and even result in excessive downtime as die makers try to correct the issue. The introduction of increasingly complex and sophisticated materials will exacerbate the inefficiencies of the current stamping process. The learning curve can be frustrating.
Proper training for your workforce regarding material mechanical properties and the know-how to develop robust stamping recipes for Advanced High-Strength Steel (AHSS) will benefit the plant. The typical tensile test provides the yield strength, ultimate tensile strength, n-value, uniform and total elongation. And typically, a strain analysis is performed, producing a forming limit diagram to measure a material’s formability. But these tests are reflective of global forming behaviors and don’t adequately describe an advanced material’s performance in localized formability. We need to ask if typical mechanical properties provide adequate information to truly assess the impact to the stamping operation – and if not, what new tests will provide insight on how these materials react to certain forming loads.

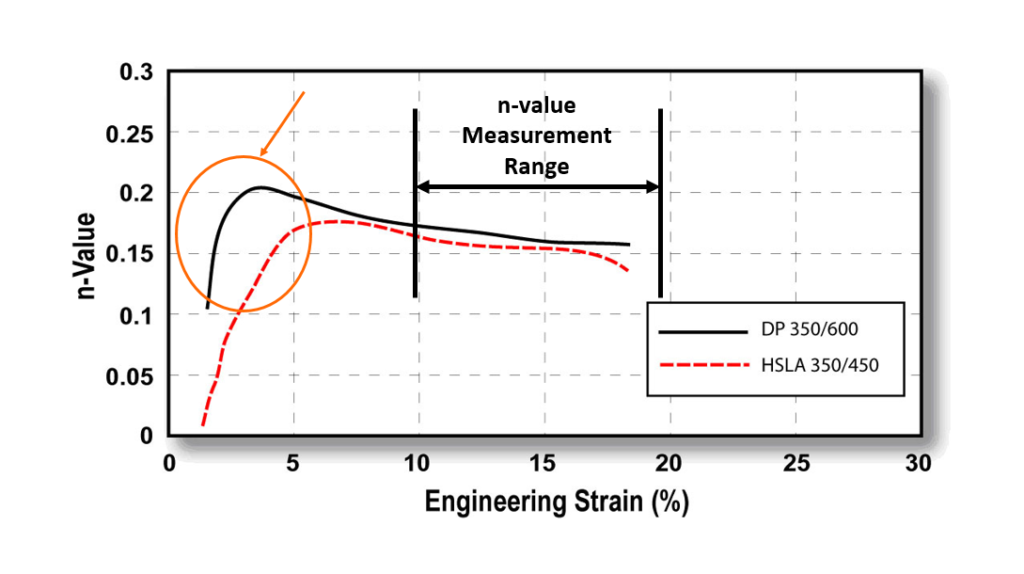
Instantaneous n-value
A new output is instantaneous n-value. Instantaneous n-value identifies the strain gradient – how the material will work-harden at initial contact with the die geometry. If only the standard n-value (work hardening exponent) is observed, measured between 10% and 20% strain, the increase in work hardening that occurs during deformation will be missed. Hole expansion and three-point bend tests are now commonly performed. The hole expansion test identifies the materials ability to stretch at the sheared edge. The three-point bend test identifies the stretchablity of a material via the minimum bend radius that can be achieved for that specific material.
Focusing on AHSS, these materials are characterized by multiple phase structures designed to improve formability. These designer steels are being created to improve crash worthiness through higher strength and lighter gauge thicknesses. To build upon the current understanding of material mechanical properties and resulting forming behaviors, training on AHSS products, testing and stamping process countermeasures is encouraged.
